
Users Guide


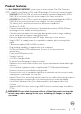

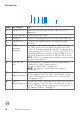
Table Of Contents
- Safety instructions
- About your monitor
- Setting up the monitor
- Connecting the stand
- Using the tilt, swivel, and vertical extension
- Rotating the display
- Configuring the display settings on your computer after rotation
- Operating the monitor webcam
- Connecting your monitor
- Organizing your cables
- Securing your monitor using Kensington lock (optional)
- Removing the monitor stand
- Wall mounting (optional)
- Operating the monitor
- Troubleshooting
- Appendix

10 | About your monitor
Bottom view
21 83 4 56 7
Label Description Use
1 Security lock slot Secures the monitor with security cable lock (sold
separately).
2 Power connector Connect the power cable.
3 HDMI port Connect your computer with the HDMI cable (optional).
4 DisplayPort in Connect your computer with the DisplayPort cable
(optional).
5 USB-C
upstream/
DisplayPort
Connect to your computer using the USB-C cable.
The USB-C port offers the fastest transfer rate (USB
3.2 Gen 1). The alternate mode with DP 1.2 supports the
following, and PD 20 V/3.25 A, 15 V/3 A, 9 V/3 A, 5 V/3 A.
•S2422HZ maximum resolution of 1920 x 1080 at 75 Hz
•S2722DZ maximum resolution of 2560 x 1440 at 75 Hz
NOTE: USB-C is not supported on Windows versions that
are prior to Windows 10.
6 Audio line-out
port
Connect speakers to playback audio through HDMI or
DisplayPort or USB-C audio channels.
Only two-channel audio is supported.
NOTE: The audio line-out port does not support
headphones.
7 USB 3.2
downstream port
Connect the USB-C cable that comes with your monitor
to the computer. Once this cable is connected, you can
use the USB downstream connectors on your monitor.
Port supports 0.9 A.
8 USB 3.2
downstream port
Connect the USB-C cable that comes with your monitor
to the computer. Once this cable is connected, you can
use the USB downstream connectors on your monitor.
Port supports Battery Charging 2 A.