Proiettore Dell™ S320/S320wi Guida all’uso
Note, richiami all’Attenzione e Avvisi NOTA: UNA NOTA segnala informazioni importanti che aiutano a fare un migliore utilizzo del proprio computer. ATTENZIONE: Un richiamo all’ATTENZIONE indica potenziali danni all’hardware o la perdita dei dati se non sono seguite le istruzioni. AVVISO: Un avviso all’AVVISO segnala il potenziale di danni alle proprietà, di lesioni personali o di morte. ____________________ Le informazioni di questo documento sono soggette a cambiamenti senza preavviso. © 2012 Dell Inc.
Contenuti 1 Descrizione del proiettore Dell . . . . . . . . Informazioni sul proiettore . . . . . . Informazioni sul puntatore interattivo 2 Collegamento del proiettore . . . . . . . 10 11 . . . . . . . . . . 13 . . . . . . . Installazione del modulo wireless optional . Installazione del modulo interattivo optional Installazione del kit RJ45 optional . . . . . Collegamento al computer . 7 . . . . 14 15 16 . . . . . . . . . . . . . . . 17 . . . . . . . .
Per proiettare un’immagine e controllare il proiettore collegato alla rete usando il cavo RJ45. . . . . . . . . . . . . . . . Collegamento ad una scatola di comando RS232 commerciale . . . . . . . . . . . Connessione al puntatore interattivo . . 3 Uso del proiettore . . . . . 26 . . . . . . . . . . 27 28 . . . . . . . . . . . . . . . . . . 30 Accensione del proiettore . . . . . . . . . . . . . . . . 30 Spegnimento del proiettore . . . . . . . . . . . . . . .
SELEZ. INPUT . . . REG. AUTOM. . . . LUMIN./CONTR. . . MOD. VIDEO . . . . VOLUME . . . . . . INGRESSO AUDIO . AVANZATE . . . . LINGUA . . . . . . GUIDA . . . . . . . . . . . . . . . . . . . . . . . . . . . . . . . . . . . . . . . . . . . . . . . . . . . . . . . . . . . . . . . . . . . . . . . . . . . . . . . . . . . . . . . . . . . . . . . . . . . . . . . . . . . . . . . . . . . . . . . . . . . . . . . . . . . . . . . . . . . . . . . . . . . . . . . . . . . . . . . . Installazione della rete wireless . .
Accesso a Web Management . . . . . . . . . . . Gestire il proiettore usando la gestione web (il kit rete RJ45 è optional per S320) . . . . . . . . . . 111 . . . . . . . . . . 111 111 112 . . . . . . . . . . . . . . . 126 Configurazione dell’impostazione di rete Accesso a Web Management . . . . . . Proprietà di gestione . . . . . . . . . . . Eseguit token applicazione 4 . . . . . Risoluzione dei problemi del proiettore 127 Risoluzione dei problemi del puntatore interattivo . Segnali guida . .
Descrizione del proiettore Dell 1 Il proiettore viene fornito con gli elementi indicati di seguito. Assicurarsi che la fornitura sia completa e rivolgersi a Dell se manca qualcosa. Contenuti standard della confezione S320 Cavo di alimentazione Cavo VGA da 1,8 m (VGA-VGA) Batterie AAA (2) Telecomando POWER A A ENTER A A MENU A SOURCE ASPECT VOL VIDEO MODE A MUTE KEYSTONE VOL AUTO ADJ.
Contenuti standard della confezione S320wi Cavo di alimentazione Cavo VGA da 1,8 m (VGA-VGA) Batterie AAA (2) Telecomando POWER A A ENTER A A MENU A SOURCE ASPECT VOL VIDEO MODE A MUTE KEYSTONE VOL AUTO ADJ.
Contenuti standard della confezione S320wi Cavo USB mini da 5 m (USB-A a USB-B Cavo USB (USB-A a USB-B) mini) Dongle wireless Dell Interactive (optional) DPB2701 Descrizione del proiettore Dell 9
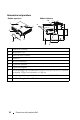
Informazioni sul proiettore Veduta superiore Veduta inferiore 10 7 1 26.0±0.1 14.0±0.1 9 82.30±0.15 5 4 3 2 110.00±0.15 6 10 8 1 Pannello di controllo 2 Altoparlante 5W 3 Ghiera di messa a fuoco 4 Obiettivo 5 Ricevitori infrarossi 6 Coperchio obiettivo 7 Coperchio lampada 8 Fori di montaggio per installazione su parete: Foro per vite M3 x 6,5 mm di profondità.
Informazioni sul puntatore interattivo Veduta superiore Veduta inferiore 4 5 3 6 7 2 8 1 1 Pennino sostituibile 2 Obiettivo 3 Tasti di controllo 4 Indicatori LED 5 Passante cinghietta 6 Interruttore d’alimentazione 7 Connettore aggiornamento firmware 8 Connettore USB mini per il caricamento NOTA: Optional (può essere acquistato separatamente), oppure è fornito in dotazione solo a S320wi.
8 Non posizionare alcun oggetto in prossimità o davanti al proiettore e non coprire l’obiettivo quando il proiettore è acceso in quanto il calore potrebbe fondere o bruciare l’oggetto. 9 Non usare il proiettore wireless vicino a persone con pacemaker cardiaco. 10 Non usare il proiettore wireless vicino ad attrezzature mediche. 11 Non usare il proiettore wireless vicino a forni microonde. NOTA: • Non tentare di installare da sé il proiettore sulla parete.
Collegamento del proiettore 1 VGA-OUT 2 3 4 VGA-A IN VGA-B IN HDMI Audio-In 15 Audio-Out Composite 14 13 12 S-Video 5 6 USB-A DOUSB 2 7 RJ45 RS232 Mini-USB 11 10 9 8 1 Connettore uscita VGA (loop through monitor) 9 Fessura di sicurezza per cavi 2 Connettore di ingresso VGA-A (D-sub) 10 Connettore USB mini (tipo B mini) per funzione telecomando mouse, funzione Interazione e aggiornamento del firmware.
Installazione del modulo wireless optional Sul proiettore deve essere installato il modulo wireless se si vuole usare l'opzione di rete wireless. Fare riferimento a "Installazione della rete wireless" a pagina 75. Il modulo wireless non è fornito in dotazione al proiettore S320. Può essere acquistato sul sito Dell all’indirizzo www.dell.com. NOTA: Il modulo wireless è integrato su S320wi.
Installazione del modulo interattivo optional Sul proiettore deve essere installato il modulo interattivo se si vuole usare la funzione interattiva. Il modulo interattivo non è fornito in dotazione al proiettore S320. Può essere acquistato sul sito Dell all’indirizzo www.dell.com. NOTA: Il modulo interattivo è integrato su S320wi.
Installazione del kit RJ45 optional Sul proiettore deve essere installato il kit RJ45 se si vuole usare l'opzione di rete. Il kit RJ45 non è fornito in dotazione al proiettore S320. Può essere acquistato sul sito Dell all’indirizzo www.dell.com. NOTA: Il kit RJ45 è integrato su S320wi.
Collegamento al computer Collegamento del computer usando il cavo VGA VGA-OUT VGA-A IN VGA-B IN HDMI USB-A Audio-In 1 Audio-Out Composite S-Video DOUSB 2 RJ45 RS232 Mini-USB 3 MOLEX 1 Cavo d’alimentazione 2 Cavo VGA a VGA 3 Cavo USB-A a USB-B mini NOTA: Il cavo USB mini deve essere collegato se si vuole usare la funzione Pagina su e Pagina giù del telecomando.
Collegamento loop through del monitor usando i cavi VGA VGA-OUT VGA-A IN VGA-B IN HDMI USB-A Audio-In 1 Audio-Out 2 1 Cavo d’alimentazione 2 Cavo VGA a VGA Composite S-Video Mini-USB DOUSB RJ45 RS232 2 NOTA: Con il proiettore viene consegnato un solo cavo VGA. Sul sito Dell, all’indirizzo www.dell.com, si può acquistare un altro cavo VGA.
Collegamento del computer usando il cavo RS232 VGA-OUT VGA-A IN VGA-B IN HDMI USB-A Audio-In Audio-Out Composite S-Video Mini-USB 1 1 Cavo d’alimentazione 2 Cavo RS232 (femmina 9 pin D-sub a swap femmina 2-3 pin) DOUSB RJ45 RS232 2 NOTA: Il cavo RS232 (femmina 9 pin D-sub a swap femmina 2-3 pin) non è fornito in dotazione al proiettore. Per il cavo e per il software del telecomando RS232, chiedere ad un installatore professionista.
Collegamento del computer usando il cavo USB VGA-OUT VGA-A IN VGA-B IN HDMI USB-A Audio-In Audio-Out Composite S-Video DOUSB RJ45 RS232 Mini-USB 1 2 MOLEX 1 Cavo d’alimentazione 2 Cavo da USB-A a USB-B NOTA: Plug and Play. Un solo cavo USB è fornito in dotazione al proiettore. Un cavo USB supplementare può essere acquistato sul sito Dell all’indirizzo www.dell.com.
Collegamento di un computer usando il dongle wireless (optional) NOTA: Un dongle USB wireless è integrato in Dell S320wi. NOTA: La funzione wireless è optional su Dell S320. Se si vuole includere la funzione wireless, installare un modulo wireless e un dongle USB wireless su Dell S320. Fare riferimento alla guida all’installazione passo a passo a pagina 13. I moduli wireless ed i dongle USB wireless sono disponibili e venduti separatamente all’indirizzo: www.dell.com.
Collegamento a un lettore DVD Collegamento di un lettore DVD usando un cavo S-Video VGA-OUT VGA-A IN VGA-B IN HDMI USB-A Audio-In Audio-Out Composite S-Video 1 Mini-USB DOUSB RJ45 RS232 2 UPQ!NFOV IENJ NFOV PQFO0DMPTF TUBOECZ0PO EWE0VTC 1 Cavo d’alimentazione 2 Cavo S-Video VTC FOUFS IPNF NFOV SFUVSO NOTA: Il cavo S-Video non è fornito in dotazione al proiettore. Sul sito Dell, all’indirizzo www.dell.com, si può acquistare il cavo di prolunga S-Video (50 ft/100 ft).
Collegamento ad un lettore DVD mediante cavo video composito VGA-OUT VGA-A IN VGA-B IN HDMI USB-A Audio-In Audio-Out Composite 1 S-Video Mini-USB DOUSB RJ45 RS232 2 UPQ!NFOV IENJ NFOV PQFO0DMPTF TUBOECZ0PO EWE0VTC 1 Cavo d’alimentazione 2 Cavo video composito VTC FOUFS IPNF NFOV SFUVSO NOTA: Il cavo video composito non viene consegnato con il proiettore. Sul sito Dell, all’indirizzo www.dell.com, si può acquistare il cavo di prolunga video composito (50 ft/100 ft).
Collegamento ad un lettore DVD mediante cavo video component VGA-OUT VGA-A IN VGA-B IN HDMI USB-A Audio-In Audio-Out 1 Composite S-Video Mini-USB DOUSB RJ45 RS232 2 UPQ!NFOV IENJ NFOV PQFO0DMPTF TUBOECZ0PO EWE0VTC 1 Cavo d’alimentazione 2 Cavo da VGA a video component VTC FOUFS IPNF NFOV SFUVSO NOTA: Il cavo da VGA a video component non viene consegnato con il proiettore. Sul sito Dell, all’indirizzo www.dell.
Collegamento del lettore DVD usando il cavo HDMI VGA-OUT VGA-A IN VGA-B IN HDMI USB-A Audio-In Audio-Out Composite S-Video Mini-USB DOUSB RJ45 RS232 2 1 UPQ!NFOV IENJ NFOV PQFO0DMPTF TUBOECZ0PO EWE0VTC 1 Cavo d’alimentazione 2 Cavo HDMI VTC FOUFS IPNF NFOV SFUVSO NOTA: Il cavo HDMI non viene consegnato con il proiettore. Sul sito Dell, all’indirizzo www.dell.com, si può acquistare il cavo HDMI.
Collegamento alla rete locale Per proiettare un’immagine e controllare il proiettore collegato alla rete usando il cavo RJ45. VGA-OUT VGA-A IN VGA-B IN HDMI USB-A Audio-In Audio-Out Composite S-Video Mini-USB 1 DOUSB RJ45 RS232 2 Rete locale (LAN) 1 Cavo d’alimentazione 2 Cavo RJ45 NOTA: Il cavo RJ45 non viene consegnato con il proiettore. Sul sito Dell, all’indirizzo www.dell.com, si può acquistare il cavo RJ45. NOTA: Il modulo LAN non è fornito in dotazione al proiettore S320.
Collegamento ad una scatola di comando RS232 commerciale VGA-OUT VGA-A IN VGA-B IN HDMI USB-A Audio-In Audio-Out Composite S-Video DOUSB Mini-USB RJ45 RS232 1 2 3 1 Cavo d’alimentazione 2 Cavo RS232 (femmina 9 pin D-sub a swap femmina 2-3 pin) 3 Scatola di comando RS232 commerciale NOTA: Il cavo RS232 (femmina 9 pin D-sub a swap femmina 2-3 pin) non è fornito in dotazione al proiettore. Per ottenere il cavo, chiedere ad un installatore professionista.
Connessione al puntatore interattivo VGA-OUT VGA-A IN VGA-B IN HDMI USB-A Audio-In Audio-Out Composite S-Video DOUSB RJ45 RS232 Mini-USB 4 1 2 3 MOLEX 5 1 Cavo d’alimentazione 2 Cavo VGA a VGA 3 Cavo USB-A a USB-B mini 4 Schermo di proiezione 5 Puntatore interattivo 28 Collegamento del proiettore
NOTA: Il modulo interattivo non è fornito in dotazione al proiettore S320. Se si vuole usare la funzione interattiva, fare riferimento a "Installazione del modulo interattivo optional" a pagina 15. Può essere acquistato sul sito Dell all’indirizzo www.dell.com. NOTA: 1 L’interazione è supportata solo con le seguenti modalità d’ingresso: VGA e HDMI dal PC, Display wireless, display USB e display LAN. 2 Per abilitare il puntatore interattivo è necessaria la 2ª connessione tra il computer ed il proiettore.
Uso del proiettore 3 Accensione del proiettore NOTA: Accendere il proiettore prima di accendere l’origine (computer, lettore DVD, ecc.). Il LED Alimentazione lampeggia di colore blu finché si preme il tasto Power. 1 Rimuovere il copriobiettivo. 2 Collegare il cavo d’alimentazione e gli appropriati cavi segnale al proiettore. Per informazioni sul collegamento del proiettore, consultare "Collegamento del proiettore" a pagina 13.
2 Premere di nuovo il tasto Alimentazione. Le ventole di raffreddamento continuano a funzionare per 120 secondi. 3 Per spegnere rapidamente il proiettore, tenere premuto per 1 secondo il tasto Alimentazione mentre le ventole di raffreddamento del proiettore sono ancora in funzione. NOTA: Prima di riaccendere il proiettore, attendere 60 secondi per consentire alla temperatura interna di stabilizzarsi. 4 Scollegare il cavo di alimentazione dalla presa elettrica e dal proiettore.
Regolazione della messa a fuoco del proiettore ATTENZIONE: Per evitare di danneggiare il proiettore, assicurarsi che la rotella di regolazione dell’inclinazione sia completamente sollevata prima di spostare il proiettore o di metterlo nella sua custodia protettiva. NOTA: La custodia protettiva non è fornita in dotazione al proiettore. La custodia protettiva (P/N: 8R3VM) può essere acquistata sul sito Dell all’indirizzo: www.dell.com. 1 Ruotare il dispositivo di messa a fuoco finché l’immagine è chiara.
Regolazione delle dimensioni dell’immagine S320/S320wi 300" (762,00 cm) 246" (624,84 cm) Distanza dal proiettore allo schermo 193" (490,22 cm) 139" (353,06 cm) 86" (218,44 cm) 3,51' (1,07 m) 5,71' (1,74 m) 7,91' (2,41 m) 10,1' (3,08 m) 12,5' (3,82 m) 31,45" (79,88 cm) 1,31' (0,4 m) VGA-OUT VGA-A IN VGA-B IN HDMI USB-A Audio-In Audio-Out Composite S-Video Mini-USB DOUSB RJ45 RS232 Uso del proiettore 33
S320/S320wi Dimensioni schermo Distanza voluta (m) Alto (Zoom minimo) Diagonale (pollici) L (cm) x H (cm) Dalla base alla sommità dell’immagine (cm) 31,45 65 x 49 56 0,4 1,07 86 174 x 130 150 1,74 139 283 x 212 244 2,41 193 392 x 294 338 3,08 246 501 x 376 432 3,82 300 610 x 457 526 C Altezza (Hd): 244 cm * Questo grafico viene fornito solo a titolo di riferimento per l’utente.
Uso del pannello di controllo 1 2 3 4 10 5 6 9 8 7 1 Alimentazione Accende o spegne il proiettore. Fare riferimento alla sezione "Accensione del proiettore" a pagina 30 e "Spegnimento del proiettore" a pagina 30 per altre informazioni. 2 Su / Regolazione distorsione Premere per spostarsi all’interno delle voci del menu OSD (visualizzazione su schermo). Premere per regolare la distorsione dell’immagine causata dall’inclinazione del proiettore (+37/-40 gradi).
4 Luce d'avviso TEMP Se l’indicatore giallo TEMP è acceso o lampeggiante, potrebbe essersi verificato uno dei seguenti problemi: • Temperatura interna del proiettore eccessivamente elevata • Ruota dei colori guasta Fare riferimento alla sezione "Risoluzione dei problemi del proiettore" a pagina 127 e "Segnali guida" a pagina 133 per altre informazioni. 5 Invio Premere per confermare la selezione effettuata. 6 Ricevitore IR Puntare il telecomando verso il ricevitore IR e premere un tasto.
Utilizzo del telecomando POWER 1 14 2 15 ENTER MENU 16 17 18 19 20 21 3 ASPECT 5 SOURCE VOL VIDEO MODE KEYSTONE VOL AUTO ADJ. FREEZE 25 26 1 Power 2 Enter 3 4 Destra Giù 6 7 MUTE MOUSE 8 9 BLANK 22 23 24 4 ZOOM ZOOM INFO VGA VIDEO S-VIDEO 10 11 12 13 Accende o spegne il proiettore. Fare riferimento alla sezione "Accensione del proiettore" a pagina 30 e "Spegnimento del proiettore" a pagina 30 per altre informazioni. ENTER Premere per confermare la selezione effettuata.
5 Proporzioni Premere per modificare le proporzioni di una immagine selezionata. 6 Mute Premere per azzerare/ripristinare il volume dell’altoparlante del proiettore. 7 Modalità Video Il proiettore è dotato di configurazioni preimpostate ottimizzate per la visualizzazione di dati (slide di presentazione) o video (filmati, giochi, ecc.). Premere il tasto Mod. Video per passare tra la modalità Presentazione, Luminoso, FILM, sRGB e PERS.. Premendo una volta il tasto Mod.
17 Volume Su 18 Source 19 Volume Giù 20 Regolazione Keystone + Premere per regolare la distorsione dell’immagine causata dall’inclinazione del proiettore (+37/-40 gradi). 21 Regolazione Keystone - Premere per regolare la distorsione dell’immagine causata dall’inclinazione del proiettore (+37/-40 gradi). 22 Reg. autom. Premere per sincronizzare il proiettore con l’origine di ingresso. La regolazione automatica non funziona se viene visualizzato l’OSD.
Uso del puntatore interattivo Veduta superiore Veduta inferiore 1 2 6 3 7 5 8 4 1 Pennino sostituibile Premere il pennino per disegnare o scrivere. Quando il pennino è attivato, funziona come il clic del tasto sinistro del mouse per disegnare o scrivere. NOTA: • Se il pennino è attivato, il puntatore passerà alla modalità Disegno e le funzioni dei tasti saranno disabilitate. • Quando il pennino si consuma, sostituirlo con uno nuovo come mostrato di seguito.
2 Sinistra Questo tasto funziona come il clic del tasto sinistro del mouse. 3 Funzione Le funzioni disponibili sono elencate nel menu OSD "Imposta funzione" (fare riferimento a pagina 71). NOTA: Facendo doppio clic sul tasto Funzione si esegue la funzione Annulla, se supportata dal software. 4 Connettore USB mini per il caricamento Permette si usare il cavo USB mini per caricare. Fare riferimento alla sezione "Caricamento della batteria del puntatore interattivo" a pagina 44.
Uso della cinghietta Usare il cinturino come precauzione di sicurezza nel caso si perda la presa del puntatore interattivo e prevenire danni al puntatore, agli oggetti circostanti, e lesioni alle persone. 1 Infilare il cordone del cinturino nel passante. 2 Infilare al polso la cinghietta.
Inserimento delle batterie del telecomando NOTA: Rimuovere le batterie dal telecomando quando non viene utilizzato. 1 Premere la linguetta per sollevare il coperchio del vano batterie. 2 Controllare la polarità (+/-) sulle batterie. 1 2 base all’indicazione nel vano batterie. AAA AAA 3 Inserire le batterie e allineare correttamente la polarità in 3 NOTA: Non mischiare batterie di tipo diverso e non usare insieme batterie nuove e vecchie. AAA AAA 4 Posizionare di nuovo il coperchio batterie.
Caricare la batteria del puntatore interattivo Quando il LED di colore ambra del puntatore interattivo inizia a lampeggiare, significa che la sua batteria interna è scarica (se la batteria è completamente scarica, non sarà possibile accendere il puntatore interattivo premendo il suo pennino, o i tasti sinistra, destra, Funzione). Per caricare la batteria, collegare il puntatore interattivo al computer o notebook usando un cavo mini USB (in questo caso, accertarsi che se il computer o notebook sia acceso).
Introduzione al caricatore (optional) Veduta frontale Veduta posteriore 1 2 3 1 LED alimentazione 2 Connettore USB mini 3 Interruttore d’alimentazione 4 Connettore cavo d’alimentazione 4 NOTA: Il caricatore non è fornito in dotazione al proiettore S320 o S320wi. Il caricatore può essere acquistato sul sito Dell all'indirizzo www.dell.com. Indicatore LED del caricatore LED verde acceso Quando il caricatore è acceso, il LED verde si accende.
Indicatore LED acceso sul puntatore interattivo LED ambra acceso Il LED ambra si accenderà durante la procedura di caricamento. LED ambra spento Quando la batteria è completamente carica, il LED si spegnerà ad indicare il "caricamento completato". LED ambra lampeggiante Se il LED ambra inizia a LAMPEGGIARE (0,4 sec acceso, 0,6 sec spento - 1 sec per ciclo), significa che la procedura di caricamento non ha luogo. Errore del caricatore oppure la batteria è guasta.
Caricamento della batteria del puntatore interattivo usando il caricatore Quando il LED batteria di colore ambra del puntatore interattivo inizia a lampeggiare, significa che la sua batteria interna è scarica (se la batteria è completamente scarica, non sarà possibile accendere il puntatore interattivo premendo il suo pennino, o i tasti sinistra, destra, Funzione). Attenersi alle istruzioni che seguono per caricare la batteria: 1 Collegare il cavo d’alimentazione ad una presa a muro.
3 Accendere l'interruttore d'alimentazione del caricatore. NOTA: Durante il caricamento il LED batteria di colore ambra del puntatore interattivo resta acceso fino a quando la procedura è completa. NOTA: La prima volta, ci vogliono 4-5 ore per caricare completamente la batteria. Una batteria completamente carica permette fino a 25 ore di utilizzo ininterrotto, oppure fino a 4 settimane di standby. ATTENZIONE: Contattare DELL se il caricatore non carica.
Portata operativa del telecomando TM S-VIDEO VIDEO VGA INFO ZOOM ZOOM KEYSTONE VOL BLANK MOUSE ±20° MUTE SOURCE VIDEO MODE VOL ASPECT MENU 7 m/22,97 ft ENTER Distância AUTO ADJ. FREEZE Distanza operativa Angolo POWER Distância Angolo Angolo Di stâ nc ia WER PO U MEN R TE EN CE UR SO VO NE TO YS KE L VO L ZO J.
Portata operativa del puntatore interattivo Angolo Distanza Distanza operativa Angolo 0° 20° 45° Distanza 9 m/29,53 ft 7 m/22,97 ft 5 m/16,4 ft Angolo Di sta nz a NOTA: • Il proiettore ha: luminosità di 2000 lm, dimensioni immagine di 100 pollici, modalità Luminoso. • Può supportare più puntatori (fino a 10) collegati da un proiettore, però i puntatori non possono essere usati simultaneamente. • La distanza operativa attuale potrebbe differire leggermente da quella dell’illustrazione.
Utilizzo dell’OSD • Il proiettore dispone di un menu OSD multilingue che può essere visualizzato con o senza la presenza di un’origine di ingresso. • Premere il tasto Menu del pannello di controllo o del telecomando per accedere al menu principale. • Per passare tra le schede del menu principale, premere il tasto o del pannello di controllo del proiettore o del telecomando. • Per selezionare un menu secondario, premere il tasto o del pannello di controllo del proiettore o del telecomando.
WIRELESS/USB—Premere per attivare il menu Selez. Input - Wireless/USB. NOTA: La funzione WIRELESS/USB può essere usata dopo avere attivato la funzione "Wireless e LAN". SELEZ. INPUT WIRELESS/USB Il menu Selez. Input Wireless/USB permette di attivare Display wireless, Display USB e Visualizzatore USB. per accedere alla schermata Guida Wireless del DISPLAY WIRELESS—Premere proiettore. Fare riferimento a "Schermata Guida wireless" a pagina 77.
LUMIN./CONTR. Il menu Lumin./Contr. permette di regolare le impostazioni di luminosità/contrasto del proiettore. LUMINOSITÀ—Usare e per regolare la luminosità dell’immagine. CONTRASTO—Usare e per regolare il contrasto dello schermo. NOTA: Se si regolano le impostazioni di Luminosità e Contrasto ed il proiettore passa automaticamente alla modalità Pers.. MOD. VIDEO Il menu Mod.
VOLUME Il menu Volume permette di regolare le impostazioni del volume del proiettore. VOLUME—Premere per aumentare il volume e per diminuire il volume. INGRESSO AUDIO Il menu Ingresso audio permette di selezionare l’origine dell’ingresso audio. Le opzioni sono: Ingresso analogico, HDMI e Wireless/LAN. NOTA: Evitare di collegare la linea ingresso segnale alla porta microfono. Diversamente dalle casse si potrebbero sentire dei disturbi provocati dalla compressione e distorsione del segnale audio.
AVANZATE Il menu Avanzate permette di modificare le impostazioni di Immagine, Visualizza, Proiettore, LAN, Wireless, Menu, Alimentazione, Interazione e Informazioni. IMP. IMMAGINE (IN MODALITÀ PC)—Selezionare e premere per attivare le impostazioni immagine. Il menu Imp. immagine fornisce le seguenti opzioni: TEMP. COLORE—Consente di regolare la temperatura colore. La schermata appare più fredda a temperature colore più alte e più calda a temperature più basse. Quando si regolano i valori nel menu Regol.
IMP. IMMAGINE (IN MODALITÀ VIDEO)—Selezionare e premere per attivare le impostazioni immagine. Il menu Imp. immagine fornisce le seguenti opzioni: TEMP. COLORE—Consente di regolare la temperatura colore. La schermata appare più fredda a temperature colore più alte e più calda a temperature più basse. Quando si regolano i valori nel menu Regol. colore, viene attivata la modalità Pers. I valori vengono salvati nella modalità Pers. REG. COL. PER.—Consente di regolare manualmente i colori rosso, verde e blu.
2 Saturazione, Nitidezza e Tinta sono disponibili solo quando l’origine dell’ingresso è video composito o S-Video. per attivare le IMP. IMMAGINE (NESSUNA ORIGINE D’INPUT)—Selezionare e premere impostazioni immagine. Il menu Imp. immagine fornisce le seguenti opzioni: USCITA VGA—Selezionare Attiva o Disatt. per attivare/disattivare la funzione d’uscita VGA quando il proiettore è in stato di standby. L’impostazione predefinita è Disatt.. per attivare le IMP. VISUALIZZ.
ALLINEAMENTO—Sincronizza la fase del segnale visualizzato con la scheda video. Se l'immagine su schermo è instabile o sfarfalla, usare Allineamento per correggere il problema. Questa funzione consente una regolazione ottimale del segnale. PROPORZIONI—Permette di selezionare le proporzioni per regolare come appare l’immagine. Le opzioni sono: Origine, 16:9 e 4:3. •Origine — Selezionare Origine per mantenere le proporzioni dell’immagine del proiettore in base all’origine dell’ingresso.
3. La selezione "Visualizzazione 3D" sarà abilitata solo nel menu "Imp. visualizz. - Avanzate" quando il proiettore rileva uno degli ingressi detti in precedenza. 4. Il supporto 3D e la frequenza d’aggiornamento sono i seguenti: a VGA/HDMI 1280 x 720, 1024 x 768 e 800 x 600 a 120 Hz b Video composito/S-Video a 60 Hz c Video a componenti 480i e 576i 5. Il segnale VGA raccomandato per il notebook è la modalità d’uscita singola (la modalità doppia non è raccomandata).
ZOOM—Premere e per ingrandire e visualizzare l’immagine. Regolare la scala dell’immagine premendo o e premere per visualizzare, solo sul telecomando. NAVIGAZIONE ZOOM—Premere Navigazione zoom. Usare proiezione. per attivare il menu per navigare nello schermo di VISUALIZZAZIONE 3D—Selezionare Attiva per avviare la funzione Visualizzazione 3D (l’impostazione predefinita è Disatt.). NOTA: 1.
SINCRONIZZAZIONE INVERSA 3D—Se, mentre si indossano gli occhiali DLP 3D, si vedono immagini mediocri o sovrapposte, eseguire il comando 'Inverti' per ottenere la migliore corrispondenza sinistra/destra della sequenza immagini ed ottenere le immagini corrette. (Per occhiali DLP 3D) per attivare le impostazioni del IMP. PROIETTORE—Selezionare e premere proiettore. Il menu Imp. proiettore fornisce le seguenti opzioni: ORIGINE AUT.—Selezionare Disatt.
DIDASCALIE—Selezionare Attiva per abilitare le didascalie ed attivare il menu delle didascalie. Selezionare le opzioni appropriate per le didascalie: CC1, CC2, CC3 e CC4. NOTA: 1. L’opzione Didascalie è disponibile solo per NTSC. 2. Le didascalie possono essere abilitate solo con gli ingressi S-Video e Video composito. ACQUISIZIONE SCHERMO—L’impostazione predefinita è il logo Dell come sfondo. Si può anche selezionare l’opzione Acquisizione schermo per acquisire la schermata.
Mod. di prova 1: Mod. di prova 2: RIPR. PRED.—Selezionare e premere per ripristinare tutte le impostazioni sui valori predefiniti. Appare il seguente messaggio d’avviso: Le voci ripristinate includono le impostazioni sia delle origini PC, sia delle origini Video. IMPOSTAZIONI LAN—Selezionare e premere per attivare le Impostazioni LAN.
WIRELESS E LAN—Selezionare Abilita per attivare la funzione Wireless e LAN. DHCP—Se sulla rete c’è un server DHCP, al quale il proiettore è collegato, l’Indirizzo IP sarà acquisito automaticamente quando DHCP è impostato su Attiva. Se DHCP è impostato su Disatt., impostare manualmente Indirizzo IP, Subnet Mask e Gateway. Usare e per selezionare il numero di Indirizzo IP, Subnet Mask, e Gateway. Inserire e premere Enter per confermare ciascun numero e poi usare e per impostare la voce successiva.
IMP. WIRELESS—Selezionare e premere per attivare le impostazioni Wireless. Il menu Imp. Wireless fornisce le seguenti opzioni: WIRELESS—Se sul proiettore è stato installato il dongle wireless, questa opzione è Connesso. SERVER DHCP—Permette di abilitare il server DHCP della rete wireless. INIZIO INDIRIZZO IP—Assegna automaticamente o manualmente l’inizio indirizzo IP del server DHCP al proiettore collegato alla rete wireless.
4. Se si seleziona Memorizza senza premere il tasto Enter, il sistema manterrà le impostazioni originali. RIPRISTINA—Premere per ripristinare la configurazione wireless. per attivare le impostazioni del IMPOSTAZIONI MENU—Selezionare e premere menu. Impostazioni menu è costituito dalle seguenti opzioni: POSIZ. MENU—Consente di modificare la posizione dell’OSD sullo schermo. TIMEOUT MENU—Consente di regolare l’ora per un timeout OSD.
a Andare a Impostazioni menu, premere per abilitare le impostazioni password. e poi selezionare Password b Abilitando la funzione Password apparirà una schermata di modifica. Nella schermata inserire un numero di 4 cifre e poi premere . Schermata password S320wi Schermata password S320 c Per confermare, immettere di nuovo la password. d Se la verifica della password ha esito positivo, è possibile riprendere ad accedere alle funzioni del proiettore e alle relative utilità.
CAMBIA PASSWORD—Inserire la password originale. Poi, inserire una nuova password ed inserirla di nuovo per confermarla. Schermata di cambia password S320 Schermata di cambia password S320wi IMPOSTAZIONI ALIMENTAZIONE—Selezionare e premere per attivare le impostazioni di alimentazione.
SPEGNIMENTO RAPIDO—Selezionare Attiva per spegnere il proiettore con una singola pressione del tasto d’alimentazione. Questa funzione permette al proiettore di spegnersi rapidamente con una velocità accelerata della ventola. Durante lo spegnimento potrebbe avvertirsi un rumore a volume leggermente più alto. NOTA: Prima di riaccendere il proiettore, attendere 60 secondi per consentire alla temperatura interna di stabilizzarsi.
IMP. INTERATT.—Selezionare e premere per attivare le impostazioni Interazione. Il menu Imp. interatt. fornisce le seguenti opzioni: NOTA: Sul proiettore S320 deve essere installato il modulo interattivo se si vuole usare la funzione interattiva. Fare riferimento a "Installazione del modulo interattivo optional" a pagina 15. INTERAZIONE—L’impostazione predefinita è Attiva. Selezionare Disatt. per disabilitare la funzione puntatore interattivo. NOTA: 1.
IMP. PENNA—Selezionare e premere per attivare le Imp. penna. Il menu Imp. penna fornisce le seguenti opzioni: MOVIMENTO PUNTATORE—Permette di selezionare la modalità Movimento puntatore: Normale, Disegno e Stabile. •Normale — In modalità Normale, premere il tasto sinistro del puntatore interattivo per bloccare temporaneamente la posizione del puntatore. Questa modalità è più adatta per usare il puntatore interattivo come un mouse, e.g. per le funzioni clic tasto sinistro e doppio clic.
Apri Esplora risorse (Cmd + E), Tasto centrale del mouse, Doppio clic e Disabilita (fare riferimento a "Uso del puntatore interattivo" a pagina 40). •Cambio: Normale/Disegno/Stabile — Funzione simile a quella per passare tra le modalità Normale, Disegno e Stabile. •Annotazione PowerPoint — Funzione simile a quella d’annotazione delle presentazioni PowerPoint. •Cambio a Windows (Alt + Tab) — Funzione simile a quella di cambio finestra, che agisce come i tasti della tastiera Alt+Tab.
•Modalità Fisso — Quando si seleziona Fisso, seguire le istruzioni su schermo per completare l’accoppiamento tra il proiettore ed il puntatore interattivo. (Questa modalità garantisce l'accoppiamento tra il puntatore interattivo ed il proiettore designato.) Dopo avere eseguito l’accoppiamento, il puntatore si fisserà automaticamente al proiettore ogni volta che sarà acceso. e selezionare l’opzione Conferma per RIPRISTINA—Premere ripristinare le Imp. penna.
LINGUA Consente di impostare la lingua dell’OSD. Premere Lingua. per attivare il menu GUIDA Se si riscontrano problemi col proiettore, accedere al menu Guida per risolverli.
Installazione della rete wireless NOTA: Il computer deve soddisfare i seguenti requisiti minimi del sistema: Sistema operativo: • Windows Microsoft Windows XP™ Home o Professional Service Pack 2 (32-bit raccomandato), Windows Vista 32-bit e Windows® 7 Home o Professional 32bit o 64-bit • MAC MacBook o versione più recente, MacOS 10.
Abilitare la funzione Wireless sul proiettore Per usare il proiettore in wireless, è necessario completare le procedure che seguono: 1 Installare il modulo wireless optional (optional per S320). Fare riferimento a "Installazione del modulo wireless optional" a pagina 14. NOTA: Il modulo wireless è integrato su S320wi. 2 Collegare il cavo d’alimentazione alla presa a muro e premere il tasto d’alimentazione. 3 Premere il tasto Menu del pannello di controllo del proiettore o del telecomando.
Appare la schermata Guida wireless, come mostrato di seguito. 5 Prendere nota di CODICE DI ACCESSO, NOME DELLA RETE (SSID) e INDIRIZZO IP. Queste informazioni saranno necessarie in un secondo tempo per accedere. Installazione del software applicativo Wireless sul computer Per usare il proiettore wireless, è necessario installare il software sul sistema. 6 Collegare il computer alla rete wireless S320 o S320wi.
NOTA: • Il computer deve essere dotato della funzione di rete wireless per rilevare la connessione. • Quando ci si collegare alla rete wireless S320 o S320wi, si perderà la connettività wireless con le altre reti wireless. NOTA: Ricordare di spegnere tutti i Proxy. (Microsoft® Windows Vista: fare clic su Pannello di controllo Opzioni Internet Connessioni Impostazioni LAN) 7 Aprire il browser Internet. Si sarà diretti automaticamente alla pagina Gestione web di S320 o S320wi.
8 Si apre la pagina di gestione web S320 o S320wi. La prima volta, fare clic su Scarica. 9 Selezionare il sistema operativo appropriato e poi fare clic su Scarica.
10 Fare clic su Esegui per procedere con l’installazione del software. NOTA: Si può scegliere di salvare il file e di eseguire l’installazione in un secondo tempo. Per farlo, fare clic su Salva. NOTA: La funzione di proiezione audio necessita l’installazione di un driver supplementare solo su Windows XP. Se sul computer non è installato il driver, sullo schermo apparirà un messaggio che richiede di installare il driver necessario.
Avvio dell’applicazione Wireless Al termine dell’installazione, l’applicazione wireless S320 or S320wi si avvierà ed eseguirà la ricerca automaticamente. Se il programma non si avvia automaticamente, fare doppio clic sull’icona o del desktop per avviare l’applicazione. Entra Per comunicare col proiettore, inserire il Codice di accesso fornito al punto 6 di Installazione della rete wireless e poi fare clic su OK.
Capire la funzione dei tasti Dopo avere eseguito l’accesso, appare la schermata che segue: 1 2 1 3 Elemento Descrizione Barra di stato Visualizza le informazioni IP e CODICE DI ACCESSO. Menu Fare clic per attivare il menu dell’applicazione. Tasto riduci a icona Fare clic per ridurre a icona l’applicazione. Tasto Chiudi 2 3 Fare clic su per uscire dall’applicazione. Barra degli strumenti di controllo Schermo intero Fare clic per proiettare l’immagine a schermo intero.
Proiettare una presentazione • Per proiettare la presentazione, fare clic su un qualsiasi dei tasti di proiezione . • • • • Fare clic su per sospendere la proiezione. L’icona diventa di colore verde. Fare di nuovo clic su per continuare con la presentazione. Per la proiezione audio della presentazione, fare clic su . Fare clic su per arrestare la presentazione. NOTA: Ambiente WLAN che usa la connessione 802.11g e nessun allungamento dello schermo.
Installazione di PtG (Presentation to Go) I requisiti minimi del sistema per installare PtG sono: Sistema operativo: - Windows Microsoft Windows XP™ Home o Professional Service pack 2/3 (32-bit raccomandato), Windows® Vista 32-bit, o Windows® 7 Home o Professional 32bit o 64-bit - Office 2003 o Office 2007 NOTA: Le procedure d’installazione di Presentation to Go (PtG ) sono uguali per i modelli S320 e S320wi.
Visualizzatore PtG Quando pronto, il sistema resterà su questa pagina.
Introduzione alla funzione PtG/Foto Mostra file PtG e foto validi che sono archiviati nel disco USB. NOTA: Se è rilevato un solo disco, il sistema ignorerà questa fase.
Descrizione Foto NOTA: Supporta 14 lingue per il formato dei nomi dei file (Lingue: Inglese, Olandese, Francese, Tedesco, Italiano, Giapponese, Coreano, Polacco, Portoghese, Russo, Cinese semplificato, Spagnolo, Svedese e Cinese tradizionale). Introduzione ai tasti Usare il tasto su, giù e sinistra per navigare ed usare il tasto controllo del proiettore o del telecomando per selezionare.
Installazione del software applicativo PtG Converter sul computer Seguire le istruzioni su schermo per completare l’installazione. NOTA: "PtG Converter - Lite" può essere scaricato dal sito Dell Support all’indirizzo: support.dell.com. Uso di PtG Converter 1 Avviare "PtG Converter - Lite.exe" oppure fare doppio clic sull'icona desktop per avviare l'applicazione. 2 Fare clic su 88 del per selezionare un file PowerPoint ed avviare la conversione.
3 Fare clic sul tasto Sfoglia per selezionare la posizione d’archiviazione e poi premere OK. NOTA: 1 Se sul computer non è installato MS PowerPoint, la conversione del file non riuscirà. 2 PtG Converter supporta solo un massimo di 20 pagine. 3 PtG Converter supporta solo la conversione di file .ppt in file .PtG.
Installazione della Proiezione audio La Proiezione audio supporta solo le origini d’ingresso Display wireless e Visualizzazione LAN. I requisiti minimi del sistema sono i seguenti: Sistema operativo: • Windows Microsoft Windows XP™ Home o Professional Service Pack 2/3 (32-bit raccomandato), Windows Vista 32-bit, o Windows® 7 Home o Professional 32-bit o 64-bit • MAC MacBook Pro e superiore, Mac OS 10.
NOTA: La funzione di proiezione audio necessita l’installazione di un driver supplementare sul sistema operativo MAC. Se sul computer MAC non è installato il driver, sullo schermo apparirà un messaggio che richiede di installare il driver necessario. "Soundflower Driver" può essere scaricato dai siti di alcuni motori di ricerca (esempio: Yahoo, MSN, ...). "Soundflower Driver" è un’applicazione gratuita. NOTA: Le fasi d’impostazione della proiezione audio sono uguali per i modelli S320 e S320wi.
Abilitare la funzione Wireless o LAN sul proiettore 1 Installare il modulo wireless optional (optional per S320). Fare riferimento a "Installazione del modulo wireless optional" a pagina 14. NOTA: Se si seleziona l'installazione del modulo LAN (optional), fare riferimento a "Installazione del kit RJ45 optional" a pagina 16. 2 Collegare il cavo d’alimentazione ed accendere il proiettore premendo il tasto d’alimentazione.
Appare la schermata Guida wireless, come segue: 4 Prendere nota di CODICE D’ACCESSO, NOME DELLA RETE (SSID) e INDIRIZZO IP. Queste informazioni saranno necessarie in un secondo tempo per accedere. Installazione del software applicativo Wireless sul computer 5 Se per la configurazione della proiezione audio è usata la rete Wireless o LAN, è necessario il "Software applicativo Wireless". Scaricare ed installare il software la prima volta che si usa la funzione Proiezione audio.
NOTA: Se si usa la funzione LAN per la Proiezione audio, collegare il cavo LAN al proiettore ed al computer. Avvio dell’applicazione Wireless 7 Il programma sarà avviato automaticamente al termine dell’installazione. o del desktop per avviare Oppure, fare doppio clic sull’icona l’applicazione. NOTA: 1 Quando si seleziona LAN per la proiezione, fare clic su "Ignora". 2 Quando si seleziona Wireless per la proiezione, selezionare Dell S320 Wireless o Dell S320wi Interactive e poi fare clic su "OK".
Entra 8 Per comunicare col proiettore, inserire il Codice di accesso (fare riferimento al punto 4) e poi fare clic su OK. NOTA: Se l’Indirizzo IP non è rilevato, inserire l’Indirizzo IP visualizzato nell’angolo in basso a sinistra della schermata wireless. 9 L’accesso all'applicazione Wireless di S320 o S320wi è stato eseguito. Fare clic sul tasto "Riproduci" dell’applicazione per avviare la proiezione LAN o wireless.
Gestire il proiettore usando la gestione web (per la rete wireless) Configurazione dell’impostazione di rete Se il proiettore è collegato ad una rete, si può accedere al proiettore usando il browser web. Fare riferimento alla sezione "Impostazioni LAN" a pagina 63 per la configurazione delle impostazioni di rete. Accesso a Web Management Usare Internet Explorer 5.0, o versione più recente, oppure Firefox 1.5, o versione più recente, ed inserire l’indirizzo IP.
Scaricare il software applicativo Wireless Fare riferimento anche a "Installazione della rete wireless" a pagina 75. Fare clic sul tasto Scarica del sistema operativo che corrisponde al computer.
Controllo conferenza Permette di ospitare presentazioni in conferenza usando origini diverse senza dovere usare i cavi del proiettore e permette di controllare come ciascuna presentazione apparirà sullo schermo. NOTA: Senza Conference Play Control, l’ultimo utente che preme il tasto "Riproduci" dell’applicazione prenderà il controllo dell’intero schermo di proiezione. Nome computer: Elenca i computer collegati per il controllo conferenza.
Proprietà di gestione Ammin. È necessaria una password amministratore per accedere alla pagina Ammin.. • Password amm.: Inserire la password amministratore e poi fare clic su Entra. La password predefinita è "admin". Fare riferimento a "Cambia password" a pagina 104 per cambiare la password.
Stato sistema Visualizza le informazioni di Stato rete, Stato connessione e Stato proiettore.
Stato rete Fare riferimento alla sezione OSD a pagina 63. Impostazione IP • Scegliere Ottieni automaticamente un indirizzo IP per assegnare automaticamente un indirizzo IP al proiettore, oppure Usare il seguente indirizzo IP: per assegnare manualmente un indirizzo IP. Impostazione server DHCP • Scegliere Auto per impostare automaticamente l’indirizzo Avvia IP, Termina IP, Subnet Mask, Gateway predefinito e Server DNS da un server DHCP, oppure scegliere Disabilita per disabilitare la funzione.
Impostazione wireless • Scegliere Abilita per impostare Regione, SSID, Programmazione SSID, Canale, Encryption e Chiave. Scegliere Disabilita per disabilitare l’impostazione wireless. SSID: Lunghezza massima di 32 caratteri. Encryption: Si può disabilitare la chiave WPA oppure selezionarne una a 64-bit o 128-bit in formato ASCII o HEX. Chiave: Se la Crittografia è abilitata, il valore della chiave deve essere impostato in base alla modalità di Crittografia selezionata.
Impostazione proiezione Impostazione proiezione • Risoluz.: Permette di selezionare la risoluzione. Le opzioni sono: XGA (1024 x 768) e WXGA (1280 x 800). • Codice di accesso: Selezionare come si vuole che il proiettore generi il codice d’accesso. Ci sono tre opzioni: • Disabilita: Il codice d’accesso non sarà necessario quando si accede al sistema. • Casuale: L’impostazione predefinita è Casuale. Il Codice di accesso sarà generato a caso. • Usare il seguente codice: Inserire un codice di 4 cifre.
Cambia password Questa pagina permette di modificare la password amministratore. • Immetti nuova password: Inserire la nuova password • Conferma nuova password: Inserire di nuovo la password e fare clic su Applica. NOTA: Contattare Dell se si dimentica la password amministratore.
Ripristina predefiniti Fare clic sul tasto Applica per ripristinare sui valori predefiniti le impostazioni wireless/rete.
Aggiornamento Firmware Usare la pagina Aggiornamento Firmware per aggiornare il firmware del proiettore. NOTA: Dopo avere aggiornato correttamente il firmware disabilitare e riabilitare la funzione Wireless/Rete usando il menu OSD per ripristinare la scheda di rete del proiettore. Attenersi alle istruzioni che seguono per avviare l’aggiornamento del firmware: 1 Premere Sfoglia per selezionare il file da aggiornare. 2 Fare clic sul tasto Attualizza per avviare.
Pannello di controllo del proiettore Info proiettore • Stato proiettore: Ci sono cinque stati: Lampada accesa, Standby, Risparmio energetico, Raffredd. e Riscaldamento. Fare clic sul tasto Aggiorna per aggiornare lo stato e le impostazioni di controllo. • Risparmio energetico: È possibile impostare Risparmio energetico su Disatt., 30, 60, 90 o 120 minuti. Fare riferimento a "Risp. Energia" a pagina 69 per altre informazioni.
Controllo immagine • Mod. Proiettore: Permette di selezionare la modalità del proiettore, in base a come è installato il proiettore. Ci sono quattro modalità proiettore: Proiezione frontale-Scrivania, Proiezione frontale-Supporto da parete, Proiezione posteriore-Scrivania e Proiezione posteriore-Supporto da parete. • Selez. origine: Il menu Selez. origine permette di selezionare l’origine dell’ingresso del proiettore. Si può selezionare VGA-A, VGA-B, S-video, Video comp.
Impostazione avviso Avviso e-mail • Avviso e-mail: Si può impostare se essere avvisati (Abilita) usando la posta elettronica o no (Disabilita). • A/Cc/Da: Inserire l’indirizzo di posta elettronica del mittente (Da) e dei destinatari (A/Cc) per essere avvisati quando si verifica un’anomalia oppure quando si attiva un allarme. • Oggetto: Inserire l’oggetto del messaggio. Fare clic sul tasto Test mess. d’avviso per verificare le impostazioni del messaggio d’avviso. Imp.
Riavvia il sistema Fare clic su Riavvia per riavviare il sistema. Crestron Per la funzione Crestron.
Gestire il proiettore usando la gestione web (il kit rete RJ45 è optional per S320) Configurazione dell’impostazione di rete Se il proiettore è connesso ad una rete, è possibile accedere al proiettore tramite un browser configurando l'impostazione di rete (TCP/IP). Quando si usa la funzione di rete, l'indirizzo IP deve essere univoco. Fare riferimento a "Impostazioni LAN" a pagina 63 per configurare le impostazioni di rete. Il kit RJ45 non è fornito in dotazione al proiettore S320.
Proprietà di gestione Home • Accedere alla homepage di Web Management immettendo l’indirizzo IP del proiettore sul browser. Fare riferimento a "Impostazioni LAN" a pagina 63. • Lingua: Permette di impostare la lingua per la gestione del web.
Impostazioni di rete • Impostare le informazioni di Nome del Modello, Nome proiettore, Posizione, e Contatto (fino a 21 caratteri per ciascun campo). Premere Salva per archiviare le impostazioni. • Scegliere DHCP per assegnare automaticamente un indirizzo IP al proiettore dal server DHCP, oppure Manuale per assegnare manualmente l’indirizzo IP. • Impostare le informazioni di Indirizzo IP, ID dispositivo, and Porta nella funzione Crestron.
Stato e controllo proiettore • Stato proiettore: Ci sono 5 stati: Lampada accesa, Standby, Risp. Energia, Raffredd. e Riscaldamento. Fare clic sul tasto Aggiorna per aggiornare lo stato e le impostazioni di controllo. • Risp. Energia: È possibile impostare Risp. Energia su Disatt., 30, 60, 90 o 120 minuti. Fare riferimento a pagina 69. • Stato avviso: Ci sono tre stati d’errore: Avviso lampada, Avviso scadenza lampada ed avviso temperatura.
- Presentazione: Consigliata per le presentazioni. - Luminoso: Massima luminosità e contrasto. - FILM: Per visualizzare filmati e foto. - sRGB: Fornisce una rappresentazione più accurata dei colori. - Pers.: Impostazioni preferite dell’utente. • Schermata in bianco: Si può selezionare Attiva o Disatt.. • Proporzioni: Permette di selezionare le proporzioni per regolare come appare l’immagine. • Luminosità: Selezionare un valore per regolare la luminosità dell’immagine.
Avviso e-mail • Avviso e-mail: Si può impostare se essere avvisati (Abilita) usando la posta elettronica o no (Disabilita). • A/Cc/Da: si può digitare l'indirizzo e-mail del mittente (Da) e dei destinatari (A/Cc) per ricevere un avviso in caso di anomalia o avvertenza. • Server SMTP in uscita, Nome e Password devono essere fornito dall’amministratore della rete o MIS. • Condizioni d’avviso: Si possono selezionare le anomalie o gli avvisi da notificare via posta elettronica.
Impostazione password Usare Impostazione password per configurare una password amministratore per accedere a Gestione web. Quando si abilita la password per la prima volta, è necessario impostarla prima di abilitarla. Quando la funzione password è abilitata, sarà richiesta la password amministratore o utente per accedere a Gestione web.
Pagina Entra • 118 Password amministratore: Inserire la password amministratore e poi fare clic su Entra.
Aggiornamento Firmware Utilizzare la pagina Aggiornamento firmware per aggiornare il firmware del proiettore. Premere Attualizza per iniziare. • Attendere che il conteggio arrivi a 0.
• Attendere 3 secondi prima di procedere automaticamente al passo successivo. • Selezionare il file da aggiornare e fare clic sul tasto Aggiorna. Mentre è in corso l'aggiornamento, il tasto Annulla è disabilitato.
• Attendere che il conteggio arrivi a 0. • Quando l'aggiornamento è completo, fare clic sul tasto Accedere di nuovo per tornare alla homepage della gestione web. Crestron Per la funzione Crestron.
FAQ: Vorrei accedere remotamente al Attenersi alle istruzioni che seguono per proiettore da Internet. Qual’è la ottenere l’impostazione migliore per il migliore impostazione per il browser: browser? 1 Aprire Pannello di controllo Opzioni Internet scheda Generale File temporanei Internet Impostazioni Selezionare Ogni volta che si visita la pagina. 2 Alcuni firewall o anti-virus possono bloccare le applicazioni HTTP. Se possibile, disattivare firewall o anti-virus.
Perché non è possibile accedere al server SMTP? 1 Verificare con il MIS o l’amministratore di Perché non è possibile ricevere l’email di avviso test nonostante sul proiettore sia indicato che già stata inviata? Probabilmente il server SMTP riconosce l’email di avviso come oppure a causa di limitazioni del server SMTP. Verificare con il MIS o l’amministratore di rete l’impostazione del server SMTP.
Configurazione Firewall e FAQ Domanda: Perché non riesco ad accedere alla pagina di gestione web? Risposta: La configurazione firewall del computer potrebbe impedire l’accesso alla pagina Gestione web. Fare riferimento alle seguenti impostazioni di configurazione: Protezione Firewall McAfee Security Center Norton AntiVirus 124 Configurazione 1 Avviare McAfee Security Center (Start > Tutti i programmi > McAfee > McAfee Security Center).
Protezione Firewall Sygate Personal Firewall Windows Firewall Zone Alarm Configurazione 1 Aprire Sygate Personal Firewall (Start > Tutti i programmi > Sygate > Sygate Personal Firewall). 2 Nell’elenco Applicazioni in esecuzione trovare e fare clic col tasto destro del mouse su Dell S320 o S320wi Projector. 3 Selezionare Consenti dal menu a comparsa. 1 Aprire Windows Firewall (Start > Tutti i programmi > Pannello di controllo). Fare doppio clic su Windows Firewall.
Eseguit token applicazione Application Token permette di eseguire la funzione Plug and Show usando un token USB. NOTA: Questo si applica solo a S320wi o a S320 abilitati wireless. 1 Dal software applicativo, fare clic su 2 Appare la seguente schermata: Fare clic su Avanti. 3 Inserire l’unità Flash in una porta USB del computer. Selezionare l’unità dall’elenco e poi fare clic su Avanti. 4 Fare clic su Fine per chiudere la procedura guidata. 126 Uso del proiettore > Make Application Token.
Risoluzione dei problemi del proiettore 4 Se si verificano problemi con il proiettore, consultare i seguenti consigli per la risoluzione dei problemi. Se il problema persiste, mettersi in contatto Dell™ (fare riferimento a "Contattare Dell" a pagina 144). Problema Possibile soluzione Assenza di immagine sullo schermo • Assicurarsi di avere scelto l’origine corretta dell’ingresso nel menu SELEZ. INPUT. • Assicurarsi che la porta video esterna sia abilitata.
Problema (continua) Immagine parziale, in scorrimento o visualizzata parzialmente Possibile soluzione (continua) 1 Premere il tasto Reg. autom. del telecomando o del pannello di controllo. 2 Se si usa un computer portatile Dell™, impostare la risoluzione del computer su WXGA (1280 x 800): a Fare clic col tasto destro del mouse su uno spazio vuoto del desktop di Microsoft® Windows® , fare clic su Proprietà e poi selezionare la scheda Impostazioni.
Problema (continua) L’immagine non è a fuoco L’immagine proiettata è allungata durante la riproduzione di un DVD da 16:9 Possibile soluzione (continua) 1 Regolare la ghiera di messa a fuoco dell’obiettivo del proiettore. 2 Assicurarsi che lo schermo di proiezione si trovi entro la distanza richiesta dal proiettore che è compresa tra 1,31 ft [0,4 m] e 12,5 ft [3,82 m]. Il proiettore rileva automaticamente il formato del segnale in ingresso.
Problema (continua) Possibile soluzione (continua) Il LED LAMPADA lampeggia di colore ambra Se LAMPADA lampeggia di colore ambra, significa che il collegamento del modulo lampada potrebbe essere interrotto. Controllare il modulo lampada e assicurarsi che sia installato correttamente. Se LAMPADA si accende e Alimentazione lampeggia di colore ambra, significa che il driver lampada si è guastato ed il proiettore si spegnerà automaticamente.
Risoluzione dei problemi del puntatore interattivo Problema (continua) Possibile soluzione (continua) Impossibile usare o collegare il puntatore • Controllare che l’origine dell’ingresso sia PC (VGA, HDMI, Wireless e LAN) • Controllare che la funzione Interazione sia attiva. (Menu -> Avanzate -> Imp. interatt. -> Interazione) • Controllare che l'opzione Connessione sia impostata correttamente. (Menu -> Avanzate -> Imp. interatt.
Impossibile selezionare Interazione Controllare che l’origine dell’ingresso sia PC (VGA, HDMI, Wireless e LAN). Impossibile usare il puntatore con l’origine 3D. a Supporta l’uscita del segnale VGA e HDMI solo a 120 Hz. b Il segnale video composito/S-Video a 60 Hz ed il segnale video a componenti non sono supportati. Impossibile usare il puntatore con l’origine video composito o S-Video. L'origine video composito e S-Video non sono supportate.
Segnali guida Tasti di controllo Stato proiettore Descrizione Indicatore Alimentazione TEMP (ambra) LAMPADA (ambra) Modalità Standby Proiettore in modalità Standby. Pronto per l’accensione. BLU Lampeggiante DISATT. DISATT. Modalità Riscaldamento Il proiettore richiede un po’ di tempo per riscaldarsi e accendersi. BLU DISATT. DISATT. Lampada accesa Proiettore in modalità Normale, pronto per visualizzare l’immagine. Nota: non si accedere al menu dell’OSD. BLU DISATT. DISATT.
Indicazioni LED del puntatore interattivo Stato puntatore Descrizione Indicatore Colore verde Colore ambra Controllo procedura e voci / tempi Modalità normale 1 Il puntatore è rivolto verso lo schermo ed è collegato al proiettore. Acceso DISATT. Modalità normale 2 Il puntatore non è rivolto verso lo schermo però è collegato al proiettore. Lampeggiante 0,02 secondi acceso / 1 secondo spento DISATT. Accederà alla modalità di sospensione dopo 3 minuti.
Sostituzione della lampada ATTENZIONE: Attenersi alle istruzioni per la sicurezza prima di iniziare una qualsiasi delle procedure di questa sezione, come descritto a pagina 11. Sostituire la lampada quando appare il messaggio "La lampada sta raggiungendo il termine della sua durata utile. È suggerita la sostituzione! www.dell.com/lamps" Se dopo la sostituzione della lampada il problema persiste, rivolgersi a Dell™. Fare riferimento a Contattare Dell™a pagina 144.
9 Ripristinare le ore d’uso della lampada selezionando "Sì" per Ripristino lamp. nel menu OSD Avanzate - Impostazioni alimentazione (fare riferimento a Impostazioni alimentazione del menu Avanzate a pagina 68). Quando si sostituisce un nuovo modulo lampada, il proiettore lo rileva automaticamente e azzera le ore della lampada.
5 Specifiche tecniche Valvola luminosa 0,55" XGA S450 DMD, DarkChip3™ Luminosità 3000 ANSI Lumens (al massimo) Rapporto di contrasto 2200:1 tipico (Full On/Full Off) Uniformità 80% Tipica (standard Giappone - JBMA) Numero di pixel 1024 x 768 (XGA) Proporzioni 4:3 Colori visualizzabili 1,07 miliardi di colori Velocità ruota dei colori 2X Obiettivo di proiezione F-Stop: F/ 2,8 Lunghezza focale effettiva = 7,26 mm Obiettivo fisso, solo zoom digitale Capacità di proiezione = 0,626 grandangolar
Consumo energetico Modalità Normale: 305 W ±10% a 110 Vac Modalità ECO: 225 W ±10% a 110 Vac Modalità Risparmio energetico: <15 W (Wireless e rete attiva) Modalità Standby: < 0,5 W (rete disattiva, VGA_OUT disattiva e Wireless disattiva) Audio 1 casse da 5 Watt RMS Livello di disturbo 35 dB(A) modalità Normale, 31 dB(A) modalità ECO Peso del proiettore 7 lb (3,18 kg) Peso puntatore interattivo 0,13 lb (60 g) (con batteria agli ioni di Litio) Dimensioni del proiettore (L x A x P) 11,3 x 3,6 x 8,7
Ambiente Temperatura d’esercizio: 5° C – 35° C (41° F- 95° F) Umidità: 80% massimo Temperatura di immagazzinamento: Da 0° C a 60° C (da 32° F a 140° F) Umidità: 90% massimo Temperatura di spedizione: Da -20° C a 60° C (da -4° F a 140° F) Umidità: 90% massimo Connettori I/O (per S320/S320wi) Alimentazione: Una presa d’alimentazione CA (3 pin – C14) Ingresso VGA: Due connettori D-sub 15 pin (blu), VGA-A e VGA-B, per segnali ingresso RGB analogico/Componente.
Dongle wireless (integrato per S320wi) Standard wireless: IEEE802.11b/g/n Wireless: Un connettore WiFi USB (tipo A) per il supporto del dongle wireless (WiFi integrato, interfaccia USB). Ambiente sistema operativo: Windows 7/Vista/XP/2000, MAC OS X Supporto di: Presentazioni e controllo proiettore. Consente la connessione contemporanea di un massimo di 30 utenti. Divisione schermo 4 a 1. Permette di proiettare sullo schermo quattro diapositive di presentazione. Modalità di controllo conferenza.
Assegnazione di pin RS232 Protocollo RS232 • Impostazioni di comunicazione Impostazioni di connessione Valore Velocità Baud 19200 Bit di dati 8 Parità Nessuno Bit di stop 1 • Tipi di comandi Per visualizzare il menu dell’OSD e regolare le impostazioni.
Modalità di compatibilità (Analogico/Digitale) 142 Risoluzione Frequenza di aggiornamento (Hz) Frequenza di sincronizzazione orizzontale (KHz) Frequenza pixel (MHz) 640 x 350 70,087 31,469 25,175 640 x 480 59,940 31,469 25,175 640 x 480 p60 59,940 31,469 25,175 720 x 480 p60 59,940 31,469 27,000 720 x 576 p50 50,000 31,250 27,000 720 x 400 70,087 31,469 28,322 640 x 480 75,000 37,500 31,500 848 x 480 60,000 31,020 33,750 640 x 480 85,008 43,269 36,000 800 x 600 60,
1600 x 1200 60,000 75,000 800 x 600 119,972 76,302 162,000 73,250 1024 x 768 119,989 97,551 115,500 1280 x 720 120,000 101,563 146,250 NOTA: La frequenza d’aggiornamento delle temporizzazioni a 120 Hz (area grigia) possono essere supportate dalla modalità 3D.
Contattare Dell Negli Stati Uniti, chiamare 800-WWW-DELL (800-999-3355). NOTA: Se non si possiede una connessione Internet attiva, è possibile trovare le informazioni di contatto nella fattura di acquisto, nella distinta di spedizione, nella bolla o nel catalogo dei prodotti Dell. Dell™ fornisce diverse opzioni di assistenza e supporto online. La disponibilità varia in base al paese e al prodotto e alcuni servizi potrebbero non essere disponibili nella propria zona.
Mettersi in contatto con eInstruction eInstuction mette a disposizioni opzioni di assistenza tecnica telefonica o a domicilio. La disponibilità dipende dai paesi, però gli utenti di tutti i paesi possono inviare un messaggio all’indirizzo: techsupport@einstruction.com. Assistenza tecnica software eInstruction – USA Telefono: 480-443-2214 oppure 800-856-0732 E-mail: Techsupport@einstruction.
Come contattare Crestron Crestron mette a disposizioni opzioni di assistenza tecnica telefonica e online. La disponibilità dipende dai paesi, però gli utenti di tutti i paesi possono inviare un messaggio all’indirizzo: getroomview@crestron.com. Supporto tecnico Negli Stati Uniti e Canada Telefono: 877-516-5394 E-mail: roomviewsupport@crestron.com Fuori degli Stati Uniti e Canada Telefono: +1 201-367-1037 E-mail: roomviewsupport@crestron.
Appendice: Glossario ANSI Lumens — Uno standard per misurare la luminosità. Viene calcolato dividendo l’immagine di un metro quadrato in nove rettangoli uguali, misurando la lettura della lux (luminosità) al centro di ciascun rettangolo e facendo la media di questi nove punti. Proporzioni — Il rapporto proporzioni più comune è 4:3 (4 a 3). I formati video e televisivi precedenti sono in formato 4:3, che significa una larghezza dell’immagine pari a 4/3 volte l’altezza.
dB— decibel — Unità utilizzate per esprimere la differenza relativa in potenza o intensità, di solito tra due segnali acustici o elettrici, pari a dieci volte il logaritmo decimale del rapporto dei due livelli. Diagonale schermo — Un metodo per misurare le dimensioni di uno schermo o di un’immagine proiettata. È la misura da un angolo a quello opposto dello schermo. Uno schermo con 9 ft (ca. 2,74 m) di altezza e 12 ft (ca. 3,66 m) di larghezza ha una diagonale di 15 ft (ca. 4,57 m).
Distanza massima — La distanza dallo schermo alla quale il proiettore può proiettare un’immagine utile (sufficientemente luminosa) in una stanza completamente buia. Dimensioni massime immagine — L’immagine più grande che il proiettore può proiettare in una stanza buia. Di solito è limitata dalla gamma focale dell’obiettivo. Distanza minima — La posizione più vicina allo schermo alla quale il proiettore riesce a mettere a fuoco un’immagine. NTSC — National Television Standards Committee.
Indice A Accensione/spegnimento del proiettore Accensione del proiettore 30 Spegnimento del proiettore 30 assistenza contattare Dell 144 C Connessione al puntatore interattivo Cavo d’alimentazione 28 Cavo USB-A a USB-B mini 28 Cavo VGA a VGA 28 Puntatore interattivo 28 Schermo di proiezione 28 Contattare Dell 7, 130, 135 Collegamento del proiettore al computer 17 Cavo d’alimentazione 17, 18, 19, 20, 22, 23, 24, 25, 26, 27 Cavo da USB a USB 17 Cavo da USB-A a USB-B 20 Cavo da VGA a YPbPr 24 Cavo HDMI 25,
SELEZ.
Dimensione dello schermo di proiezione 137 Dimensioni 138 Distanza di proiezione 137 Livello di disturbo 138 Luminosità 137 Numero di pixel 137 Obiettivo di proiezione 137 Peso 138 Protocollo RS232 141 Rapporto di contrasto 137 Uniformità 137 Valvola luminosa 137 Velocità ruota dei colori 137 T Telecomando 37 Ricevitore a infrarossi 36 U Unità principale 10 Altoparlante 5W 10 Coperchio obiettivo 10 Dispositivo di messa a fuoco 10 Obiettivo 10 Pannello di controllo 10 Ricevitori infrarossi 10 Rotellina di