Dell SE2417HGX User’s Guide Monitor Model: SE2417HGX Regulatory Model: SE2417HGXc
NOTE: A NOTE indicates important information that helps you make better use of your computer. CAUTION: A CAUTION indicates potential damage to hardware or loss of data if instructions are not followed. WARNING: A WARNING indicates a potential for property damage, personal injury, or death. Copyright © 2019 Dell Inc. or its subsidiaries. All rights reserved. Dell, EMC, and other trademarks are trademarks of Dell Inc. or its subsidiaries. Other trademarks may be trademarks of their respective owners.
Contents About your monitor................................................................. 5 Package contents........................................................................................ 5 Product features..........................................................................................6 Identifying parts and controls................................................................... 7 Plug and play capability...........................................................................
Preset display modes............................................................................... 40 Electrical specifications............................................................................41 Physical characteristics............................................................................41 Environmental characteristics................................................................42 Power management modes...................................................................
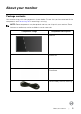
About your monitor Package contents Your monitor ships with the components shown below. Ensure that you have received all the components and Contacting Dell if something is missing. NOTE: Some components may be optional and may not ship with your monitor. Some features or media may not be available in certain countries.
HDMI cable ∞∞ Quick Setup Guide ∞∞ Safety and Regulatory Information Product features The Dell SE2417HGX flat panel display has an active matrix, Thin-Film Transistor (TFT), Liquid Crystal Display (LCD), and LED backlight. The monitor features include: ∞∞ 59.9 cm (23.6 inch) viewable area display (measured diagonally). 1920 x 1080 resolution, plus full-screen support for lower resolutions. ∞∞ Plug and play capability if supported by your system. ∞∞ VGA and dual HDMI connectivity.
Identifying parts and controls Front View 1 2 Front panel controls Label Description 1 Function buttons (For more information, see Operating your monitor) 2 Power on/off button (with LED indicator) NOTE: For displays with glossy bezels the user should consider the placement of the display as the bezel may cause disturbing reflections from surrounding light and bright surfaces.
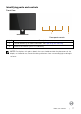
Back View 1 2 4 3 Back View with monitor stand Back View without monitor stand Label Description Use 1 Stand release button Releases stand from monitor. 2 Security-lock slot Secures monitor with security lock (security lock not included). 3 Barcode serial number label Refer to this label if you need to contact Dell for technical support. 4 Cable management slot Uses to organize cables by placing them through the slot.
Bottom View CAN ICES-3 (B)/NMB-3(B) XXXXXXX-XXXXX MSIP-REM-TPV-SE2416Hc de energía: XX.X Wh 㐔㷡㢬ڕTOP VICTORY ELECTRONICS (FUJIAN) CO., LTD. Consumo Consumo de energía en modo de espera: X.XX Wh 㥐㦤㣄ڕTPV Electronics (Fujian) Co., Ltd. 080-200-3800 1 2 Удельная мощность рабочего режима - X.XXX Вт/см² Потребляемая мощность изделием в режиме ожидания - X.XX Вт Потребляемая мощность изделием в выключенном режиме - X.XX Вт The equipment must be connected to an earthed mains socket-outlet.
Plug and play capability You can install the monitor in any Plug and Play-compatible system. The monitor automatically provides the computer system with its Extended Display Identification Data (EDID) using Display Data Channel (DDC) protocols so the system can configure itself and optimize the monitor settings. Most monitor installations are automatic, you can select different settings if desired. For more information about changing the monitor settings, see Operating your monitor.
Setting up the monitor Connecting the stand NOTE: The stand is detached when the monitor is shipped from the factory. NOTE: The following steps are applicable for connecting the stand that shipped with your monitor. For setting up any other stand, see the documentation that shipped with it. To attach the monitor stand: 1. Place the monitor on a soft cloth or cushion. 2. Insert the tabs on the upper part of the stand in to the grooves on the back of the monitor. 3.
Connecting your monitor WARNING: Before you perform any of the procedures in this section, follow the Safety instructions. NOTE: Do not connect all cables to the computer at the same time. It is recommend to route the cables through the cable-management slot before you connect them to the monitor. To connect your monitor to the computer: 1. Turn off your computer and disconnect the power cable. 2. Connect the VGA/HDMI cable from your monitor to the computer.
Organizing cables Use the cable-management slot to organize the cables connected to your monitor.
Disconnecting the monitor stand NOTE: To prevent scratches on the LCD screen while removing the stand, ensure that the monitor is placed on a soft and clean surface. To remove the stand: 1. Place the monitor on a soft cloth or cushion. 2. Use a long and thin screwdriver to push the release latch. 3. After the latch is released, remove the stand away from the monitor.
Operating your monitor Power on the monitor Press the button to turn on the monitor. Using the front panel controls Use the control buttons on the front of the monitor to adjust the image being displayed. 2 1 3 4 5 The following table describes the front panel buttons: Front Panel Button 1 Description Use this button to choose from a list of preset modes. Shortcut key/Preset Modes Use this button to directly access the brightness/ contrast menu.
2 and 3 Use the power button to turn the monitor on and off. Solid white light indicates the monitor is turned on. Power On/Off button (with Blinking white light indicates it is in power-save LED indicator) mode. OSD controls Use the buttons on the front of the monitor to adjust the image settings. 1 2 3 4 Front Panel Button 1 Description Use the up button to increase values or move up in a menu. Up 2 Use the down button to decrease values or move down in a menu.
Using the On-screen Display (OSD) menu Accessing the OSD menu NOTE: Any changes you make are automatically saved when you move to another menu, exit the OSD menu, or wait for the OSD menu to automatically close. 1. Press the button to display the OSD main menu. Main menu Dell 24 Monitor Brightness / Contrast Auto Adjust Input Source 75% Color Display Menu 75% Personalize Others 2. Press the and buttons to move between the setting options.
Icon Menu and Submenus Brightness/ Contrast Description Use this menu to activate brightness/contrast adjustment. Dell 24 Monitor Brightness / Contrast Auto Adjust Input Source 75% Color Display Menu 75% Personalize Others Brightness Brightness adjusts the luminance of the backlight. Press the button to increase the brightness and press the button to decrease the brightness (min. 0 / max. 100). NOTE: Manual adjustment of brightness is disabled when dynamic contrast is switched on.
Auto Use this key to activate automatic setup and adjust menu. Dell 24 Monitor Brightness / Contrast Auto Adjust Press to adjust the screen automatically. Input Source Color Display Menu Personalize Others The following dialog appears on a black screen as the monitor self-adjusts to the current input: Auto Adjustment in Progress... Auto adjustment allows the monitor to self-adjust to the incoming video signal.
Input Source Use the input source menu to select between the different video signals that may be connected to your monitor. Dell 24 Monitor Brightness / Contrast VGA Auto Adjust HDMI 1 Input Source HDMI 2 Color Auto Select Display > On Reset Input Source Menu Personalize Others VGA HDMI 1 Select VGA input when you are using the analog (VGA) connector. Push to select the VGA input source. Select HDMI 1 input when you are using the HDMI 1 connector.
Preset Modes When you select Preset modes, you can choose Standard, ComfortView, Movie, FPS Game, RTS Game, RPG Game, Warm, Cool or Custom Color from the list. ∞∞ Standard: Loads the monitor's default color settings. This is the default preset mode. ∞∞ ComfortView: Decreases the level of blue light emitted from the screen to make viewing more comfortable for your eyes. ∞∞ Movie: Loads color settings ideal for movies. ∞∞ FPS Game: Loads color settings ideal for First-Person Shooter games.
Dell 24 Monitor Brightness / Contrast Preset Modes Auto Adjust Input Color Format Cool Input Source Reset Color Custom Color Color Display Menu Personalize Others Input Color Format Allows you to set the video input mode to: ∞∞ RGB: Select this option if your monitor is connected to a computer or DVD player using the HDMI cable. ∞∞ YPbPr: Select this option if your DVD player supports only YPbPr output.
Reset Color Resets your monitor color settings to the factory preset values. Dell 24 Monitor Brightness / Contrast Preset Modes > Standard Auto Adjust Input Color Format > RGB Input Source Reset Color Color Display Menu Personalize Others Display Use the display to adjust image.
Horizontal Position Vertical Position Sharpness Pixel Clock Phase Use or the buttons to adjust image left and right. Minimum is 0 (-). Maximum is 100 (+). Use the or buttons to adjust image up and down. Minimum is 0 (-). Maximum is 100 (+). This feature can make the image look sharper or softer. Use or to adjust the sharpness from 0 to 100. The phase and pixel clock adjustments allow you to adjust your monitor to your preference. Use or buttons to adjust for best image quality. Minimum is 0 (-).
Transparency Timer Select this option to change the menu transparency by pressing the and buttons from 0 to 100. OSD hold time: sets the length of time the OSD will remain active after the last time you pressed a button. Use or to adjust the slider in 1 second increments, from 5 to 60 seconds. Reset Menu Reset all OSD settings to the factory preset values.
Others Dell 24 Monitor Brightness / Contrast Display Info Auto Adjust DDC/CI > On LCD Conditioning > Off Service Tag > ABCDEFG Input Source Color Display Reset Others Factory Reset Menu Personalize Others Display Info Dell 24 Monitor Brightness / Contrast Display Info Auto Adjust DDC/CI Input Source LCD Conditioning Color Service Tag Reset Others Display Menu Personalize Others 26 | Operating your monitor Factory Reset Model: Dell SE2417HGX Input Source: HDMI1 Current: 1920
DDC/CI DDC/CI (display data channel/command interface) allows your monitor parameters (brightness, color balance and etc.) to be adjustable via the software on your computer. You can disable this feature by selecting Off. Select On to enable this feature for best user experience and optimum performance of your monitor.
OSD warning messages When the Dynamic Contrast feature is enabled (in these preset modes: Game or Movie), the manual brightness adjustment is disabled. Dell 24 Monitor To allow manual adjustment of brightness, the Dynamic Contrast To allow manual adjustment of brightness, the Dynamic Contrast will be switched off.
Dell 24 Monitor Entering Power Save Mode. SE2417HGX If you press any button other than the power button, the following messages will appear depending on the selected input: Dell 24 Monitor ? No VGA signal from your device. Press any key on the keyboard or move the mouse to wake it up. If there is no display, press the monitor button again to select the correct input source. SE2417HGX If VGA or HDMI cable is not connected, a floating dialog box as shown below appears.
Dell 24 Monitor ? No HDMI 2 Cable The display will go into Power Save Mode in 4 minutes. www.dell.com/SE2417HGX SE2417HGX See Troubleshooting for more information.
Setting up your monitor Setting the maximum resolution To set the maximum resolution for the monitor: 1. For Windows 8 and Windows 8.1, select the Desktop tile to switch to classic desktop. 2. Right-click on the desktop and click Screen Resolution. 3. Click the Dropdown list of the Screen Resolution and select 1920 x 1080. 4. Click OK. If you do not see 1920 x 1080 as an option, you may need to update your graphics driver.
Using tilt The stand shipped with your monitor supports tilt up to 5 degrees forward and 21 degrees backward.
Troubleshooting WARNING: Before you begin any of the procedures in this section, follow the Safety instructions. Self-test Your monitor provides a self-test feature that allows you to check if your monitor is functioning properly. If your monitor and computer are properly connected but the monitor screen remains dark, run the monitor self-test by performing the following steps: 1. Turn off both your computer and the monitor. 2. Disconnect all video cables from the monitor.
Dell 24 Monitor ? No HDMI 2 Cable The display will go into Power Save Mode in 4 minutes. www.dell.com/SE2417HGX SE2417HGX NOTE: This box also appears during normal system operation, if the video cable is disconnected or damaged. 4. Turn off your monitor and reconnect the video cable; then turn on both your computer and the monitor. If your monitor remains dark after you reconnect the cables, check your video controller and computer.
6. Inspect the display for any abnormalities. 7. Repeat steps 5 and 6 to inspect the display in green, blue, black, white and text screens. The test is complete when the text screen appears. To exit, press Button 1 again. If you do not detect any screen abnormalities upon using the built-in diagnostic tool, the monitor is functioning properly. Check the video card and computer.
Common problems The following table contains general information about common monitor problems you might encounter and the possible solutions: Common Symptoms Possible Solutions No video/power LED off ∞∞ Ensure that the video cable connecting the monitor and the computer is properly connected and secure. ∞∞ Verify that the power outlet is functioning properly using any other electrical equipment. ∞∞ Ensure that the correct input source is selected via the Input source menu.
Synchronization problems ∞∞ Reset the monitor to Factory Settings (Factory Reset). ∞∞ Perform monitor self-test feature check to determine if the scrambled screen appears in self-test mode. ∞∞ Check for bent or broken pins in the video cable connector. ∞∞ Restart the computer in the safe mode. Safety related issues ∞∞ Do not perform any troubleshooting steps. ∞∞ Contact Dell immediately.
Product-specific problems Specific Symptoms Possible Solutions Screen image is too small ∞∞ Check the Aspect Ratio setting in the Display settings OSD. ∞∞ Reset the monitor to Factory Settings (Factory Reset) . Cannot adjust the monitor with the buttons on the side panel ∞∞ Turn off the monitor, unplug the power cord, plug it back, and then turn on the monitor. ∞∞ Check if the OSD menu is locked. If yes, press and hold the button above the power button for 10 seconds to unlock.
Monitor specifications Flat panel specifications Model SE2417HGX Screen type Active matrix - TFT LCD Panel type TN Viewable image Diagonal 599.44 mm (23.60 in) Horizontal, Active Area 521.28 mm (20.52 in) Vertical, Active Area 293.22 mm (11.54 in) Area 1528.50 cm2 (236.80 in2) Pixel pitch 0.
Vertical scan range 48 Hz to 76 Hz (automatic) Maximum preset resolution 1920 x 1080 at 60Hz (VGA) 1920 x 1080 at 75 Hz (HDMI) Supported video modes Model SE2417HGX Video display capabilities (HDMI ) 480i, 480p, 576i, 576p, 720p, 1080i, 1080p FreeSync Graphic Card Support List For information on graphic cards that are compatible with Radeon FreeSync technology, see www.amd.
Electrical specifications Model SE2417HGX Video input signals ∞∞ Analog RGB, 0.7 Volts +/-5%, positive polarity at 75 ohm input impedance AC input voltage/frequency/ current Inrush current ∞∞ HDMI 1.4, 600mV for each differential line, 100 ohm input impedance per differential pair 100 VAC to 240 VAC / 50 Hz or 60 Hz ± 3 Hz / 1.6A (typical) ∞∞ 120 V: 30 A (Max.) at 0°C (cold start) ∞∞ 240 V: 60 A (Max.
Weight of stand assembly 0.67 kg (1.
NOTE: Energy consumption (On Mode) is tested at 230 Volts / 50 Hz. This document is informational only and reflects laboratory performance. Your product may perform differently, depending on the software, components and peripherals you ordered and shall have no obligation to update such information. Accordingly, the customer should not rely upon this information in making decisions about electrical tolerances or otherwise. No warranty as to accuracy or completeness is expressed or implied.
Pin assignments VGA connector Pin Number 1 2 3 4 5 6 7 8 9 10 11 12 13 14 15 15-pin Side of the Connected Signal Cable Video-Red Video-Green Video-Blue GND Self-test GND-R GND-G GND-B Computer 5V/3.
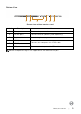
HDMI connector Pin Number 1 2 3 4 5 19-pin Side of the Connected Signal Cable T.M.D.S. Data 2T.M.D.S. Data 2 Shield T.M.D.S. Data 2+ T.M.D.S. Data 1+ T.M.D.S. Data 1 Shield 6 7 8 9 10 11 12 13 14 15 16 17 18 19 T.M.D.S. Data 1 T.M.D.S. Data 0+ T.M.D.S. Data 0 Shield T.M.D.S. Data 0T.M.D.S. Clock + T.M.D.S. Clock Shield T.M.D.S. Clock CEC Reserved (N.C.
Appendix WARNING: Safety Instructions WARNING: Use of controls, adjustments, or procedures other than those specified in this documentation may result in exposure to shock, electrical hazards, and/or mechanical hazards. For information on safety instructions, see the Product Information Guide. FCC notices (U.S. Only) and other regulatory information For FCC notices and other regulatory information, see the regulatory compliance website located at www.dell.com/regulatory_compliance.