Dell Security Center Quickstart Guide Azure Account: Paid Azure Subscription vs. Free Azure Account Both paid Azure subscriptions and free Azure accounts are supported for Dell Security Center tenant setup, as follows: Paid Azure subscription: Dell provides an automated tenant setup script. This script requires Azure’s Cloud Shell, which is included in a paid subscription to Azure.
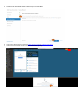
. Click Register your account from your welcome email to get started. 3. The setup wizard opens. Click Next and enter the verification email and code from these emails into the setup wizard. 4. Read and accept the Terms and Conditions of the license agreement.
5. Download the automated tenant creation script and click Next. 1 2 6. Login to the Microsoft Azure Portal at https://azure.microsoft.com/en-us/account. 7. Launch the Cloud Shell console and click Powershell (Linux).
8. Upload the AzureADAutomation.ps1 script. 9. Run the AzureADAutomation.ps1 script and enter your Domain Name. (Ex: -Domain dell.com –Verbose). 10. Once the script returns with a warning message, grant permissions for the Dell Security Web App in the Azure portal.
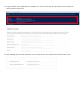
11. To grant permissions for the Dell Security Web App and Dell Security Native App, the Required Permissions must be updated. a. Navigate to Azure Active Directory > App registrations > Dell Security Web App > Settings > Required permissions. Click Grant Permissions. 1 3 2 Important: The Dell Security Web App must have permissions granted first. If the native app is attempted to have permissions granted first, the following error will appear: b.
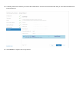
12. Copy the Domain Name, Application IDs, Application Uri, and the Secret from the script output and enter them in the Identity Provider setup wizard. 13. After validating your Azure AD credentials, enter the email address of the administrator for Dell Security Center.
14. Carefully review the summary to ensure all information is accurate. Dell recommends that you save this information for future reference. 15. Click Finish to complete the setup wizard.
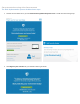
Set up tenant when using a free Azure account The basic implementation process includes these steps: 1. Retrieve the two emails sent to you from tenantservices@dellsecuritycenter.com. You will need these during setup. 2. Click Register your account from your welcome email to get started.
3. The setup wizard opens. Click Next and enter the verification email and code from these emails into the setup wizard. 4. Read and accept the Terms and Conditions of the license agreement. 5. Click Next.
6. Information from Azure Active Directory must be entered into the setup wizard. a. Login to the Microsoft Azure Portal at https://azure.microsoft.com/en-us/account b. From Azure Active Directory, retrieve your Domain Name (for example, domain.onmicrosoft.com), and enter it in the setup wizard. Note: The Name will be used for step 10 as the Domain Name. 3 2 1 c. From Azure, navigate to App registration > New application registration to your two Application IDs.
6. Once registered, Azure provides Application IDs for both Apps. 2 3 1 Important: Copy the Application ID for both Native App and Web App for step 10. 7. To register the Apps, the App ID URI, Graph Keys, Required permissions, and groupMembershipClaims must be updated. a. App ID URI: Navigate to Settings > Properties to change the App ID URI to change current GUID to the home page for the Web App. Click Save. (Ex: Change "https://domain.com/6f6d082a-5b93..." to "https://domain.
Note: The Value is used for step 10 as the Secret code. 1 4 3 2 1 c. Required Permissions: Navigate to Settings > Required permissions > Add to Add API access.
a. Click Select an API > Microsoft Graph. Click Select. 1 2 3 4 b. From Select Permissions, choose the following permissions: 1. Read the organization's roster 2. Read all groups 3. Read all users’ full profiles 2 1 3 4 5 c. Click Select.
d. Click Grant Permissions to save. 1 Repeat steps for Required permissions for the following API with the same Web App: e. Windows Azure Service Management API 1.
f. Windows Azure Active Directory 1. Manage apps that this app creates or owns 2. Read and write all applications 4 1 2 3 d. groupMembershipClaims: Navigate to Manifest. a. Change "groupMembershipClaims": null, to "groupMembershipClaims": "SecurityGroup", b. Click Save. Important: Make these changes for both Native App and Web App.
8. Navigate to Settings > Reply URIs. Add the Consoles and Data Guardian portals to the Reply URLs in the App Registration for the Web App. Click Save. Console: https://console.dellsecuritycenter.com/webui/verfied DG Portal: https://dgportal.dellsecuritycenter.com/edap-ui/rest/verified 1 5 3 2 4 9. To link the Native App with the Web App, access to API for the Web App must be added under settings for the Native App. a. Navigate to Settings > Required permissions > Add > Select an API.
b. When selecting an API, type in Dell Security Web App, press Enter, and click Select. 1 2 3 c. Select the check box for Access Dell Security Web App. Click Select, and then click Grant permissions. 3 1 2 10. Enter the Domain Name, Web App ID, Native App ID, Native App Redirect Uri, Web App Uri, and the Secret (GraphKey) in the Identity Provider setup wizard.
11. After validating your Azure AD credentials, enter the email addresses of the administrators for Dell Security Center. 12. Carefully review the summary to ensure all information is accurate. Dell recommends that you save this information for future reference. 13. Click Finish to complete the setup wizard.