Dell Data Protection Security Tools Installation Guide v1.12 February 2017 Rev.
Notes, cautions, and warnings NOTE: A NOTE indicates important information that helps you make better use of your product. CAUTION: A CAUTION indicates either potential damage to hardware or loss of data and tells you how to avoid the problem. WARNING: A WARNING indicates a potential for property damage, personal injury, or death. © 2017 Dell Inc. All rights reserved.Dell, EMC, and other trademarks are trademarks of Dell Inc. or its subsidiaries.
Contents Chapter 1: Introduction................................................................................................................... 5 Overview.................................................................................................................................................................................5 Chapter 2: Requirements.................................................................................................................6 Drivers..............................
Self-Recovery, Windows Logon Recovery Questions.................................................................................................... 38 Self-Recovery, PBA Recovery Questions........................................................................................................................ 39 Self-Recovery, One-time Password................................................................................................................................. 40 Chapter 7: Glossary................
1 Introduction Dell Data Protection | Security Tools provides security and identity protection to Dell computer administrators and users. DDP | Security Tools is pre-installed on all Dell Latitude, Optiplex, and Precision computers and on select Dell XPS notebooks. Should you need to reinstall DDP | Security Tools, follow the instructions in this guide. For additional support, see www.dell.com/support > Endpoint Security Solutions.
2 Requirements • DDP | Security Tools is pre-installed on all Dell Latitude, Optiplex, and Precision computers and on select Dell XPS notebooks, and meets the following minimum requirements. Should you need to reinstall DDP | Security Tools, ensure that your computer still meets these requirements. See www.dell.com/support > Endpoint Security Solutions for more information. Windows 8.1 should not be installed on drive 1 on self-encrypting drives.
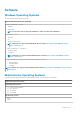
Software Windows Operating Systems The following table details supported software. Windows Operating Systems (32- and 64-bit) • Microsoft Windows 7 SP0-SP1 - Enterprise - Professional NOTE: Legacy Boot mode is supported on Windows 7. UEFI is not supported on Windows 7. • Microsoft Windows 8 - Enterprise - Pro - Windows 8 (Consumer) NOTE: Windows 8 is supported with UEFI Mode when used with Opal Compliant SEDs and Dell Computer Models - UEFI Support. • Microsoft Windows 8.1 - 8.
Mobile Device Operating Systems Windows Phone Operating Systems • • Windows Phone 8.1 Windows 10 Mobile Hardware Authentication The following table details supported authentication hardware. Authentication Fingerprint Readers • Validity VFS495 in Secure Mode • Broadcom Control Vault Swipe Reader • UPEK TCS1 FIPS 201 Secure Reader 1.6.3.
Dell Computer Models - UEFI Support Authentication features are supported with UEFI mode on select Dell computers running Microsoft Windows 8, Microsoft Windows 8.1, and Microsoft Windows 10 with qualified Opal Compliant SEDs. Other computers running Microsoft Windows 7, Microsoft Windows 8, Microsoft Windows 8.1, and Microsoft Windows 10 support Legacy Boot mode. The following table details Dell computer models supported with UEFI.
International Keyboards • The following table lists international keyboards supported with Preboot Authentication on UEFI and non-UEFI computers. International Keyboard Support - UEFI ○ DE-CH - Swiss German ○ DE-FR - Swiss French International Keyboard Support - Non-UEFI ○ AR - Arabic (using Latin letters) ○ DE-CH - Swiss German ○ DE-FR - Swiss French Language Support DDP | Security Tools is Multilingual User Interface (MUI) compliant and supports the following languages.
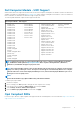
Non-UEFI PBA Passwor Fingerp d rint Windows Authentication Contact ed Smart card OTP SIPR Card Passwor Fingerp d rint Smart card OTP SIPR Card Windows 7 SP0- X1 SP1 X X X X X Windows 8 X1 X X X X X Windows 8.1Windows 8.1 Update 1 X1 X X X X X Windows 10 X1 X X X X X 1. Available with a supported Opal SED.
Deprovision DDP|A-Managed Hardware 1. Launch DDP|A and click the Advanced tab. 2. Select Reset System. This will require that you enter any provisioned credentials to verify your identity.
Clear Ownership and Activate the TPM To clear and set ownership of the TPM, see https://technet.microsoft.com/en-us/library/cc749022%28v=ws.10%29.aspx#BKMK_S2. Proceed to Installation and Activation.
3 Installation and Activation This section details installing DDP | Security Tools on a local computer. To install and activate DDP | Security Tools, you must be logged on to the computer as an administrator. NOTE: During installation, do not make any changes to the computer, including inserting or removing external (USB) drives. Install DDP | Security Tools To install Security Tools: 1. Locate installation file in the DDP | Security Tools installation media. Copy it to the local computer.
7. Click Install to begin the installation. 8. Once the installation is complete, a computer restart is required. Select Yes to restart and then click Finish. Installation is complete. Activate DDP | Security Tools The first time that you run the DDP Security Console and select Administrator Settings, the Activation wizard walks you through the Activation process. If the DDP Security Console isn't activated yet, an end user can still run it.
3. At the Welcome page, click Next. 4. Create the DDP | Security Tools password, and click Next. You must create the DDP | Security Tools administrator's password before configuring Security Tools. This password will be needed any time you run the Administrator Settings tool. The password must be 8-32 characters long and must include at least one letter, one number, and one special character. 5. In Backup Location, specify the location where the backup file is to be written, and click Next.
6. At the Summary page, click Apply. Security Tools activation is complete. Administrators and users can immediately begin to take advantage of Security Tools features, based on default settings.
4 Configuration Tasks for Administrators Security Tools default settings allow administrators and users to use Security Tools immediately after activation, without additional configuration. Users are automatically added as Security Tools users when they log on to the computer with their Windows passwords but, by default, multi-factor Windows authentication is not enabled. Encryption and Preboot Authentication also are not enabled, by default.
6. Enter the password a second time to confirm it, then click Apply. 7. To change the location where the recovery key is stored, in the left pane, select Change Backup Location. 8. Select a new location for the backup, and click Apply. The backup file must be saved either on a network drive or onto removable media. The backup file contains the keys that are needed to recover data on this computer. Dell ProSupport must have access to this file to help you recover data.
Configure Encryption and Preboot Authentication Encryption and Preboot Authentication (PBA) are available if your computer is equipped with a self-encrypting drive (SED). Both are configured through the Encryption tab, which is visible only if your computer is equipped with a self-encrypting drive (SED). When you enable either encryption or PBA, the other is also enabled.
6. In the Preboot Customization page, enter customized text to display on the Preboot Authentication (PBA) screen, and click Next. Preboot Title Text This text displays on the top of the PBA screen. If you leave this field blank, no title will be displayed. The text does not wrap, so entering more than 17 characters may result in the text being cut off. Support Information Text This text displays on the PBA support information page.
7. At the Summary page, click Apply. 8. When prompted, click Shutdown. A full shutdown is required before encryption can begin. 9. After shutdown, restart the computer. Authentication is now managed by Security Tools. Users must log in at the Preboot Authentication screen with their Windows passwords.
After you first enable encryption and configure Preboot Policy and Customization, the following actions are available from the Preboot Settings tab: • Change Preboot Policy or Customization - Click the Preboot Settings tab and select either Preboot Customization or Preboot Logon Policies. For uninstallation instructions, see Uninstallation Tasks.
For example, you can require both a fingerprint and a password as logon credentials. In the dialog, select the second authentication method that must be used with fingerprint authentication. • To allow each authentication method to be used individually, in the Available Options dialog, leave the second authentication method set to None, and click OK. • To remove a sign-in option, under Available Options on the Sign-in Options page, click X to remove the method.
Functionality During the Grace Period During a specified Grace Period, after every log on, the Additional Credentials notification displays when the user has not yet enrolled the minimum credentials required to satisfy a changed Sign-in Option. The message content is: Additional credentials are available for enrollment. If additional credentials are available, but are not required, the message displays only once after the policy has been changed.
4. Set Available Options for authentication. By default, each authentication method is configured to be used individually, not in combination with other authentication methods. You can change the defaults in the following ways: • To set up a combination of authentication options, under Available Options, click to select the first authentication method. In the Available Options dialog, select the second authentication method, then click OK.
5. To save the settings for the selected role, click Apply. NOTE: Select the Defaults button to restore the settings to their original values. Configure Recovery Questions On the Recovery Questions page, you can select which questions will be presented to users when they define personal Recovery Questions and answers. Recovery Questions allow users to recover access to their computers if their passwords are expired or forgotten. To configure Recovery Questions: 1. 2. 3. 4.
3. Set the Fingerprint Scan sensitivity. Lower sensitivity increases the acceptable variance and the probability of accepting a false scan. At the highest setting, the system may reject legitimate fingerprints. The More sensitivity setting lowers the false acceptance rate to 1 in 10,000 scan. 4. To remove all fingerprint scans and credential enrollments from the fingerprint reader's buffer, click Clear Reader. This removes only data that you are currently adding.
3. To select the length of the One-time Password (OTP), for One-time Password Length, select number of password characters to require. 4. To select the number of chances the user has to enter the One-time Password correctly, for User Sign-in Attempts Allowed, select a number from 5 to 30. When the maximum attempts is reached, the OTP feature will be disabled until the user re-enrolls the mobile device.
Configure Advanced Permissions 1. Click Advanced to modify advanced end user options. Under Advanced, you can optionally allow users to self-enroll credentials, optionally allow users to modify their enrolled credentials, and enable one step logon. 2. Select or clear the check boxes: Allow users to enroll credentials - By default, the check box is selected. Users are permitted to enroll credentials without intervention by an administrator.
NOTE: This option cannot be selected unless the Allow users to enroll credentials setting is also selected. 3. Click Apply when finished. Smart Card and Biometric Services (Optional) If you do not want Security Tools to change the services associated with smart cards and biometric devices to a startup type of "automatic," the service startup feature can be disabled.
NOTE: Sign-in and Session show the enrollment status of a user. When Sign-in status is OK, all enrollments that the user needs to be able to log on have been completed. When Session status is OK, all enrollments that the user needs to use Password Manager have been completed. If either status is No, the user needs to complete additional enrollments. To find out which enrollments are still needed, select the Administrator Settings tool and open the Users tab.
The Enrollment wizard opens. Continue to Enroll or Change User Credentials for instructions. Enroll or Change User Credentials The administrator can enroll or change a user's credentials on behalf of a user, but a few enrollment activities require the user's presence, such as answering recovery questions and scanning the user's fingerprints. To enroll or change user credentials: 1. In Administrator Settings, click the Users tab. 2. On the Users page, click Enroll. 3. On the Welcome page, click Next. 4.
5. On the Password page, to change the user's Windows password, enter and confirm a new password and click Next. To skip changing the password, click Skip. The wizard allows you to skip a credential if you don't want to enroll it. To return to a page, click Back. 6. Follow the instructions on each page, and click the appropriate button: Next, Skip, or Back. 7. On the Summary page, confirm the enrolled credentials and, when finished with enrollment, click Apply.
Remove All of a User's Enrolled Credentials 1. Click the Administrator Settings tile. 2. Click the Users tab and find the user you want to remove. 3. Click Remove. (The Remove command appears in red at the bottom of the user's settings). After removal, the user will not be able to log on to the computer unless he re-enrolls.
5 Uninstallation Tasks To uninstall DDP | Security Tools, you must be at least a local Admin user. Uninstall DDP | Security Tools You must uninstall the applications in this order: 1. DDP | Client Security Framework 2. DDP | Security Tools Authentication 3. DDP | Security Tools If you have a computer with a self-encrypting drive, follow these instructions to uninstall: 1. Deprovision the SED: a. From Administrator Settings > click the Encryption tab. b. Click Decrypt to disable encryption. c.
5. From the Windows Control Panel, uninstall Security Tools. A message displays prompting whether you want to completely uninstall this application and its components. Click Yes. The Uninstallation Complete dialog displays. 6. Click Yes, I want to restart my computer now and then click Finish. 7. The computer restarts and uninstallation is complete.
6 Recovery Recovery options are available in case user credentials expire or are lost: • • One-time Password (OTP): The user generates an OTP with the Security Tools Mobile app on an enrolled mobile device and enters the OTP at the Windows logon screen to regain access. This option is available only if the user has enrolled a mobile device with Security Tools on the computer. To use the OTP feature for recovery, the user must not have used OTP to log on to the computer.
• If a fingerprint failed to be recognized, then the fingerprint enrollment page displays so that you can re-enroll the fingerprint. Self-Recovery, PBA Recovery Questions To answer Recovery Questions to recover access at the Preboot Authentication screen: 1. Enter your user name. 2. At the bottom left side of the screen, click Options > Trouble Signing In. 3. When the Q&A dialog appears, enter the answers that you supplied when you enrolled in Recovery Questions the first time you signed in.
Self-Recovery, One-time Password This procedure describes how to use the One-time Password (OTP) feature to recover access to the computer if, for example, the Windows password is expired or forgotten or the maximum allowed logon attempts is exceeded. The One-time Password (OTP) option is available only if the user has enrolled a mobile device and only if OTP was not last used to log on to Windows. NOTE: The One-time Password feature requires that TPM is present, enabled, and owned.
• If you have more than one Windows user account, either DDP | Security Tools is not installed on the computer that you are trying to access or you are attempting to log on to a different user account than was used to pair the computer and the mobile device. 4. Tap One-time Password. A password displays on the mobile device screen. NOTE: If necessary, click the Refresh symbol to get a new code. After the first two OTP refreshes, there will be a thirty-second delay before another OTP can be generated.
7 Glossary Deprovision - Deprovisioning removes the PBA database and deactivates the PBA. Deprovisioning requires a shutdown to take effect. One-Time Password (OTP) - A one-time password is a password that can be used only once and is valid for a limited length of time. OTP requires that the TPM is present, enabled, and owned. To enable OTP, a mobile device is paired with the computer using the Security Console and the Security Tools Mobile app.