
White Papers


(A) Viewing network settings
14 MX7000 Deployment of Management Module Network using the LCD control panel | Document
ID
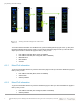
Press the IPv6 button (Figure-10 item 1), then press the Auto Configuration button (Figure-10 item 2) and you
will be asked to confirm (Figure-10 item 3) that you intend to change the IPv6 setting to Auto Configuration.
Pressing “Yes” in the confirmation page initiates the configuration change process.
For a short period of time, you may see the Save in-progress icon (Figure-10 item 4). When the configuration
process is complete, you will see the “Success” menu (Figure-10 item 5). Press “Close” button to conclude
the configuration.
NOTE: Although the configuration has concluded, the information in the LCD may take a few seconds to
reflect the changes.
C.4 (G) Disabling IPv6 network
To disable the IPv6 network, start from the Main menu described in the “Start IPv6 network changes” section.
Disabling IPv6
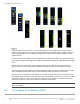
Press the IPv6 button (Figure-11 item 1), then press the “Disable” button (Figure-11 item 2) and you will be
asked to confirm (Figure-11 item 3) that you intend to disable IPv6 network. Pressing “Yes” in the confirmation
page initiates the Disable configuration process.
For a short period of time, you may see the Save in-progress icon (Figure-11 item 4). When the configuration
process is complete, you will see the “Success” menu (Figure-11 item 5). Press “Close” button to conclude
the configuration.
NOTE: Although the configuration has concluded, the information in the LCD may take a few seconds to
reflect the changes.