
White Papers


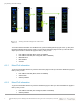

(A) Viewing network settings
9 MX7000 Deployment of Management Module Network using the LCD control panel | Document
ID
Configure IPv4 setting to Static
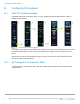
Press the IPv4 button (Figure-5 item 1), then press the Static IP button (Figure-5 item 2) and you will be
asked to confirm (Figure-5 item 3) that you intend to change the IPv4 setting to Static. Pressing “Yes” in the
confirmation page takes you to the Static IP configuration. The first part is the static IPv4 address setting
(Figure-5 item 4).
For each octet of the IPv4 address, you are presented with a 3-digit numeric dial. Due to the already limited
screen space, the dial for each digit is fairly small so for an effective selection try to slide the dial with a lighter
touch.
After the first octet, touch the next octet for setting its value (Figure-5 item 5). Do the same for the rest
(Figure-5 items 6-7). When done, press the “Mask” button (Figure-5 item 7) at the bottom of the screen.
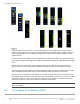
The second part of the configuration is the subnet Mask menu (Figure-5 item 8). The steps here is the same
as the IPv4 address setting. When done, press the “Gateway” button at the bottom of the screen.
The last part of the configuration is the Gateway menu (Figure-5 item 9). The steps here is the same as the
IPv4 address setting. When done, press the “Save” button at the bottom of the screen. You may see the Save
in-progress icon (Figure-5 item 10) for a brief time. When the save is complete, you will see the “Success”
menu (Figure-5 item 11). Press “Close” button to conclude the configuration.
NOTE: Although the configuration has concluded, the information in the LCD may take a few seconds to
reflect the changes.
B.3 (C) Configure IPv4 network to DHCP