Dell Smart Plug-in For HP Operations Manager 9.
メモ、注意、警告 メモ: コンピュータを使いやすくするための重要な情報を説明しています。 注意: ハードウェアの損傷やデータの損失の可能性を示し、その問題を回避するための方法を説明して います。 警告: 物的損害、けが、または死亡の原因となる可能性があることを示しています。 著作権 © 2015 Dell Inc. 無断転載を禁じます。 この製品は、米国および国際著作権法、ならびに米国および国際知的財産 法で保護されています。Dell™、およびデルのロゴは、米国および / またはその他管轄区域における Dell Inc. の商標です。 本書で使用されているその他すべての商標および名称は、各社の商標である場合があります。 2015 - 04 Rev.
目次 Dell SPI for HPOM for Microsoft Windows について.........................................4 Dell SPI のインストールの必要条件........................................................................5 管理サーバーのソフトウェア要件......................................................................................................... 5 管理下システムのソフトウェア要件..................................................................................................... 6 対応ファームウェアバージョン......................................................................
Dell SPI for HPOM for Microsoft Windows について 『Dell Smart Plug-in(SPI)for Hewlett Packard Operations Manager (HPOM) 9.0 for Microsoft Windows バ ージョン 4.
Dell SPI のインストールの必要条件 Dell SPI のインストールの要件は次のとおりです。 • Dell SPI を HPOM 9.0 for Windows 管理サーバーのみにインストールしていることを確認する。 • HPOM 管理サーバーにシステム管理者および HP_OVE_ADMIN 権限があることを確認する。 • 管理サーバーに.Net Framework 3.5 がインストールされていることを確認する。 管理サーバーのソフトウェア要件 以下の表は管理サーバーのソフトウェア要件を示しています。 表 1. 管理サーバーのソフトウェア要件 要件 説明 Dell SPI for HPOM 9.0 for Microsoft Windows 対応 のオペレーティングシステム Dell SPI for HPOM 9.
要件 説明 Dell Connections License Manager(オプション) ライセンスサーバーは、Integrated Dell Remote Access Controller(iDRAC)を使用することによっ て、帯域外(OOB)メソッドで Dell サーバー、Dell ワークステション、または Dell PowerVault NX スト レージアレイを監視することを選択した場合にの み、インストールして設定してください。詳細につ いては、dell.com/support/manuals にある『Dell Connections License Manager インストールガイ ド』を参照してください。 管理下システムのソフトウェア要件 以下の表は管理下システムのソフトウェア要件を示しています。 メモ: ESXi を実行している Dell システムを監視するための WinRM 権限があることを確認する。 すべての管理下システムで DNS が正しく設定されており、管理下ノードに DNS 名前解決が可能な完全 修飾ドメイン名(FQDN)があることを確認します。 表 2.
要件 説明 ムを実行している Dell サーバー、Dell ワークステー ション、Dell PowerVault NX ストレージアレイでサ ポートされています。 ESXi を実行している Dell サーバーまたはワークス テーション上には Dell OpenManage Server Administrator vSphere Installation Bundle(VIB)を インストールし、OEM CIM プロバイダを有効にし て、管理サーバーがシステムと通信できるようにし ます。 OEM CIM プロバイダを有効にする、または Windows、ESXi、または Linux オペレーティングシ ステムを実行している Dell サーバー用に SNMP を 設定する場合の詳細に関しては、 「関連文書」を参照 してください。 対応ファームウェアバージョン 次の表は、Dell デバイスでサポートされているファームウェアバージョンのリストです。 表 3. Dell デバイス用の対応ファームウェアバージョン Dell デバイス 対応 OMSA バージョン 7.4~8.
Dell デバイス 対応 OMSA バージョン 対応ファームウェアバージョン デルの第 10 世代 PowerVault ス トレージアレイから第 12 世代 PowerVault ストレージアレイ 7.4~8.1 該当なし Dell ネットワークスイッチ 該当なし • S シリーズ – S6000(9.6.0.0 および 9.5.0.1) – S5000(9.6.0.0 および 9.1) – S4820T(9.6.0.0 および 9.5.0.1) – S4810(9.6.0.0 および 9.5.0.1) – S55(8.3.5.6) • – S60(8.3.3.10) Z シリーズ – Z9500(9.6.0.0 および 9.5.0.1) • – Z9000(9.6.0.0 および 9.5.0.1) M シリーズ – MXL(9.6.0.0 および 9.5.0.1) • – MIOA(9.6.0.0 および 9.5.0.1) N シリーズ • – 6.1.2.4 および 6.1.1.7 8100 シリーズ • – 5.1.4.5 および 5.1.3.
Dell SPI for HPOM for Microsoft Windows のインストール Dell SPI をインストールする前に、HPOM コンソールを閉じる必要があります。 HPOM 管理サーバーに Dell SPI をインストールするには次の手順を実行します。 1. デルサポートサイト dell.com/support から Dell SPI インストーラをダウンロードします。 2. 管理サーバーで Dell_Smart_Plug-in v4.1_Axx.exe を解凍します。 3. Dell_Smart_Plug-in v4.1_Axx.exe の内容を解凍したディレクトリに移動して、Dell Smart Plug-in v4.1_x64.msi を実行します。 4. ようこそ 画面で、次へ をクリックします。 5. ライセンス契約に同意する オプションを選択して 次へ をクリックします。 6. 対応マニュアルと場所 画面で、次へ をクリックします。 7. Dell Smart Plug-in v4.
• 2. 3. 4. Dell DRAC • DRAC5 • iDRAC6 モジュラー • iDRAC6 モノリシック • iDRAC7 モジュラー • iDRAC7 モノリシック • iDRAC8 モジュラー • iDRAC8 モノリシック Dell ネットワークスイッチ • 8000 | 8100 シリーズスイッチ • M シリーズスイッチ • N シリーズスイッチ • S シリーズスイッチ • Z シリーズスイッチ Dell サーバー • 5. 6.
図 1.
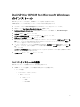
• ノード階層 – Dell 管理下システム a. b. c. Dell シャーシ * CMC * FX2 CMC * VRTX CMC Dell DRAC * DRAC5 * iDRAC6 モジュラー * iDRAC6 モノリシック * iDRAC7 モジュラー * iDRAC7 モノリシック * iDRAC8 モジュラー * iDRAC8 モノリシック Dell ネットワークスイッチ * d. e. * M シリーズスイッチ * N シリーズスイッチ * S シリーズスイッチ * Z シリーズスイッチ Dell サーバー * モジュラーサーバー * モノリシックサーバー Dell ストレージ * Compellent ストレージ * EqualLogic PS Series ストレージ * PowerVault MD ストレージ * PowerVault NX ストレージ f. 応答のない Dell デバイス g.
図 2. インストール後の Dell ハードウェアノードの階層 2. ポリシー管理 → ポリシーグループ → Dell デバイス用 SPI と移動します。 a. Dell デバイス用 SPI に次のポリシーが存在することを確認します。 • Dell サーバー • Dell ストレージ • Dell スイッチ • Dell ワークステーション • Dell Connections License Manager のスケジュールされた状態ポーリング • Dell デバイスの汎用トラップ • Dell ハードウェアの自動グループ化ポリシー b.
• Dell DRAC およびシャーシのトラップ • Dell DRAC およびシャーシのトラップ(手動確認) • デルエージェントフリーサーバーのトラップ • デルエージェントフリーサーバーのトラップ(手動確認) • Dell サーバーのスケジュールされた状態ポーリング • Dell サーバートラップ • Dell サーバーのトラップ(手動承認) c.
4. • Dell ハードウェアの自動グループ化ポリシー • Dell N シリーズネットワークスイッチのスケジュールされた状態ポーリング • Dell PowerVault MD ストレージのスケジュールされた状態ポーリング • Dell PowerVault MD ストレージのトラップ(手動確認) • Dell PowerVault NX ストレージのスケジュールされた状態ポーリング • Dell サーバーのスケジュールされた状態ポーリング • Dell サーバーのトラップ • Dell ワークステーションのスケジュールされた状態ポーリング 以下のツールが、ツール 下にあるそれぞれの該当するフォルダに表示されていることを確認します。 a.
– Dell Compellent Storage Manager コンソール • Dell EqualLogic PS-Series ストレージ – EqualLogic Group Manager コンソール • Dell PowerVault MD ストレージ – MD Storage Manager コンソール • Dell PowerVault NX ストレージ – OpenManage Server Administration コンソール – Dell OpenManage Server Administration Web Server コンソール – Dell Remote Access Controller コンソール (帯域内) h. 以下のツールは、ツール → Dell ツール → Dell ワークステーション に表示されます。 5.
次に行う手順 Dell SPI のインストール後、対応 Dell デバイスのための SNMP パラメータ、OOB サーバー監視のための Dell Connections License Manager(DCLM)パラメータ、および ESXi システムのための WSMAN パラメータを 設定し、管理サーバーと Dell システムとの間の通信が正しく確立されることを確認します。通信パラメータ を設定するには、Dell SPI インストーラの一部である DellSPICongfigUtility.
以下の表では、 SNMP、Dell OpenManage Server Administrator Web Server コンソール URL、WSMAN、 DCLM、および保証レポート URL に異なる値を設定するためのコマンドラインオプションがリストされてい ます。 表 4. コマンドラインオプション オプション 説明 -snmptimeout ミリセカンドの単位で SNMP タイムアウト値を指定 します。デフォルト値は 5000 (5 秒)。100 ミリセ カンドから 4294967290 ミリセカンドまでの値を 設定します。 -snmpretries SNMP の再試行数を指定します。デフォルト値は 1 です。 - dwsurl Dell OpenManage Server Administrator ウェブサー バーコンソール URL を指定します。 例:https://dwshost:1311/ -dclmwebserviceurl DCLM の URL を指定します。 例: http://dclmserver.domain.
オプション 説明 ログインするための WSMAN のユーザー名を指定し ます。 -wsmanpassword 指定したユーザー名用のパスワードを指定します。 -wsmancacheck 証明書を発行した認証局の認証を省略します。値は yes または no のいずれかです。デフォルト値は no です。この値を yes に設定すると、認証機関の認 証チェックが実行されます。 -wsmancncheck 共通名(CN)の認証を省略します。値は yes また は no のいずれかです。デフォルト値は no です。 この値を yes に設定すると、共通名がチェックされ ます。 -wsmanrevocationcheck WSMAN 接続がサーバー証明書の失効状態を検証す るかどうかを指定します。値は yes または no で す。デフォルト値は no です。この値を yes に設定 すると、サーバー証明書の失効ステータスのチェッ クがされます。 -wsmantimeout ミリセカンドの単位で WSMAN タイムアウト値を指 定します。デフォルト値は 30000(30 秒)。500 ミ リセカンド
• パスワードを変更する場合は、古いパスワードを入力してから、新しいパスワードを 2 回入力する プロンプトが表示されます。 • パスワードを最初に指定するときには、そのパスワードを 2 回入力する必要があります。 メモ: ユーザー名 を変更した場合でも、ユーティリティによって パスワード を変更するようプロ ンプトが表示されます。 無効な値を入力した場合、ユーティリティによりエラーメッセージとヘルプテキストが表示されま す。 wsmanusername および wsmanpassword 以外の各オプションの値を確認するには、 DellSPIConfigUtility.exe -
Dell Connections License Manager URL の設定 Dell Connections License Manager(DCLM)の URL を設定するには、次の手順を実行します。 1. ツール → Dell ツール → Dell SPI ライセンス → Dell Connections License Manager コンソール起動ツ ール をクリックします。 2. 右のペインで、Dell License Manager コンソールの起動ツール を右クリックして、ポップアップメニュ ーから プロパティ をクリックします。 Dell Connections License Manager コンソール起動ツールのプロパティ ウィンドウが表示されます。 3. Dell Connections License Manager コンソール起動ツールのプロパティ ウィンドウで、詳細 タブをク リックします。 4. URL:(必須) ボックスで、Dell Connections License Manager コンソール の URL を入力します。 5.
詳細については、dell.com/support/manuals で『Dell OpenManage Power Center ユーザーズガイド』 を参照してください。 2. HPOM コンソールで、ツール → Dell ツール を選択します。 3. 右のペインで OpenManage Power Center コンソール を右クリックして、ポップアップメニューから プロパティ をクリックします。 OpenManage Power Center コンソールプロパティ ウィンドウが表示されます。 4. OpenManage Power Center コンソールプロパティ ウィンドウで、詳細 タブをクリックします。 5. コマンドタイプ:(必須) ドロップダウンリストで、URL を選択します。 6.
Dell OpenManage Network Manager(OMNM)ツールの設 定 Dell OMNM ツールを設定するには、次の手順を実行します。 1. Dell OpenManage Network Manager をインストールします。 詳細については、dell.com/support/manuals で『Dell OpenManage Network Manager クイックスタ ートガイド』を参照してください。 2. HPOM コンソールで、ツール → Dell ツール → Dell ネットワークスイッチをクリックします。 3. 右のペインで、OpenManage Network Manager コンソール を右クリックして、ポップアップメニュー の プロパティ をクリックします。 Dell OpenManage Network Manager コンソールプロパティ ウィンドウが表示されます。 4. Dell OpenManage Network Manager コンソールプロパティ ウィンドウで、詳細 タブをクリックしま す。 5.
6. EnterpriseClient.exe のパスを取得します デフォルトコマンド:/c "cd C:\Program Files (x86)\Compellent Technologies\Compellent Enterprise Manager\msagui\" & start EnterpriseClient.exe 7. コマンド:(必須)ボックスで、EnterpriseClient.exe の場所の詳細を入力するか、参照 をクリックし て、EnterpriseClient.exe ファイルをインストールする場所に移動します。 8. 適用 をクリックします。 9. OK をクリックします。 Dell Compellent Enterprise Manager クライアントコンソール は、HPOM コンソールに設定されてい ます。 Dell スイッチの Telnet ツールの設定 Dell スイッチの Telnet ツールを設定するには、次の手順を実行します。 1. サーバーマネージャ で、機能 → 機能の追加 をクリックします。 機能の選択 画面が表示されます。 2.
図 3.
図 4.
Connections License Manager ドメイング ループの作成 Dell Connections License Manager のインストール中、Windows Server Active Directory 内に次のグループ が作成されます。 • Dell Connections License 管理者 • Dell Connections License オペレータ • Dell Connections License ユーザー 上記のドメイングループがインストール中に自動的に作成されない場合は、グループを手動で作成します。 ドメインを作成してドメインにユーザーを追加するには、Microsoft(technet.microsoft.
Dell デバイスの削除 Dell デバイスを HPOM コンソールから取り外すには、次の手順を実行します。 1. HPOM コンソールから Dell デバイスを取り外すには、 「HP Operations Manager オンラインヘルプ」の 「ノードの管理」にある、「管理対象ノードの削除、コピー、移動」の項を参照してください。 2. デルの第 12 世代以降の PowerEdge サーバー、Dell PowerVault ストレージサーバー、または Dell ワー クステーションを HPOM コンソールから削除する前に、次の手順を実行して、取得した Dell Connections License を放棄します。 a. 管理サーバーでコマンドプロンプトを起動します。 b. DellSPIConfigUtility.exe に移動します。 デフォルトの場所は、C:\Program Files\Dell\OpenManage Connection for HP です。 c. 次のコマンドを入力します。 DellSPIConfigUtility.
インストーラの修復オプションの使用 Dell デバイス用 SPI ポリシーグループ、または管理サーバーのポリシーインベントリからポリシーを誤って 削除した場合、Dell SPI インストーラの 修復 オプションを使用してポリシーを再インストールします。 自動導入 オプションが選択されていると、この 修復 オプションは管理サーバーに欠落している Dell SPI ポ リシーをインストールし、自動的にポリシーを導入します。修復 オプションを使用する前に、HPOM コンソ ールで HPOM 管理サーバーノードからすべての Dell SPI ポリシーを削除するか、または導入解除するように してください。 メモ: ポリシーの変更を行った後に削除した場合、修復 オプションではポリシーのオリジナルバージョ ンのみをインストールします。必要に応じて、ポリシーを再度変更してください。修復オプションは、 インストール手順中に Dell SPI の設定を維持 にチェックを入れていない場合に限り、SNMP、 WSMAN、DWSURL、DCLM Webservice URL、および保証レポートの URL パラメータの値をすべてデ フォ
7. 修復プロセスが完了したら、終了 をクリックします。 Windows コントロールパネルを使用した Dell SPI プログラ ム機能の修復 Windows コントロールパネルを使用して Dell SPI プログラム機能を修復するには、次の手順を行います。 1. スタートメニューから、コントロールパネル → プログラム → プログラムのアンインストールをクリッ クします。 2. プログラムのアンインストールまたは変更 ウィンドウで、Dell Smart Plug-in for HP Operations Manager for Windows バージョン 4.1 を選択し、修復 をクリックして、修復プロセスを開始します。 DellSPIConfigUtility.
Dell SPI バージョン 4.1 へのアップグレー ド 管理サーバーに Dell SPI バージョン 3.0 以降をインストールした場合、それをバージョン 4.1 にアップグレ ードすることができます。 バージョン 3.0 以降からアップグレードすると、既存のポリシーがバージョン 4.0 にアップグレードされ、 既存の Dell グループは自動的に ノード および サービス から削除されて、再度作成されます。 メモ: アップグレードプロセスでは、ポリシーファイルのスケジュール設定は維持されません。ただし、 DellSPIConfigUtility.exe 使用して設定されたパラメータは保持されます。 Dell SPI のアップグレード 1. 解凍先のフォルダから Dell Smart Plug-In v4.1.msi を実行します。 ようこそ スクリーンが表示されます。Dell SPI の別バージョンがインストールされており、新しいバー ジョンにアップグレードしたいかどうかをたずねるメッセージも表示されます。 2. はい をクリックしてインストールを続行します。 3.
Dell SPI for HPOM for Microsoft Windows のアンインストール Dell SPI のアンインストールは、Windows のコントロールパネル、または Dell SPI インストーラの 削除 オ プションから行うことができます。Dell SPI をアンインストールする際、ファイルやスクリプトといった Dell SPI コンポーネントは、インストールされているシステムから削除されます。 Dell SPI をアンインストールする前に、次の要件が満たされていることを確認します。 • 管理サーバー上で Dell ポリシーが実行されていないこと。 • HPOM コンソール上の HPOM 管理サーバーから、すべての Dell SPI ポリシーが削除または展開解除され ていること。 • Dell SPI ディレクトリが閉じていること。 注意: HPOM をアンインストールする前に、Dell SPI をアンインストールしてください。HPOM を先に アンインストールしてから Dell SPI をアンインストールしようとすると、アンインストールプロセスが エラーを伴って失敗する場合が
メモ: Windows のコントロールパネルにある 変更 オプションを使用して、Dell SPI のプログラム 機能も削除できます。 インストーラを使用した Dell SPI の削除 インストーラを使用して Dell SPI を削除するには、次の手順を実行します。 1. 自己解凍パッケージ Dell Smart Plug-in v4.1_Axx.exe の内容を解凍したフォルダから、Dell Smart Plug-In v4.1_x64.msi を実行します。 ようこそ 画面が表示されます。 2. 次へ をクリックします。 インストーラに 2 つのオプション、修理 と 削除 が表示されます。 3. 削除 を選択し、次へ をクリックします。 プログラムの削除 画面が表示されます。 4.
関連文書 本ガイドに加え、デルサポートサイト dell.com/support/manuals で利用できる次のガイドにアクセスする ことができます。マニュアルページで、ソフトウェアとセキュリティ → エンタープライズシステム管理 を クリックします。右側の該当する製品リンクをクリックして、マニュアルにアクセスします。 たとえば、Dell SPI マニュアルを表示するには、ソフトウェアとセキュリティ → エンタープライズシステム 管理 → Dell Smart Plug-in for HP Operations Manager Version 9.0 for Microsoft Windows をクリックし ます。 • Dell Smart Plug-in for HP Operations Manager Version 9.0 for Microsoft Windows バージョン 4.