
Users Guide


4 When the correct time zone is displayed, type 1 and press Enter to save the changes.
5 When the time zone is set, press Enter to return to the main menu.
Congure the Network Settings of DSITV
1 Log in to DSITV.
2 At the CLI prompt, type 2 and press Enter.
3 Type the host name of DSITV and press Enter.
4 Type the IP address of DSITV for the management network and press Enter.
5 Type the network mask for the management network and press Enter.
6 Type the gateway IP address for the management network and press Enter.
7 Type the IP address of the DNS server for the management network and press Enter.
8 To specify a second DNS server, type the IP address of the DNS server for the management network and press Enter. Otherwise,
press Enter to skip this step.
9 When the values that you entered in the previous steps are displayed on the screen, type y and press Enter to save the changes.
10 When the network settings are congured, press Enter to return to the main menu.
(Optional) Change the Root Password of DSITV
1 Log in to DSITV.
2 At the CLI prompt, type 13 and press Enter.
3 Type the new root password and press Enter.
4 Type the new root password again and press Enter.
5 When the root password is changed, press Enter to return to the main menu.
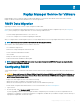
Display the Current Version of DSITV
1 Log in to DSITV.
2 At the CLI prompt, type 15 and press Enter. The following options are displayed:
-------------------------------------------
1. Appliance version
2. Check for updates
3. Install update
4. Return to main menu
Enter selection [1 - 4]:
NOTE
: Options 2 and 3 are not applicable for updates from DSITV version 4.x to DSITV version 5.x.
3 Type 1 and press Enter. The current version of the virtual appliance is displayed.
Version - 05.00.02.XXX
Description - Updates to the Dell Storage Integration
Tools for VMware appliance
press [enter] to continue...
4 Press Enter to return to the virtual appliance update menu.
8
Installing DSITV