
Install Guide


b. (Optional) Under Data Collector Service Information, modify the default Data Collector ports if one or more of the default
ports are already in use.
NOTE: If a rewall is enabled on the host computer, make sure that these ports are allowed inbound.
c. In the Data Source Type drop-down menu, select a database type.
d. In the Service User Type drop-down menu, select the type of Windows account under which the Data Collector will run.
NOTE: User accounts (local or domain) must be able to log in as a service and must have administrator
privileges.
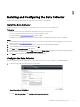
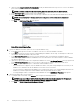
e. Click Next. The Data Source Properties page appears.
Figure 3. Data Source Properties Page
2. Specify the database information. (Microsoft SQL or MySQL databases only)
a. In the Server eld, type the host name or IP address of the server on which the database is installed.
b. In the Port eld, type the TCP port that was congured during the database TCP/IP setup. The default port for Microsoft
SQL Server is 1433 and the default for MySQL is 3306.
c. In the User Name/Password elds, type the user name and password for a user dened in the database that has
administrator rights to create databases and database users. The Data Collector uses this information to create a database
user named compmsauser.
d. (Optional) To specify a password for the compmsauser database user, select Use Custom Password, then type a password
in the DSM DB User Password eld. If you do not specify a password, a 13‑character default password is used.
e. Click Next. Storage Manager attempts to communicate with the database server.
• If a communication error appears, verify the database information, verify that Storage Manager has connectivity to the
database server, and make sure that the database server allows remote connections.
• If a user-creation error appears and the database server was previously used to store Storage Manager data, delete the
database user named compmsauser and the database named compmsadb, and then try again.
• If Storage Manager is able to communicate with the database server, the SMI‑S Server Properties page appears.
3. (Optional) Congure SMI-S Server Properties.
a. To congure SMI-S at this time, select Enabled, then congure the remaining properties.
NOTE: You can also congure SMI-S after the Data Collector is installed and congured. For information on
setting up and using SMI-S, see the
Dell Storage Manager Administrator’s Guide
.
b. Click Next. The Network Adaptor and Max Memory Settings page appears.
20
Installing and Conguring the Data Collector