
Administrator Guide


Creating Volumes
Create volumes to present servers a logical unit of storage on a Storage Center.
NOTE: For user interface reference information, click Help.
Create a Volume Using Single-Step Dialog
If you need a small number of volumes, you can create them one at a time.
Prerequisite
The options for Volume QoS Prole and Group QoS Prole appear on the dialog box only if Allow QoS Prole Selection has been selected
on the Storage Center Preferences.
Steps
1 If the Storage Manager Client is connected to a Data Collector, select a Storage Center from the Storage view.
2 Click the Storage tab.
3 In the Storage tab navigation pane, select Volumes.
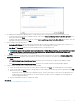
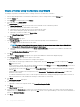
4 In the right pane, click Create Volume. The Create Volume dialog box opens.
5 In the Name eld, type a name for the volume.
6 In the Size eld, type a size for the volume in kilobytes (KB), megabytes (MB), gigabytes (GB), or terabytes (TB).
NOTE
: A volume with a congured size greater than half the supported maximum volume size, as dened in the Storage
Center Release Notes, does not support view volumes.
7 In the Volume Folder pane, select the parent folder for the volume.
8 (Optional) Congure the remaining volume attributes as needed.
• To schedule snapshot creation and expiration for the volume, apply one or more Snapshot Proles by clicking Change across from
Snapshot Proles.
• To map the volume to a server, click Change across from Server.
• If Chargeback is enabled, select the department to charge for storage costs associated with the volume by clicking Change across
from Chargeback Department.
• If Data Reduction is enabled on the Storage Center, select Compression or Deduplication with Compression to enable Data
Reduction on the volume.
• To use specic disk tiers and RAID levels for volume data, select the appropriate Storage Prole from the Storage Prole drop-
down menu. Using the Recommended Storage Prole allows the volume to take full advantage of data progression.
• If more than one Storage Type is dened on the Storage Center, select the Storage Type to provide storage from the Storage
Type drop-down menu.
• To set a Volume QoS Prole, either accept the default QoS Prole or click Change across from Volume QoS Prole. Then select a
Volume QoS prole from the resulting list, and click OK.
• To set a Group QoS Prole, click Change across from Group QoS Prole. Then select a Group QoS prole from the resulting list,
and click OK.
• To adjust the Read/Write Cache, enter the desired size of the cache.
• To congure Replications and Live Volumes if they are licensed, select Replications and Live Volumes.
9 Click OK.
Storage Center Administration
109