Dell Storage vSphere Web Client Plugin Version 4.
Anmerkungen, Vorsichtshinweise und Warnungen ANMERKUNG: Eine ANMERKUNG liefert wichtige Informationen, mit denen Sie den Computer besser einsetzen können. VORSICHT: Ein VORSICHTSHINWEIS macht darauf aufmerksam, dass bei Nichtbefolgung von Anweisungen eine Beschädigung der Hardware oder ein Verlust von Daten droht, und zeigt auf, wie derartige Probleme vermieden werden können.
Inhaltsverzeichnis Einleitung...................................................................................................................................................................................... 6 Versionsverlauf.......................................................................................................................................................................6 Zielgruppe........................................................................................................
Erstellen von virtuellen Maschinen....................................................................................................................................48 Bereitstellen virtueller Maschinen für einen vorhandenen VMFS- oder NFS-Datenspeicher............................. 48 Bereitstellen virtueller Maschinen für einen neuen VMFS-Datenspeicher.............................................................
Hosts und Cluster................................................................................................................................................................82 Hostauswahl für Snapshot-Wiederherstellung................................................................................................................ 82 Live Volumes..................................................................................................................................................................
Einleitung Das Dell Storage vSphere Web Client Plugin Administrator’s Guide (Administratorhandbuch zum Dell Storage vSphere Web Client Plugin) enthält Anweisungen zum Installieren, Konfigurieren und Verwenden des Dell Storage vSphere Web Client Plugin. Mit dem Plugin können Sie Dell Speicher über den VMware vSphere Web Client verwalten. Versionsverlauf Dokumentnummer: 680-054-007 Revision Datum Beschreibung A Februar 2017 Dell Storage vSphere Web Client Plugin Version 4.
1 Erste Schritte Einführung in das vSphere Web Client Plugin Das Dell Storage vSphere Web Client Plugin ermöglicht die Verwaltung von Dell Storage. ANMERKUNG: Verwenden Sie den VMware vSphere Web Client zur Ausführung aller in diesem Handbuch beschriebenen Konfigurationsverfahren, sofern nicht anders angegeben.
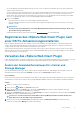
Folgende Voraussetzungen müssen erfüllt sein, wenn Sie iSCSI-Verbindungen für Replikationen verwenden: • • Das Ziel-Storage Center muss als iSCSI-Remote-System auf dem Quell-Storage Center definiert sein. Das Quell-Storage Center muss als iSCSI-Remote-Verbindung auf dem Ziel-Storage Center definiert sein. Informationen zum Konfigurieren von iSCSI-Verbindungen zwischen Storage Center finden Sie im Dell Storage Manager Administrator’s Guide (Dell Storage Manager-Administratorhandbuch).
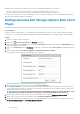
Die Storage Manager-Benutzeranmeldeinformationen steuern, welche Storage Center und FluidFS-Cluster im vSphere Web Client Plugin verwaltet werden können. Um ein Storage Center oder einen FluidFS-Cluster zum vSphere Web Client Plugin hinzuzufügen, melden Sie sich unter Verwendung derselben Benutzeranmeldeinformationen beim Storage Manager-Client an. Fügen Sie die zu verwaltenden Storage Center bzw. FluidFS-Cluster hinzu.
Abbildung 2. Dialogfeld für Anmeldeinformationen des „Connection Manager“ (Verbindungsmanager) 6. Klicken Sie auf Edit (Bearbeiten). Das Dialogfeld Connection Manager (Verbindungsmanager) wird angezeigt. (Siehe Abbildung 1. Dialogfeld „Connection Manager-Anmeldeinformationen“). 7. Ändern Sie die vCenter- und Storage Manager-Anmeldeinformationen nach Bedarf ab und klicken Sie auf Submit (Senden). Klicken Sie zum Löschen der vCenter- und Storage Manager-Anmeldeinformationen auf Delete (Löschen).
Abbildung 3. Zusammenfassende Informationen zu Storage Center Kennzeichnung Beschreibung Controller Information (Controller-Informationen) Zeigt Netzwerk- und Statusinformationen zu den Storage Center-Controllern an Storage Type Information (Speichertypinformationen) Zeigt die im Storage Center definierten Speichertypen an Zusammenfassende Informationen zu FluidFS Die folgende Abbildung veranschaulicht die zusammenfassenden Informationen für einen FluidFS-Cluster. Abbildung 4.
Kennzeichnung Beschreibung FluidFS Cluster Information (FluidFS-ClusterInformationen) Zeigt Details zu FluidFS-Geräten und den zugehörigen Controllern an NAS Pool Capacity Statistics (NAS-PoolKapazitätsstatistik) Zeigt Informationen zur Poolkapazität und zum Speicherplatz für einen NAS-Pool an Anzeigen von Überwachungsdaten zu Dell Speicher Sie können Leistungs- und Nutzungsinformationen für Storage Center und FluidFS-Cluster auf der Registerkarte Monitor (Überwachung) anzeigen. Schritte 1.
Abbildung 5. Storage Center-Diagrammdaten Kennzeichnung Beschreibung KB/s-Diagramm Read KB/sec (KB/s Lesen) – Übertragungsrate der Lesevorgänge in Kilobyte pro Sekunde Total KB/sec (KB/s Gesamt) – Kombinierte Übertragungsrate der Lese- und Schreibvorgänge in Kilobyte pro Sekunde.
Abbildung 6.
Abbildung 7.
Abbildung 8.
2 Arbeiten mit Dell Speicher Einführung in Dell Speicher Administratoren können das Dell Storage vSphere Web Client Plugin zur Verwaltung von Dell Speicher auf einem Storage Center oder FluidFS-Cluster verwenden. Ein Storage Center konfiguriert und verwendet Speicher auf der Grundlage folgender Einstellungen. Speicherbegriff Beschreibung Speicherschicht Speicherschichten stellen die Klassifizierung aller physischen Speichermedien im Storage Center dar.
Speicherbegriff Beschreibung • • möchten. Die Anwendung dieses Profils auf ein Volume verhindert, dass die VolumeDaten in eine andere Schicht verschoben werden. „Medium Priority“ (Mittlere Priorität): Verwenden Sie das Profil „Medium Priority“ (Mittlere Priorität) nur für Volumes, die Daten enthalten, die Sie in Schicht 2 beibehalten möchten. Die Anwendung dieses Profils auf ein Volume verhindert, dass die Volume-Daten in eine andere Schicht verschoben werden.
Erstellen und Verwalten von VMFSDatenspeichern und Rohgeräten auf Storage Centern Mit dem vSphere Web Client Plugin können Sie Dell Volumes erstellen und verwalten, die als VMFS-Datenspeicher ESXi-Hosts oder Clustern auf einem Storage Center zugewiesen sind, sowie Volumes, die virtuellen Maschinen als Rohgeräte (RDMs) zugewiesen sind.
7. Wählen Sie aus den folgenden Schritten, die für Ihre Umgebung relevant sind. Welche Schritte anzuwenden sind, hängt von den Einstellungen der Benutzereinstellungen des Storage Center-Benutzers in Storage Manager ab. a) Geben Sie den Namen und die Größe für das neue Volume ein, wählen Sie den Volume-Ordner aus und klicken Sie auf Weiter. b) Wählen Sie den zu verwendenden Seitenpool für die Erstellung des Volumes aus. c) Wählen Sie gegebenenfalls die Speicheroptionen für dieses Volume aus.
Schritte 1. Wählen Sie ein Objekt aus dem Bestand aus, das als übergeordnetes Objekt eines Datenspeichers fungieren kann: • • • Rechenzentrum Host Cluster 2. Wählen Sie Aktionen > Alle Aktionen für Dell Storage > Datenspeicher hinzufügen aus. Der Assistent Add Datastore (Datenspeicher hinzufügen) wird aufgerufen. 3. Wählen Sie bei Bedarf einen oder mehrere Hosts aus, dem/denen Sie das neue Volume zuweisen möchten, und klicken Sie auf Next (Weiter). 4.
4. Wählen Sie Create New Dell Volume (Neues Dell Volume erstellen) aus, und klicken Sie auf Next (Weiter). 5. Wählen Sie zwischen folgenden Schritte entsprechend Ihrer Umgebung. Die anwendbaren Schritte hängen von den BenutzerEinstellungen des Storage Center-Benutzers in Storage Manager ab. a) Geben Sie den Namen und die Größe für das neue Volume ein, wählen Sie den Volume-Ordner aus, und klicken Sie auf Next (Weiter). b) Wählen Sie den zu verwendenden Seitenpool für die Erstellung des Volumes aus.
Schritte 1. Wählen Sie einen Datenspeicher. 2. Wählen Sie Actions (Aktionen) > All Dell Storage Actions (Alle Aktionen für Dell Speicher) > Edit Volume Settings (Volume-Einstellungen bearbeiten) aus. Der Assistent Live Volume Settings (Live Volume-Einstellungen) wird angezeigt. 3. Ändern Sie die Komprimierungseinstellungen. Klicken Sie auf Next (Weiter). Die Seite Ready to Complete (Bereit für Fertigstellung) wird angezeigt. 4. Klicken Sie auf Finish (Fertigstellen).
e) Wählen Sie die LUN für die Zuweisung des Volumes aus, und klicken Sie auf Next (Weiter). 9. Wählen Sie bei Bedarf das Protokoll für die Zuweisung aus, und klicken Sie auf Next (Weiter). 10. Wählen Sie den Kompatibilitätsmodus für das Rohgerät aus, und klicken Sie auf Next (Weiter). Die Seite Ready to Complete (Bereit für Fertigstellung) wird angezeigt. 11. Klicken Sie auf Finish (Fertigstellen).
Gerätekonfiguration Hostauswahl Zuweisungs-LUN Protokollauswahl Storage Center Auswählen eines Volumes Volume Zuweisen eines vorhandenen RDM zu zusätzlichen Hosts oder Clustern Ein RDM kann unter Verwendung des vSphere Web Client Plugin zusätzlichen Hosts oder Clustern zugewiesen werden. Schritte 1. Wählen Sie die virtuelle Maschine aus dem Bestand aus, die das Rohgerät enthält, das Sie zusätzlichen Hosts und/oder Clustern zuweisen möchten. 2.
Zugehörige Verweise Anpassen der Größe eines Datenspeichers Erweitern eines RDM Ein RDM kann unter Verwendung des vSphere Web Client Plugin neu dimensioniert (erweitert) werden. Schritte 1. Wählen Sie eine virtuelle Maschine aus dem Bestand aus, für das ein RDM erweitert werden soll. 2. Wählen Sie Actions (Aktionen) > All Dell Storage Actions (Alle Aktionen für Dell Speicher) > Extend Raw Device (Rohgerät erweitern) aus. Der Assistent Extend Datastore RDM (Datenspeicher-RDM erweitern) wird gestartet. 3.
Schritte 1. Wählen Sie eine virtuelle Maschine aus dem Bestand aus, für die ein RDM entfernt werden soll. 2. Wählen Sie Actions (Aktionen) > All Dell Storage Actions (Alle Aktionen für Dell Speicher) > Remove Raw Device (Rohgerät entfernen) aus. Der Assistent Remove Storage (Speicher entfernen) wird gestartet. 3. Wählen Sie ein oder mehrere zu entfernende RDMs aus. 4. Klicken Sie auf Next (Weiter). Die Seite Volume Retention (Volume-Aufbewahrung) wird angezeigt. 5.
• • Create a New NAS Volume Folder (Neuen NAS-Volume-Ordner erstellen) – Standardmäßig wird der Ordnername aus dem von Ihnen eingegebenen Datenspeichernamen abgeleitet. Use Existing NAS Volume Folder (Vorhandenen NAS-Volume-Ordner verwenden) – Navigieren Sie zu dem gewünschten Ordner. 9. Geben Sie die FluidFS-Cluster-VIP in das Feld FluidFS Cluster VIP or DNS Name (FluidFS-Cluster-VIP oder DNS-Name) ein. 10. Klicken Sie auf Next (Weiter).
a) Use Kerberos for authentication only (Kerberos nur für Authentifizierung verwenden) b) Use Kerberos for authentication and data integrity (Kerberos für Authentifizierung und Datenintegrität verwenden) 10. Klicken Sie auf Next (Weiter). Die Seite Ready to Complete (Bereit für Fertigstellung) wird angezeigt. 11. Klicken Sie auf Finish (Fertigstellen).
Es stehen nur Snapshot-Profile zur Auswahl, die bereits auf dem Storage Center definiert sind. Anweisungen zum Erstellen oder Ändern von Snapshot-Profilen finden Sie im Storage Center System Manager Administrator’s Guide (Storage Center System Manager Administratorhandbuch) bzw. im Dell Storage Manager Administrator’s Guide (Dell Storage Manager Administratorhandbuch).
Der Assistent Create Snapshot (Snapshot erstellen) wird gestartet. 3. Geben Sie einen Zeitpunkt für den Ablauf des Snapshot an. Wenn der Snapshot nicht ablaufen soll, markieren Sie das Kontrollkästchen Never Expire (Kein autom. Ablauf). 4. Klicken Sie auf Next (Weiter). Die Seite Ready to Complete (Bereit für Fertigstellung) wird angezeigt. 5. Klicken Sie auf Finish (Fertigstellen).
Zugehörige Verweise Snapshot-Auswahl Löschen von Snapshots von RDM-Volumes, die einer virtuellen Maschine zugeordnet sind Ein Snapshot eines RDM kann unter Verwendung des vSphere Web Client Plugin gelöscht werden. Schritte 1. Wählen Sie die virtuelle Maschine aus, für die Datenspeicher-Snapshots gelöscht werden sollen. 2.
11. Klicken Sie auf Finish (Fertig stellen). Zugehörige Verweise Datenspeichername Hostauswahl Zuweisungs-LUN Replay-Auswahl Wiederherstellen eines RDM anhand eines Storage Center-Snapshot Ein RDM kann unter Verwendung des vSphere Web Client Plugin wiederhergestellt werden. Voraussetzungen Es muss ein Snapshot des RDM vorhanden sein. Schritte 1. Wählen Sie die virtuelle Maschine aus, für die das RDM wiederhergestellt werden soll. 2.
Informationen über FluidFS-NAS-Volume-SnapshotZeitpläne Mithilfe von NAS-Volume-Snapshot-Zeitplänen können Sie in regelmäßigen Abständen (z. B. stündlich oder täglich) Snapshots erstellen, um eine vollständige Ansicht des Dateisystems über einen bestimmten Zeitraum hinweg zu erhalten. Mithilfe des Dell Storage vSphere Web Client Plugin können Sie Folgendes tun: • • • Einen Zeitplan erstellen, der den Namen des Snapshot-Zeitplans, die Häufigkeit der Snapshot-Erstellung und die Aufbewahrungszeit festlegt.
c) Geben Sie die Anzahl der Minuten an, um die die Erstellung von Snapshots eines NAS-Volumes verzögert werden soll. Geben Sie optional einen Offset-Wert ein, um mit der Erstellung von Snapshots einige Minuten nach der Stunde zu beginnen. Der Standardwert ist null (0) Minuten. 7. Wählen Sie Aufbewahrungszeitraum für Snapshots aus, um anzugeben, wie lange Snapshots gespeichert werden, bevor sie automatisch gelöscht werden.
Anzeigen von Zeitplänen über die Registerkarte „Überwachen“ Zeigen Sie zusammenfassende Informationen zu allen Snapshot-Zeitplänen für das ausgewählte NAS-Volume. Schritte 1. Wählen Sie einen NFS-Datenspeicher aus dem Bestand aus. Das vSphere Web Client-Plugin lädt Informationen für den ausgewählten Datenspeicher.
Schritte 1. Wählen Sie einen NFS-Datenspeicher aus dem Bestand aus. 2. Wählen Sie Aktionen > Alle Aktionen für Dell Storage > Snapshot > Snapshot/Snapshot-Zeitplan bearbeiten aus. Der Assistent Snapshot/Snapshot-Zeitplan bearbeiten wird gestartet. 3. Wählen Sie auf der Seite Snapshot/Snapshot-Zeitplan bearbeiten Snapshot aus und klicken Sie auf Weiter. 4. Wählen Sie den Snapshot aus der Liste der Zeitpläne in der Tabelle aus. 5.
Löschen von NAS-Volume-Snapshot-Zeitplänen Zeigen Sie alle verfügbaren Snapshot-Zeitpläne an und wählen Sie anschließend einen oder mehrere Zeitpläne aus und löschen Sie sie. Schritte 1. Wählen Sie einen NFS-Datenspeicher aus dem Bestand aus. 2. Wählen Sie Aktionen > Alle Aktionen für Dell Storage > Snapshot > Snapshot/Snapshot-Zeitplan löschen aus. Der Assistent Snapshot/Snapshot-Zeitplan löschen wird gestartet. 3.
• Informationen zum Konfigurieren von iSCSI-Verbindungen zwischen Storage Center finden Sie im Dell Storage Manager Administrator’s Guide (Dell Storage Manager-Administratorhandbuch). Mindestens eine Quality-of-Service (QoS) Definition muss auf dem Quell-Storage Center für die Replikation eingerichtet werden. Anweisungen zur Erstellung von QoS-Definitionen finden Sie im Dell Storage Manager Administrator's Guide (Dell Storage Manager Administratorhandbuch). Schritte 1.
• • Replication, Synchronous – High Availability (Replikation, synchron – Hohe Verfügbarkeit) Replication, Synchronous – High Consistency (Replikation, synchron – Hohe Konsistenz) 8. Legen Sie die weiteren Replikationseinstellungen sowie einen Zielspeicherort fest, wie unter Replikationsoptionen angegeben. 9. Klicken Sie auf Next (Weiter). Die Seite Ready to Complete (Bereit für Fertigstellung) wird angezeigt. 10. Klicken Sie auf Finish (Fertigstellen).
5. Um den Replikationstyp zu ändern, wählen Sie einen neuen Typ aus dem Drop-down-Menü aus. ANMERKUNG: Wenn Sie den Replikationstyp von einer Replikation in ein Live Volume ändern möchten, wird ein Warnungsdialogfeld angezeigt. Aktivieren Sie das Kontrollkästchen zum Bestätigen des Konvertierungsvorgangs und klicken Sie anschließend auf OK. 6. Ändern Sie die übrigen Replikationseinstellungen nach Bedarf. 7.
Zugehörige Verweise Optionen zum Löschen von Replikationen Auswählen von Replikationen Live Volume-Vorgänge Mit dem Dell Storage vSphere Web Client Plugin können Sie Live Volumes für Datenspeicher und RDMs hinzufügen, ändern und entfernen. Sie können auch automatische Failover- und Wiederherstellungsfunktionen konfigurieren. Hinzufügen eines Live Volume zu einem Datenspeicher oder RDM Verwenden Sie das Dell Storage vSphere Web Client Plugin, um Live Volumes zu Datenspeichern und RDMs hinzuzufügen.
Hinzufügen eines Live Volumes zu einem RDM Verwenden Sie das Dell Storage vSphere Web Client Plugin, um Live Volumes zu RDMs hinzuzufügen. Schritte 1. Wählen Sie die virtuelle Maschine mit dem zu replizierenden RDM aus. 2. Wählen Sie Actions (Aktionen) > All Dell Storage Actions (Alle Aktionen für Dell Speicher) > Replications/Live Volume (Replikationen/Live Volume) > Add (Hinzufügen) aus. Der Assistent Add Replications/Live Volume (Replikationen/Live Volume hinzufügen) wird gestartet. 3.
Der Assistent Modify Replications/Live Volume (Replikationen/Live Volume ändern) wird gestartet. 3. Wählen Sie aus der Liste der Replikationen die zu ändernde Replikation aus. 4. Klicken Sie auf Next (Weiter). Die Seite Replications Options (Replikationen-Optionen) wird angezeigt. 5. Um den Replikationstyp zu ändern, wählen Sie einen neuen Typ aus dem Drop-down-Menü aus. ANMERKUNG: Wenn Sie den Replikationstyp von einem Live Volume in eine Replikation ändern möchten, wird ein Warnungsdialogfeld angezeigt.
8. (Optional) Wenn Sie „Automatisches Failover“ und „Automatische Wiederherstellung“ aktiviert haben, können Sie sowohl beide als auch „Automatische Wiederherstellung“ deaktivieren. Gehen Sie wie folgt vor: • • Löschen Sie Failover Automatically (Failover automatisch), die auch löscht Restore Automatically (Automatisch wiederherstellen). Löschen Sie Restore Automatically (Automatisch wiederherstellen), das deaktiviert die automatische Wiederherstellung aber behält das automatische Failover bei. 9.
7. Klicken Sie auf Finish (Fertigstellen). Zugehörige Verweise Optionen zum Löschen von Replikationen Auswählen von Replikationen Konfigurieren von Live Volume für automatisches Failover und Wiederherstellung Sie können das Storage Center für automatisches Failover und die automatische Wiederherstellung des vSphere Web Client-Plugin auf Live Volumes aktivieren, die bestimmte Kriterien erfüllen.
Failover Automatically (Failover automatisch) und optional Restore Automatically (Automatisch wiederherstellen) sollten beide Yes (Ja) anzeigen. 10. Klicken Sie auf Finish (Fertig stellen), um die Konfiguration zu bestätigen und den Assistenten zu beenden.
3 Arbeiten mit virtuellen Maschinen Mit dem Dell Storage vSphere Web Client Plugin können Sie virtuelle Maschinen bereitstellen und Daten virtueller Maschinen anhand eines Snapshot wiederherstellen.
6. Geben Sie einen Basisnamen für die VMs an, die Anzahl der zu erstellenden VMs sowie einen Bestandsspeicherort für die neuen virtuellen Maschinen. Klicken Sie anschließend auf Next (Weiter). 7. Geben Sie bei Bedarf den Ressourcenpool an, in dem die virtuellen Maschinen ausgeführt werden sollen, und klicken Sie auf Next (Weiter). 8. Wählen Sie Lookup for Existing Datastore (Nach vorhandenem Datenspeicher suchen) aus, und klicken Sie auf Next (Weiter).
9. Wählen Sie das Storage Center für die Volume-Erstellung aus und klicken Sie auf Weiter. Der Assistent Speichervolume erstellen wird angezeigt. 10. Geben Sie den Namen und die Größe für das neue Volume ein, wählen Sie den Volume-Ordner aus und klicken Sie auf Weiter. 11. Wählen Sie die folgenden Schritte aus, die für Ihre Umgebung relevant sind. Welche Schritte anzuwenden sind, hängt von den Einstellungen der Benutzereinstellungen des Storage Center-Benutzers in Storage Manager ab.
4. Falls die Seite Host/Cluster angezeigt wird, wählen Sie den Host oder Cluster aus, auf dem die virtuellen Maschinen ausgeführt werden sollen, und klicken Sie auf Next (Weiter). Die Seite Template Selection (Vorlagenauswahl) wird angezeigt. 5. Wählen Sie eine Vorlage für virtuelle Maschinen aus der Liste aus, und klicken Sie auf Next (Weiter). Die Seite Name and Location (Name und Speicherort) wird angezeigt. 6.
2. Wählen Sie Actions (Aktionen) > All Dell Storage Actions (Alle Aktionen für Dell Speicher) > Provision Virtual Machines (Virtuelle Maschinen bereitstellen) aus. Der Assistent Provision Virtual Machines (Virtuelle Maschinen bereitstellen) wird gestartet. 3. Wählen Sie Create Virtual Machine (Virtuelle Maschine erstellen) aus. Falls Sie in Schritt 1 ein Datacenter ausgewählt haben, wird die Seite Host/Cluster angezeigt.
Schritte 1. Wählen Sie ein Objekt aus, das als übergeordnetes Objekt einer virtuellen Maschine fungieren kann: • • • Datacenter Host Cluster 2. Wählen Sie Actions (Aktionen) > All Dell Storage Actions (Alle Aktionen für Dell Speicher) > Provision Virtual Machines (Virtuelle Maschinen bereitstellen) aus. Der Assistent Provision Virtual Machines (Virtuelle Maschinen bereitstellen) wird gestartet. 3. Wählen Sie Clone Virtual Machine (Virtuelle Maschine klonen) aus.
Wiederherstellen von Daten einer virtuellen Maschine anhand eines Snapshot Verwenden Sie den Assistenten „Storage Center Snapshot Recovery“ (Storage Center-Snapshot-Wiederherstellung), um Daten einer virtuellen Maschine anhand eines Snapshot eines VMFS-Datenspeichers wiederherzustellen. Voraussetzungen Mindestens ein Snapshot der virtuellen Maschine muss vorhanden sein. Schritte 1. Wählen Sie eine virtuelle Maschine aus. 2.
4 Verwalten der Notfall-Wiederherstellung Verwenden Sie das Dell Storage vSphere Web Client Plugin zum Verwalten der Notfall-Wiederherstellung für VMFS-Datenspeicher. Themen: • • • Notfall-Wiederherstellung aktivieren Wiederherstellen/Starten der Notfall-Wiederherstellung Notfall-Wiederherstellung vordefinieren Notfall-Wiederherstellung aktivieren Aktivieren Sie die Notfall-Wiederherstellung für den zugehörigen Datenspeicher auf dem zugeordneten Storage Center.
Zugehörige Verweise Bearbeiten der Aktivierung von Wiederherstellungseinstellungen Auswählen von Wiederherstellungspunkten Auswählen von Quell-/Ziel-Paar Wiederherstellen/Starten der NotfallWiederherstellung Verwenden Sie die Seite Restore/Start Disaster Recovery (Wiederherstellen/Starten der Notfall-Wiederherstellung) zum Wiederherstellen des Volumes für das die Notfall-Wiederherstellung aktiviert ist, für den entsprechenden Datenspeicher.
Auswählen von Quell-/Ziel-Paar Notfall-Wiederherstellung vordefinieren Definieren Sie Updates von Notfall-Wiederherstellungs-Einstellungen im Voraus für den entsprechenden Datenspeicher auf dem zugeordneten Storage Center-Volume. Schritte 1. Wählen Sie ein Rechenzentrum aus. 2. Wählen Sie Aktionen > Alle Aktionen für Dell Speicher > Notfall-Wiederherstellung > Vordefinieren. Die Seite SAN-Array Quelle/Ziel auswählen wird geöffnet. 3.
5 Anzeigen von Informationen zu Dell Storage Anzeigen der Dell Einstellungen für einen Host Auf der Registerkarte Dell Storage Settings (Dell Storage Einstellungen) können Sie Informationen zu den Fibre Channel- und iSCSIVerbindungen zwischen dem ESXi-Host und dem Storage Center anzeigen. Die Seite Dell Storage Settings (Dell Storage Einstellungen) können Sie über die Registerkarte Configure (Konfigurieren) eines ESXi-Hosts aufrufen. Abbildung 12.
Konnektivität – Legenden Tabelle 1. Beschreibung der Legenden der Konnektivität Symbol Kennzeichnung Beschreibung Connected FC (FC verbunden) Es ist eine Fibre Channel-Verbindung zwischen dem HBA und dem Storage Center vorhanden. Disconnected FC (FC getrennt) Es ist keine Fibre Channel-Verbindung zwischen dem HBA und dem Storage Center vorhanden. Connected iSCSI (iSCSI verbunden) Es ist eine iSCSI-Verbindung zwischen dem HBA und dem Storage Center vorhanden.
Adapterdetails Tabelle 2. Beschreibung der gemeldeten Adapterinformationen Kennzeichnung Beschreibung Model (Modell) Modellname des Adapters WWN World Wide Name (WWN) für Fibre Channel und iSCSI Qualified Name (IQN) für iSCSI Device (Gerät) Name des Adapters Type (Typ) Storage adapter type (Speicheradaptertyp, FC oder iSCSI) Node Name (Knotenname) Fibre Channel-Knotenname Alias iSCSI-Aliasname Status Status des Adapters Speicherdetails Tabelle 3.
Abbildung 13. Registerkarte „General“ (Allgemein) für ein Storage Center Die folgende Tabelle beschreibt die Informationen in der Registerkarte General (Allgemein). Tabelle 4.
Kennzeichnung Beschreibung Date Created (Erstellungsdatum) Datum und Uhrzeit der Volume-Erstellung Created By (Erstellt von) Benutzer, der das Volume erstellt hat Date Updated (Erstellungsdatum) Datum, zu dem das Volume zuletzt aktualisiert wurde Updated By (Aktualisiert von) Benutzer, der das Volume zuletzt aktualisiert hat Notes (Anmerkungen) Beschreibende Anmerkungen zum Volume Informationen der FluidFS-Registerkarte „Allgemein“ Die folgende Abbildung zeigt ein Beispiel für Informationen unte
Abbildung 15. Storage Center-Statistikdaten Die folgende Tabelle beschreibt die Nutzungsstatistik für ein Storage Center. Tabelle 6. Nutzungsstatistik für ein Storage Center Kennzeichnung Beschreibung Total volume space consumed (Insgesamt verbrauchter VolumeSpeicherplatz) Insgesamt auf dem Volume verwendeter Speicherplatz Savings vs.
Kennzeichnung Beschreibung Disk Space Saved Through Compression (Einsparung von Speicherplatz durch Komprimierung) Menge an Volume-Speicherplatz, der durch die Komprimierung eingespart wird FluidFS-Statistikdaten Die folgende Abbildung zeigt ein Beispiel von Nutzungsstatistiken für einen FluidFS-Cluster. Abbildung 16. Nutzungsstatistik für einen FluidFS-Cluster Die folgende Tabelle beschreibt die Informationen der FluidFS-Nutzungsstatistik. Tabelle 7.
Kennzeichnung Beschreibung erstmals zugewiesen wird. Bei dieser Art der Bereitstellung können Sie den NASVolumes mehr Speicherplatz zuweisen, als dem NAS-Pool selbst zugewiesen wurde.
Abbildung 18. Informationen zur Konnektivität für einen FluidFS-Cluster Die folgende Tabelle beschreibt die Konnektivitätsinformationen für einen FluidFS-Cluster. Tabelle 9.
Abbildung 19. Registerkarte „Volume Snapshots“ Die folgende Tabelle beschreibt die Informationen in der Registerkarte „Volume Snapshots“. Tabelle 10.
Abbildung 20. Registerkarte „Replikationen/Live Volumes“ Die folgende Tabelle beschreibt die Informationen in der Registerkarte „Replications/Live Volume“ (Replikationen/Live Volume). Tabelle 11.
Kennzeichnung Beschreibung Replicate Active Snapshot (Aktiven Snapshot replizieren) Gibt an, ob die Option Replicate Active Snapshot (Aktiven Snapshot replizieren) aktiviert ist Deduplicate (Deduplizieren) Gibt an, ob die Option Deduplication (Deduplizierung) aktiviert ist Replicate to Lowest Tier (Auf unterste Schicht replizieren) Einstellung (Ja oder Nein) bezüglich der Replikation auf unterste Schicht QoS Definition (QoS-Definition) Name der QoS-Definition für die Replikation Anzeigen von Dell
Abbildung 22. Beispiel für ein Latenz-Diagramm für ein Storage Center Für jedes mit dem ESXi-Host verbundene Storage Center werden in der folgenden Tabelle beschriebene Informationen in der Überschrift angezeigt. Tabelle 12.
Kennzeichnung Beschreibung Transfer Latency (Übertragungslatenzzeit) – Latenzzeit der Datenübertragungsvorgänge in Millisekunden Anzeigen von Informationen zu Dell Storage 71
6 Referenzmaterial zu den Seiten des Assistenten Hinzufügen von Speicher (Storage Center) Auf der Seite Add Storage (Speicher hinzufügen) können Sie auswählen, wie Speicher hinzugefügt werden soll. • • Create New Dell Storage Volume (Neues Dell Speicher-Volume erstellen) – Wählen Sie diese Option aus, um ein neues Dell Volume für die Zuweisung zu erstellen.
• • Create New NFS Datastore (Neuen NFS-Datenspeicher erstellen) – Wählen Sie diese Option aus, um einen neuen NFSDatenspeicher für die Zuweisung zu erstellen. Map an Existing NFS Export (Vorhandenen NFS-Export zuweisen) – Wählen Sie diese Option aus, um einen vorhandenen NFSDatenspeicher für die Zuweisung auszuwählen. Kompatibilitätsmodus Auf der Seite Compatibility Mode (Kompatibilitätsmodus) können Sie den Zugangsmodus für die virtuelle Festplatte auswählen.
• • • Number of Datastores (Anzahl der Datenspeicher) – Geben Sie die Anzahl der zu erstellenden Datenspeicher ein. Start numbering at (Nummerierung starten bei) – Geben Sie die Zahl ein, ab der die Nummerierung von Volume-Namen und Datenspeichernamen beginnen soll.
Anpassung für das Klonen einer virtuellen Maschine Auf der Seite Customization (Anpassung) können Sie Einstellungen zum Klonen virtueller Maschinen anpassen. • Use Customization Spec (Anpassungsspez. verwenden) – Markieren Sie dieses Kontrollkästchen, um aus vordefinierten Anpassungsspezifikationen zu wählen. Datenspeichersuche Auf der Seite Datastore Lookup (Datenspeichersuche) können Sie den Datenspeicher auswählen, auf dem die virtuelle Maschine ausgeführt werden soll.
• • • Datastore Name (Datenspeichername) – Geben Sie einen Namen für den wiederhergestellten Datenspeicher an. Use original datastore name (Name des ursprünglichen Datenspeichers verwenden) – Markieren Sie dieses Kontrollkästchen, um den Namen des ursprünglichen Datenspeichers und die Snapshot-Uhrzeit als Name für den wiederhergestellten Datenspeicher zu verwenden. Location (Speicherort) – Geben Sie den Speicherort für den wiederhergestellten Datenspeicher an.
Datenspeichereigenschaften Auf der Seite Datastore Properties (Datenspeichereigenschaften) können Sie Eigenschaften für einen Datenspeicher angeben. • • • Datastore name (Datenspeichername) – Geben Sie einen Namen für den Datenspeicher ein. Maximum file size (Maximale Dateigröße) – Falls die Dateisystemversion VMFS-3 lautet, wählen Sie die Option für die DateisystemBlockgröße für den Datenspeicher aus. Die Blockgröße bestimmt die maximale Dateigröße, die der neue Datenspeicher unterstützt.
Gerätekonfiguration Auf der Seite Device Configuration (Gerätekonfiguration) können Sie die Option zum Hinzufügen eines Rohgeräts auswählen. • • • Add New Raw Device Mapping to Virtual Machine (Neues Rohgerät zu virtueller Maschine hinzufügen) – Wählen Sie diese Option aus, um ein neues Volume zu erstellen und es der virtuellen Maschine als RDM zuzuweisen.
• • • • Server – Ermöglicht es Ihnen, den Server zu ändern. Use Original Volumes Folder (Ursprünglichen Volume-Ordner verwenden) – Wählen Sie diese Option aus, um anzugeben, dass die ursprünglichen Volume-Ordner für die Notfall-Wiederherstellungsvorgänge verwendet werden sollen. Use Active Snapshot (Aktiven Snapshot verwenden) – Wählen Sie diese Option aus, um anzugeben, dass aktive Snapshots für die Notfall-Wiederherstellungsvorgänge verwendet werden sollen.
(Komprimierung zulassen) finden Sie im Dell Storage Manager Administrator's Guide (Dell Storage Manager Administratorhandbuch). Erweitern der RDM-Größe Auf der Seite Expansion Size (Erweiterungsgröße) können Sie eine neue, erweiterte Größe für ein RDM eines vorhandenen Volumes angeben. • • • Original Size (Ursprüngliche Größe) – Zeigt die derzeitige Größe des Volumes an. Extend to (Erweitern auf) – Geben Sie die neue Größe für das Volume ein.
Wenn auf dem Host ESXi 5.5 ausgeführt wird, stehen die folgenden Optionen zur Verfügung. • • VMFS-5 – Wählen Sie diese Option aus, um zusätzliche Fähigkeiten zu aktivieren, z. B. Unterstützung für Datenspeicher über 2 TB. VMFS-3 – Wählen Sie diese Option aus, wenn ältere Hosts (vor Version 5.0) auf den Datenspeicher zugreifen. Hostauswahl Auf der Seite Host Selection (Hostauswahl) können Sie einen oder mehrere Hosts auswählen, denen das Rohgerät zugewiesen werden soll.
Hosts und Cluster Auf der Seite Hosts and Clusters (Hosts und Cluster) können Sie einen oder mehrere Hosts oder Cluster auswählen, denen der Datenspeicher hinzugefügt werden soll. Hostauswahl für Snapshot-Wiederherstellung Auf der Seite Host Selection (Hostauswahl) können Sie den Host oder Cluster auswählen, auf dem die wiederhergestellten Daten verfügbar sein sollen.
Live Volumes Auf der Seite Live Volumes können Sie die Werte für die Live Volume-Replikation angeben. • • • • • • Secondary QoS Definition (Sekundäre QoS-Definition) – Wählen Sie eine sekundäre QoS-Definition (Quality of Service) für das Live Volume aus. Informationen zum Erstellen oder Ändern von QoS-Definitionen finden Sie im Dell Storage Manager Administrator’s Guide (Dell Storage Manager-Administratorhandbuch).
Zuweisungs-LUN Auf der Seite Mapping LUN (Zuweisungs-LUN) können Sie die LUN auswählen, der das Dell Volume zugewiesen werden soll. Die Zuweisung von LUNs für mehrere Datenspeicher beginnt bei der angegebenen LUN und wird dann schrittweise unter Verwendung der verfügbaren LUNs fortgesetzt. Name und Speicherort Auf der Seite Name and Location (Name und Speicherort) können Sie den Namen und den Speicherort für die virtuellen Maschinen angeben.
• • • • • • • • Create a New Volume (Neues Volume erstellen) – Wählen Sie diese Option aus, um ein neues NAS-Volume zu erstellen. Use Existing Volume (Vorhandenes Volume verwenden) – Wenn Sie diese Option auswählen, werden die vorhandenen NASVolumes angezeigt. Wählen Sie ein Volume aus der Liste aus. Name – Name des NAS-Datenspeichers, der im vorherigen Schritt des Assistenten zum Bereitstellen von Datenspeichern angegeben wurde.
• • • SAS – Wählen Sie diese Option zur Verwendung des Front-End-SAS-Protokolls. iSCSI – Wählen Sie diese Option aus, um die Zuweisung ausschließlich auf iSCSI-Pfade zu beschränken. Any available (Nach Verfügbarkeit) – Wählen Sie diese Option aus, um einen beliebigen verfügbaren Pfad zwischen Host und Speicher zu verwenden.
• Automatically Deactivate Destination (Ziel automatisch deaktivieren) – Automatisches Entfernen von Serverzuweisungen vom aktivierten Volume, ohne dass ein Eingreifen des Administrators erforderlich ist. Wenn diese Option ausgewählt ist, sollten die E/AVorgänge auf das aktivierte Volume vor dem Ausführen der Wiederherstellung angehalten werden.
• • QoS-Definition – Wählen Sie eine QoS-Definition (Quality of Service) für die Replikation aus. Informationen zum Erstellen oder Ändern von QoS-Definitionen finden Sie im Dell Storage Manager Administrator’s Guide (Dell Storage-Administratorhandbuch). Deduplication (Deduplizierung) – Markieren Sie dieses Kontrollkästchen, um nur die geänderten Teile des Replay-Verlaufs auf dem Quellvolume zu kopieren, und nicht alle Daten, die in den einzelnen Snapshot enthalten sind.
Anpassen der Größe eines Datenspeichers Auf der Seite Resize Datastore (Datenspeichergröße anpassen) können Sie eine neue, erweiterte Größe für ein vorhandenes Volume angeben. • • • Original Size (Ursprüngliche Größe) – Zeigt die derzeitige Größe des Volumes an. Resize to (Größe ändern auf) – Geben Sie die neue Größe für das Volume ein. Storage Size Type (Speichergrößentyp) – Wählen Sie eine Maßeinheit aus (GB oder TB).
• • • NFS3 – Wählen Sie diese Option aus, wenn der Zugriff auf den Datenspeicher durch ältere FluidFS-Geräte erfolgt. NFS4.1 – Wählen Sie diese Option zur Aktivierung zusätzlicher, in NFS 4.1 bereitgestellter Funktionen. Configure Kerberos Authentication (Kerberos-Authentifizierung konfigurieren) – Falls NFS 4.1 ausgewählt ist, können Sie optional die Authentifizierung auf Kerberos-Basis beim Erstellen des NFS-Datenspeichers aktivieren.
Auswählen eines RDM Auf der Seite Select RDM (RDM auswählen), können Sie das zu erweiternde RDM auswählen Auswählen von Replikationen Auf der Seite Select Replications (Replikationen auswählen) können Sie eine oder mehrere Replikationen zum Ändern oder Entfernen auswählen.
Auswählen von Quell-/Ziel-Paar Verwenden Sie die Seite Select Source/Destination Pair (Auswählen von Quell-/Ziel-Paar), um die Array-Paare auszuwählen, die bei einem Notfall-Wiederherstellungsvorgang verwendet werden sollen. Auswählen eines Volumes Auf der Seite Select Volume (Volume auswählen) können Sie nach einem vorhandenen Dell Volume suchen und es für die Zuweisung als Speicher auswählen. Das ausgewählte Volume muss bereits als VMFS-Datenspeicher formatiert sein.
Snapshot-Optionen Auf der Seite Snapshot Options (Snapshot-Optionen) können Sie einen temporären VMware-Snapshot erstellen und Optionen für den Snapshot festlegen. • • • Create Temporary VMware Snapshot (Temporären VMware-Snapshot erstellen) – Markieren Sie dieses Kontrollkästchen, um vor der Snapshot-Erstellung einen temporären VMware-Snapshot zu erstellen.
Snapshot-Profil Auf der Seite Snapshot Profile (Snapshot-Profil) können Sie ein oder mehrere Snapshot-Profile für die Anwendung auf ein Dell Volume auswählen. Weitere Informationen zu Snapshot-Profilen finden Sie unter Einführung in Dell Speicher. • • Select Snapshot Profiles (Snapshot-Profile auswählen) – Wählen Sie ein oder mehrere Snapshot-Profile für die Zuweisung zum Volume aus.
• • • Expiration (Ablauf) – Geben Sie einen Zeitpunkt an, zu dem der Snapshot ablaufen soll. Never Expire (Kein autom. Ablauf) – Markieren Sie dieses Kontrollkästchen, um den automatischen Ablauf des Snapshot zu verhindern. Der Snapshot muss dann manuell für den Ablauf konfiguriert werden. Description (Beschreibung) – Geben Sie eine Beschreibung für den Snapshot ein.
• Wählen Sie einen oder mehrere Snapshots aus, die Sie löschen möchten (deren Ablauf initiiert werden soll). Storage Center Auf der Seite Storage Center können Sie das Storage Center auswählen, auf dem Speicher hinzugefügt werden soll. • • Select Storage Center (Storage Center auswählen) – Wählen Sie das Storage Center aus, auf dem Speicher hinzugefügt werden soll.
Vorlagenauswahl Auf der Seite Template Selection (Vorlagenauswahl) können Sie eine Vorlage für eine virtuelle Maschine auswählen, auf deren Grundlage eine neue virtuelle Maschine erstellt werden soll. • • Select Virtual Machine template (Vorlage für virtuelle Maschine auswählen) – Wählen Sie eine VM-Vorlage aus der Drop-downListe der verfügbaren Vorlagen aus. Details – Zeigt Details zu der derzeit ausgewählten VM-Vorlage an.
VM-Auswahl Falls der virtuellen Maschine ein RDM-Volume zugeordnet ist, verwenden Sie die Wiederherstellungsseite VM Selection (VM-Auswahl), um die virtuelle Maschine auszuwählen, die Sie für den Zugang zu den wiederhergestellten Daten verwenden möchten.
Volume-Aufbewahrung Auf der Seite Volume Retention (Volume-Aufbewahrung) können Sie die Aufbewahrungsoptionen für das Entfernen des Volumes oder Rohgeräts angeben. • • • Unmap volume (Volume-Zuweisung aufheben) – Wählen Sie diese Option aus, um die Zuweisung des Volumes zum Host aufzuheben. Das Volume verbleibt nach der Aufhebung auf dem Storage Center.
ANMERKUNG: Die Werte für Storage-Profil und Datenträgerordner können nur dann geändert werden, wenn die Einstellungen für das Storage Center auf „Allow“ (Zulassen) eingerichtet wurden. Weitere Informationen über das Verwalten der Einstellungen finden Sie im Dell Storage Manager Administrator's Guide (Dell Storage Manager Administratorhandbuch). • • Pagepool (Seitenpool) – Wählen Sie aus der Drop-Down-Liste einen Seitenpool aus.