
Administrator Guide
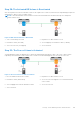


Table Of Contents
- About This Guide
- Storage Manager 2020 R1 Administrator's Guide
- Contents
- Storage Manager Overview
- Getting Started
- Use the Client to Connect to the Data Collector
- Next Steps
- Add Storage Manager Users
- Add Storage Centers to Storage Manager
- Configure Storage Center Volumes
- Add Servers to the Storage Centers
- Add PS Groups to Storage Manager
- Add FluidFS Clusters to Storage Manager
- Configure Email Notifications
- Set up Remote Storage Centers and Relication QoS
- Configure Replications and Live Volumes
- Prepare for Disaster Recovery
- Storage Center Overview
- Storage Center Deployment
- Discover and Configure Uninitialized SCv2000 Series Storage Systems
- Open the Discover and Configure Uninitialized Storage Centers Wizard From the Storage Manager Client Welcome Screen
- Open the Discover and Configure Uninitialized Storage Centers Wizard from the Storage Manager Client
- Select a Storage Center to Initialize
- Set System Information
- Set Administrator Information
- Configure iSCSI Fault Domains (iSCSI Front-End Only)
- Confirm the Storage Center Configuration
- Deploy the Storage Center
- Review Redundant Paths (FC or SAS Front-End Only)
- Inherit Settings
- Configure Time Settings
- Configure SMTP Server Settings
- Set Up SupportAssist
- Accept the SupportAssist Collection Agreement
- Provide Contact Information
- Provide Site Contact Information
- Validate the SupportAssist Connection
- Update Storage Center
- Set Default Storage Profile (SCv2000 Series Controllers Only)
- Complete Configuration and Perform Next Steps
- Discover and Configure Uninitialized SCv3000 Series Storage Systems
- Open the Discover and Configure Uninitialized Storage Centers Wizard From the Storage Manager Client Welcome Screen
- Open the Discover and Configure Uninitialized Storage Centers Wizard from the Storage Manager Client
- Select a Storage Center to Initialize
- Welcome Page
- Customer Installation Authorization
- Set System Information
- Set Administrator Information
- Confirm the Storage Center Configuration
- Deploy the Storage Center
- Enter Key Management Server Settings
- Create a Storage Type
- Fault Tolerance
- Inherit Settings
- Configure Time Settings
- Configure SMTP Server Settings
- Set Up SupportAssist
- Accept the SupportAssist Collection Agreement
- Provide Contact Information
- Provide Site Contact Information
- Validate the SupportAssist Connection
- Update Storage Center
- Complete Configuration and Perform Next Steps
- Discover and Configure Uninitialized SC5020 and SC7020 Storage Systems
- Open the Discover and Configure Uninitialized Storage Centers Wizard From the Storage Manager Client Welcome Screen
- Open the Discover and Configure Uninitialized Storage Centers Wizard from the Storage Manager Client
- Introduction to Storage Center Initial Configuration
- Select a Storage Center to Initialize
- Welcome Page
- Customer Installation Authorization
- Set System Information
- Set Administrator Information
- Confirm the Storage Center Configuration
- Deploy the Storage Center
- Enter Key Management Server Settings
- Create a Storage Type
- Fault Tolerance
- Inherit Settings
- Configure Time Settings
- Configure SMTP Server Settings
- Set Up SupportAssist
- Accept the SupportAssist Collection Agreement
- Provide Contact Information
- Provide Site Contact Information
- Validate the SupportAssist Connection
- Complete Configuration and Perform Next Steps
- Configuring SC4020 and SC8000 Storage Centers
- Welcome Page
- Submit the Storage Center License
- Create a Disk Folder
- Add a Controller (Configure Storage Center Wizard)
- Set System Information
- Enter Key Management Server Settings
- Configure Ports
- Inherit Settings
- Configure Time Settings
- Configure SMTP Server Settings
- Accept the SupportAssist Collection Agreement
- Provide Contact Information
- Provide Site Contact Information
- Validate the SupportAssist Connection
- Complete Configuration and Perform Next Steps
- Configuring SC9000 Storage Centers
- Welcome Page
- Set System Information
- Submit the Storage Center License
- Create a Disk Folder
- Deploy the Storage Center – Add a Controller
- Deploy the Storage Center
- Enter Key Management Server Settings
- Create a Storage Type
- Configure Ports
- Inherit Settings
- Configure Time Settings
- Configure SMTP Server Settings
- Set Up SupportAssist
- Accept the SupportAssist Collection Agreement
- Provide Contact Information
- Provide Site Contact Information
- Validate the SupportAssist Connection
- Complete Configuration and Perform Next Steps
- Set Up a localhost or VMware Host
- Discover and Configure Uninitialized SCv2000 Series Storage Systems
- Storage Center Administration
- Adding and Organizing Storage Centers
- Managing Volumes
- Attributes That Determine Volume Behavior
- Volume Icons
- Creating Volumes
- Modifying Volumes
- Edit Multiple Volumes
- Rename a Volume
- Move a Volume to a Different Volume Folder
- Move Multiple Volumes to a Different Volume Folder
- Expand a Volume
- Enable or Disable Read/Write Caching for a Volume
- Assign Snapshot Profiles to a Volume
- Assign Snapshot Profiles to Multiple Volumes
- Assign a Different Storage Profile to a Volume
- Assign a Different Storage Profile to Multiple Volumes
- Force Writes to the Lowest Storage Tier for a Volume
- Associate a Chargeback Department with a Volume
- Configure a Space Consumption Limit for a Volume
- Configure an OpenVMS Unique Disk ID for a Volume
- Configure Related View Volume Maximums for a Volume
- Copying Volumes
- Migrating Volumes With Live Migrate
- Live Migration Requirements
- Live Migration Roles
- Creating a Live Migration
- Modifying Live Migrations
- Swap the Source Storage Center for a Live Migration
- Cancel a Live Migration Source Storage Center Swap
- Allow a Live Migration to Automatically Swap Roles
- Complete a Live Migration
- Enable or Disable Deduplication for a Live Migration
- Change the Source Replication QoS Node for a Live Migration
- Delete a Live Migration
- Viewing Live Migration Volumes
- Creating and Managing Volume Folders
- Creating and Managing Volume Snapshots
- Manually Create a Snapshot for a Volume
- View Snapshots on a Volume
- Assign Snapshot Profiles to a Volume
- Create a Local Recovery Volume (View Volume) from a Snapshot
- Pause Snapshot Creation for a Volume
- Pause Snapshot Expiration for a Volume
- Allow the Most Recent Snapshot for a Volume to be Expired
- Expire a Snapshot Manually
- Mapping Volumes to Servers
- Map a Volume to a Server
- Map Multiple Volumes to a Server
- Unmap a Volume from a Server
- Unmap Multiple Volumes from Servers
- Promote a Volume Mapping from a Server to a Server Cluster
- Demote a Mapping from a Server Cluster to an Individual Server
- Deploy a Bootable Volume Image to a New Server
- Change the LUN Used by a Volume/Server Mapping
- Specify Which Controller Processes IO for a Volume/Server Mapping
- Limit the Number of Paths That Can Be Used for a Volume/Server Mapping
- Change a Volume/Server Mapping to Read-Only
- Deleting Volumes and Volume Folders
- Managing Data Reduction
- Managing Snapshot Profiles
- Managing Storage Profiles
- Managing QoS Profiles
- Importing Volumes from an External Storage Array
- Storage Center Server Administration
- Server Management Options
- Managing Servers on a Storage Center
- Creating Servers
- Modifying Servers
- Apply One or More Snapshot Profiles to a Server
- Add a Server to a Server Cluster
- Remove a Server from a Server Cluster
- Convert a Physical Server to a Virtual Server
- Convert a Virtual Server to a Physical Server
- Rename a Server
- Change the Operating System of a Server
- Move a Server to a Different Server Folder
- Add One or More HBAs to a Server
- Remove One or More HBAs from a Server
- Mapping Volumes to Servers
- Creating and Managing Server Folders
- Deleting Servers and Server Folders
- Managing Servers Centrally on the Servers View
- Server Types That Can Be Centrally Managed
- Storage Manager Server Agent for Windows Servers
- IPMI Support for NAS Appliances
- Registering Servers with Storage Manager
- Organizing and Removing Registered Servers
- Updating Server Information
- Managing Server Data Collection and Reporting Settings
- Creating Server Volumes and Datastores
- Assigning/Creating Virtual Servers on Storage Centers
- Manually Mapping a Windows Server to a Storage Center Server
- Managing NAS Appliances Powered by Windows Storage Server
- View Operating System Information about a Windows-Based NAS Appliance
- View HBA Connectivity Information for a Windows-Based NAS Appliance
- View Hardware Health Information for a Windows-Based NAS Appliance
- Clear the System Event Log (SEL) for a Windows-based NAS appliance
- Shut Down a Windows-Based NAS Appliance
- Reset the Power for a Windows-Based NAS Appliance
- Installing and Using the Server Agent on a Windows Server
- Managing Virtual Volumes With Storage Manager
- PS Series Storage Array Administration
- About Groups
- About Volumes
- Create a Volume
- Modify a Volume
- Create a Volume Folder
- Edit a Volume Folder
- Delete a Volume Folder
- Move a Volume to a Folder
- Move Multiple Volumes to a Folder
- Rename a Volume
- Clone a Volume
- Modify Volume Access Settings
- Set a Volume Online or Offline
- Add Access Policy Groups to a Volume
- Add Access Policies to a Volume
- Create a Basic Access Point
- Delete a Volume
- Restore a Volume from the Recycle Bin
- Empty the Recycle Bin
- Permanently Delete a Volume in the Recycle Bin
- About Snapshots
- Managing Replication Schedules
- About Access Policies
- Monitoring a PS Series Group
- Storage Center Maintenance
- Managing Storage Center Settings
- Viewing and Modifying Storage Center Information
- Modifying Storage Center Network Settings
- Configuring Storage Center User Preferences
- Set the Default Size for New Volumes
- Set the Default Base Volume Name for New Volumes
- Set Default Data Reduction Settings for New Volumes
- Set Default Cache Settings for New Volumes
- Set the Default Snapshot Options for New Volumes
- Allow or Disallow Advanced Volume Mapping Settings
- Set the Default Operating System for New Servers
- Set the Default Storage Profile for New Volumes
- Set the Default Storage Type for New Volumes
- Set Default Volume QoS Profile
- Allow QoS Profile Selection
- Configuring Storage Center Data Settings
- Configuring Storage Center Secure Console Settings
- Configuring Storage Center SMTP Settings
- Configuring Storage Center SNMP Settings
- Configuring Storage Center Time Settings
- Configuring Filters to Restrict Administrative Access
- Configuring a Storage Center to Inherit Settings
- Managing Storage Center Users and Groups
- User Privilege Levels
- User Groups
- User Account Management and Authentication
- Managing Local Storage Center Users
- Create a Local Storage Center User
- Configure the Default User Preferences for New Storage Center Users
- Increase the Privilege Level for a Local Storage Center User
- Change the Preferred Language for a Storage Center User
- Change the Session Timeout for a Local Storage Center User
- Enable or Disable Access for a Local Storage Center User
- Modify Local Group Membership for a Local Storage Center User
- Configure Preferences for a Local Storage Center User
- Modify Descriptive Information About a Local Storage Center User
- Change the Password for a Local Storage Center User
- Delete a Local Storage Center User
- Restore a Deleted Local Storage Center User
- Managing Local Storage Center User Groups
- Enabling Directory Services Authentication
- Managing Directory Service Users
- Grant Access to a Directory User
- Increase the Privilege Level for a Directory Service User
- Change the Session Timeout for a Directory Service User
- Enable or Disable Access for a Directory Service User
- Modify Local Group Membership for a Directory Service User
- Configure Preferences for a Directory Service User
- Modify Descriptive Information About a Directory Service User
- Delete a Directory Service User
- Restore a Deleted Directory Service User
- Managing Directory User Groups
- Managing Local Storage Center User Password Requirements
- Managing Front-End I/O Ports
- Front-End Connectivity Modes
- About Fault Domains and Ports
- Failover Behavior
- Rebalance Front-End Ports
- Managing Front-End I/O Port Hardware
- Rename a Front-End I/O Port
- Reset a Front-End IO Port Name to the WWN
- Change the Preferred Physical IO Port for a Virtual IO Port
- Set or Modify the IP Address and Gateway for a Single iSCSI Port
- Test Network Connectivity for an iSCSI Port
- Set Threshold Alert Definitions for a Front-End IO Port
- Configure Front-End I/O Ports (Fibre Channel and SAS)
- Configure Front-End I/O Ports (iSCSI)
- Unconfigure Front-End I/O Ports
- Converting Front-End Ports to Virtual Port Mode
- Managing Back-End I/O Port Hardware
- Grouping Fibre Channel I/O Ports Using Fault Domains
- Grouping iSCSI I/O Ports Using Fault Domains
- iSCSI VLAN Tagging Support
- Creating iSCSI Fault Domains
- Modifying iSCSI Fault Domains
- Rename an iSCSI Fault Domain
- Modify iSCSI Fault Domain Control Port Network Settings
- Add a VLAN ID to a Physical iSCSI Fault Domain
- Modify the MTU for an iSCSI Fault Domain
- Modify the TCP Port for an iSCSI Fault Domain
- Modify the iSCSI Window Size for an iSCSI Fault Domain
- Modify Digest Settings for an iSCSI Fault Domain
- Modify Timeout Settings for an iSCSI Fault Domain
- Add Ports to an iSCSI Fault Domain
- Test Network Connectivity for an iSCSI Port in a Fault Domain
- Remove Ports from an iSCSI Fault Domain
- Delete an iSCSI Fault Domain
- Configuring NAT Port Forwarding for iSCSI Fault Domains
- Configuring CHAP for iSCSI Fault Domains
- Grouping SAS I/O Ports Using Fault Domains
- Managing Disks and Disk Folders
- Managing Secure Data
- Managing Data Redundancy
- Managing Disk Enclosures
- Add an Enclosure
- Remove an Enclosure
- Replace an Enclosure
- Rename a Disk Enclosure
- Set an Asset Tag for a Disk Enclosure
- Delete an Enclosure
- Mute an Enclosure Alarm
- Unmute an Enclosure Alarm
- Clear the Swap Status for an Enclosure Cooling Fan
- Clear the Swap Status for an Enclosure I/O Module
- Clear the Swap Status for an Enclosure Power Supply
- Replace a Failed Power Supply
- Clear the Under Voltage Status for a Power Supply
- Clear the Swap Status for a Temperature Sensor
- Clear the Minimum and Maximum Recorded Values for Temperature Sensor
- Replace a Failed Cooling Fan Sensor
- Enable or Disable the Disk Indicator Light
- Clear the Swap Status for a Disk
- Managing Storage Center Controllers
- Updating Storage Center
- Shutting Down and Restarting a Storage Center
- Managing Field Replaceable Units (FRU)
- Managing Storage Center Settings
- Viewing Storage Center Information
- Viewing Summary Information
- Storage Center Summary Plugins
- Viewing Summary Information for a Storage Center
- Viewing Summary Information for Multiple Storage Centers
- Using the Status Plugin
- Using the Storage Summary Plugin
- Using the Front End IO Summary Plugin
- Using the Current Alerts Plugin
- Using the Replication Validation Plugin
- Using the Top 10 Fastest Growing Volumes Plugin
- Using the Current Threshold Alerts Plugin
- Viewing Detailed Storage Usage Information
- Viewing Historical IO Performance
- Viewing Current IO Performance
- Configuring Chart Options
- Configure the Storage Center Data Gathering Schedule
- Exporting Usage Data
- Monitoring Storage Center Hardware
- Monitoring a Storage Center Controller
- View Summary Information for All Controllers in a Storage Center
- View Summary Information for a Controller
- View a Diagram of a Controller
- View IO Port Information and Status for a Controller
- Locate a Port in the Controller Diagram
- View Fan Status for a Controller
- View Power Supply Status for a Controller
- View Temperature Information for a Controller
- View Voltage Sensor Status for a Controller
- View Cache Card Status for a Controller
- Monitoring a Storage Center Disk Enclosure
- View Summary Information for All Enclosures in a Storage Center
- View Summary Information for an Enclosure
- View a Diagram of an Enclosure
- View Alarm Status for an Enclosure
- View Disk Status for an Enclosure
- Locate a Disk in the Enclosure Diagram
- View Cooling Fan Status for an Enclosure
- Locate a Cooling Fan Sensor in the Enclosure Diagram
- View IO Module Status for an Enclosure
- Locate an IO Module in the Enclosure Diagram
- View Power Supply Status for an Enclosure
- Locate a Power Supply in the Enclosure Diagram
- View Temperatures for an Enclosure
- Monitoring SSD Endurance
- Viewing UPS Status
- Monitoring a Storage Center Controller
- Viewing Summary Information
- SMI-S
- FluidFS Administration
- How FS8600 Scale-Out NAS Works
- FluidFS System Management for FS Series Appliances
- Seamless Session Failover
- Using the Storage Manager Client or CLI to Connect to the FluidFS Cluster
- Managing Secured Management
- Add a Secured Management Subnet
- Change the Secured Management Subnet Interface
- Change the Prefix for the Secured Management Subnet
- Change the VLAN Tag for the Secured Management Subnet
- Change the VIP for the Secured Management Subnet
- Change the NAS Controller IP Addresses for the Secured Management Subnet
- Enable or Disable Secured Management
- Managing the FluidFS Cluster Name
- Accept the End-User License Agreement
- Managing the System Time
- Managing the FTP Server
- Managing SNMP
- Managing the Health Scan Throttling Mode
- Managing the Operation Mode
- Managing Client Connections
- Shutting Down and Restarting NAS Controllers
- Managing NAS Appliance and NAS Controller Blinking
- FluidFS Networking
- Managing the Default Gateway
- Managing DNS Servers and Suffixes
- Managing Static Routes
- Managing the Client Networks
- View the Client Networks
- Create a Client Network
- Change the Prefix for a Client Network
- Change the VLAN Tag for a Client Network
- Change the Client VIPs for a Client Network
- Change the NAS Controller IP Addresses for a Client Network
- Delete a Client Network
- View the Client Network MTU
- Change the Client Network MTU
- View the Client Network Bonding Mode
- Change the Client Network Bonding Mode
- About Multichannel
- Viewing the Fibre Channel WWNs
- Managing iSCSI SAN Connectivity
- Add or Remove an iSCSI Port
- Add or Remove an iSCSI Fabric
- Change the VLAN Tag for an iSCSI Fabric
- Change the NAS Controller IP Addresses for an iSCSI Fabric
- FluidFS Account Management and Authentication
- Account Management and Authentication
- Default Administrative Accounts
- Default Local User and Local Group Accounts
- Managing Administrator Accounts
- Managing Local Users and Groups Using MMC
- Managing Local Users
- Managing Local Groups
- Managing Active Directory
- Managing LDAP
- Reduce the Number of Subtrees for Searches
- Enable LDAP Authentication
- Change the LDAP Base DN
- Add or Remove LDAP Servers
- Enable or Disable LDAP on Active Directory Extended Schema
- Enable or Disable Authentication for the LDAP Connection
- Enable or Disable TLS Encryption for the LDAP Connection
- Disable LDAP Authentication
- Managing NIS
- Managing User Mappings Between Windows and UNIX/Linux Users
- FluidFS NAS Volumes, Shares, and Exports
- Managing the NAS Pool
- View Internal Storage Reservations
- View the Size of the NAS Pool
- Expand the Size of the NAS Pool
- Set the Metadata Tier
- Enable or Disable the NAS Pool Used Space Alert
- Enable or Disable the NAS Pool Unused Space Alert
- About Multitenancy
- Create a New Tenant
- Moving a NAS Volume Between Tenants
- Managing NAS Volumes
- File Security Styles
- Thin and Thick Provisioning for NAS Volumes
- Managing NAS Volume Space
- Choosing a Strategy for NAS Volume Creation
- Examples of NAS Volume Creation
- NAS Volumes Storage Space Terminology
- Managing the Storage Profile for a NAS Cluster or Pool
- Configuring NAS Volumes
- Optimize NAS Volumes for Use as VMware vSphere Datastores
- Restrict Snapshot Access
- View NAS Volumes
- Create a NAS Volume
- Rename a NAS Volume
- Change Access Time Granularity for a NAS Volume
- Change Permissions Interoperability for a NAS Volume
- Change the Space Settings of a NAS Volume
- SCSI Unmap
- Enable or Disable a NAS Volume Used Space Alert
- Enable or Disable a NAS Volume Unused Space Alert
- Enable or Disable a NAS Volume Snapshot Space Consumption Threshold Alert
- Delete a NAS Volume
- Organizing NAS Volumes in Storage Manager Using Folders
- Cloning a NAS Volume
- Managing SMB Shares
- Configuring SMB Shares
- Enable or Disable SMB Message Signing
- Enable or Disable SMB Message Encryption
- Viewing and Disconnecting SMB Connections
- Using SMB Home Shares
- Changing the Owner of an SMB Share
- Managing ACLs or SLPs on an SMB Share
- Accessing an SMB Share Using Windows
- Show Dot Files to SMB Client
- Branch Cache
- Configuring Branch Cache
- Accessing an SMB Share Using UNIX or Linux
- Managing NFS Exports
- Configuring NFS Exports
- View All NFS Exports on a FluidFS Cluster
- View NFS Exports on a NAS Volume
- Add an NFS Export
- Change the Folder Path for an NFS Export
- Change the Client Authentication Methods for an NFS Export
- Change the Client Access Permissions for an NFS Export
- Enable or Disable Secure Ports for an NFS Export
- Delete an NFS Export
- View or Select the Latest NFS Version Supported
- Setting Permissions for an NFS Export
- Accessing an NFS Export
- Configuring NFS Exports
- Global Namespace
- Using FTP
- Using Symbolic Links
- Managing Quota Rules
- About Data Reduction
- FluidFS Data Protection
- Managing Antivirus
- Managing Snapshots
- Managing NDMP
- Managing Replication
- How Replication Works
- Target NAS Volumes
- Managing Replication Partnerships
- Replicating NAS Volumes
- Monitoring Replication Progress and Viewing Replication Events
- Recovering an Individual NAS Volume
- Using Replication for Disaster Recovery
- File Access Notification
- FluidFS Monitoring
- Monitoring NAS Appliance Hardware
- View the Status of the Interfaces
- View the Status of the Disks
- View the Status of a Backup Power Supply
- View the Status of the Fans
- View the Status of the Power Supplies
- Viewing the Status of FluidFS Cluster Services
- Viewing the Status of Background Processes
- Viewing FluidFS Cluster NAS Pool Trends
- Viewing FluidFS Cluster Storage Usage
- Viewing NAS Volume Storage Usage
- Viewing FluidFS Cluster Traffic Statistics
- Monitoring NAS Appliance Hardware
- FluidFS Maintenance
- Connecting Multiple Data Collectors to the Same Cluster
- Adding and Removing FluidFS Clusters in Storage Manager
- Organizing FluidFS Clusters Using Folders
- Adding a Storage Center to a FluidFS Cluster
- Adding and Deleting NAS Appliances in a FluidFS Cluster
- Detaching, Attaching, and Replacing a NAS Controller
- Managing Service Packs
- Managing Firmware Updates
- Update Firmware Using FTP
- Restoring the NAS Volume Configuration
- Restoring Local Users
- Restoring Local Groups
- Reinstalling FluidFS from the Internal Storage Device
- FS Series VAAI Plugin
- FluidFS Troubleshooting
- Viewing the Event Log
- Running Diagnostics
- Configuring the BMC Network
- Launching the iBMC Virtual KVM
- Troubleshooting Common Issues
- Troubleshoot Active Directory Issues
- Troubleshoot Backup Issues
- Troubleshoot SMB Issues
- Access to SMB File Denied Due to Unavailable AV Server
- Access to SMB File/Folder Denied Due to Permissions
- Access to SMB Shares Unavailable After Microsoft Update
- SMB ACL Corruption
- SMB Client Clock Skew
- SMB Client Disconnect on File Read
- SMB Client Incorrect Password Login Failure
- SMB Delete On Close Denial
- SMB File Sharing Conflict
- SMB Locking Inconsistency
- SMB Maximum Connections Reached
- SMB Share Does Not Exist
- SMB Share Name Truncated In Event After Mapping SMB Share
- SMB Path Share Not Found
- SMB Write to Read Only NAS Volume
- Troubleshoot NFS Issues
- Cannot Mount NFS Export
- NFS Export Does Not Exist
- NFS File Access Denied
- NFS Insecure Access to Secure Export
- NFS Mount Fails Due to Export Options
- NFS Mount Fails Due to Netgroup Failure
- NFS Mount Path Does Not Exist
- NFS Owner Restricted Operation
- NFS Write to Read-Only Export
- NFS Write To Read-Only NAS Volume
- NFS Write to Snapshot
- Troubleshoot NAS File Access and Permissions Issues
- Troubleshoot Networking Problems
- Troubleshoot Replication Issues
- Replication Configuration Error
- Replication Target FluidFS Cluster is Busy
- Replication Target File System is Busy
- Replication Target is Down
- Replication Target is Not Optimal
- Replication Target Volume is Busy Reclaiming Space
- Replication Target Volume is Detached
- Replication Disconnection
- Replication Incompatible Versions
- Replication Internal Error
- Replication Target Does Not Have Enough Space
- Replication Source FluidFS Cluster is Busy
- Replication Source is Down
- Replication Source is Not Optimal
- Replication Source Volume Is Busy Reclaiming Space
- Troubleshoot System Issues
- Remote Storage Centers and Replication QoS
- Storage Center Replications and Live Volumes
- Storage Center Replications
- Replication Types
- Replication Requirements
- Replication Behavior When a Destination Volume Fails
- Replicating a Single Volume to Multiple Destinations
- Replication on SCv2000 Series Storage Systems
- Replication Icons
- Simulating Replications
- Replicating Volumes
- Migrating Volumes to Another Storage Center
- Modifying Replications
- Change the Type for a Replication
- Change the Synchronization Mode for a Synchronous Replication
- Include Active Snapshot Data for an Asynchronous Replication
- Enable or Disable Deduplication for a Replication
- Select a Different QoS Definition for a Replication
- Configure a Replication to Write Data to the Lowest Tier at the Destination
- Allow Replicate Storage to Lowest Tier Selection During Initial Replication Configuration
- Pause a Replication
- Resume a Paused Live Volume
- Convert a Replication to a Live Volume
- Set Threshold Alert Definitions for a Replication
- Monitoring Replications
- Managing Cross-Platform Replication
- Storage Center Live Volumes
- Live Volume Requirements
- Live Volume Types
- Live Volume Icon
- Live Volume Roles
- Automatic Failover for Live Volumes
- Managed Replications for Live Volumes
- Creating Live Volumes
- Modifying Live Volumes
- Swap the Primary Storage Center for a Live Volume
- Change the Replication Type for a Live Volume
- Change the Synchronization Mode for a Synchronous Live Volume
- Add a Managed Replication to a Live Volume
- Include Active Snapshot Data for an Asynchronous Live Volume
- Enable or Disable Deduplication for a Live Volume
- Select Different QoS Definitions for a Live Volume
- Configure a Live Volume to Write Data to the Lowest Tier at the Destination
- Allow Replicate Storage to Lowest Tier Selection
- Allow a Live Volume to Automatically Swap Roles
- Revert a Live Volume to a Replication
- Pause a Live Volume
- Resume a Paused Live Volume
- Set Threshold Alert Definitions for a Live Volume
- Delete a Live Volume
- Force Delete a Live Volume
- Manually Bring Primary Live Volume Online
- Modifying Live Volumes with Automatic Failover
- Live Volume ALUA
- Monitoring Live Volumes
- Storage Center Replications
- Storage Center DR Preparation and Activation
- How Disaster Recovery Works
- Disaster Recovery Administration Options
- Preparing for Disaster Recovery
- Activating Disaster Recovery
- Activating Disaster Recovery for PS Series Group Replications
- Restarting Failed Replications
- Restoring Replications and Live Volumes
- Deleting Restore Points
- Remote Data Collector
- Remote Data Collector Management
- Remote Data Collector Requirements
- Virtual Appliance Requirements
- Installing and Configuring a Remote Data Collector
- Disconnecting and Reconnecting a Remote Data Collector
- Using a Remote Data Collector to Activate Disaster Recovery
- Enabling Email Notifications for the Remote Data Collector
- Storage Replication Adapter for VMware SRM
- Threshold Alerts
- Configuring Threshold Definitions
- Viewing and Deleting Threshold Alerts
- Configuring Volume Advisor Movement Recommendations
- Export Threshold Alerts
- Configuring Email Notifications for Threshold Alerts
- Performing Threshold Queries
- Storage Center Reports
- Storage Center Chargeback
- Configure Chargeback or Modify Chargeback Settings
- Configuring Chargeback Departments
- Setting Up Departments
- Managing Department Line Items
- Assigning Volumes to Chargeback Departments
- Assign Volumes to a Department in the Chargeback View
- Assign Volume Folders to a Department in the Chargeback View
- Remove Volumes/Volume Folders from a Department in the Chargeback View
- Assign a Volume/Volume Folder to a Department in the Storage View
- Remove a Volume/Volume Folder from a Department in the Storage View
- Perform a Manual Chargeback Run
- Viewing Chargeback Runs
- View a Chart of Department Costs for a Chargeback Run
- View the Results of the Chargeback Run in Table Format
- View Cost and Storage Savings Realized by Dynamic Capacity for a Chargeback Run
- View Cost and Storage Savings Realized by Using Data Instant Snapshots for a Chargeback Run
- View Cost Savings Realized by Using Data Progression for a Chargeback Run
- Working with Charts
- Exporting Chargeback Data
- Storage Center Monitoring
- Storage Alerts
- Events
- Storage Logs
- Audit Logs
- Export Monitoring Data
- Configure Data Collection Schedules
- Data Collector Management
- Access the Data Collector View
- Configuring Data Collector Settings
- Configuring General Settings
- Restart the Data Collector
- Enable the Chargeback Feature
- Change Storage Center Timeout Settings
- Set the Maximum Memory for a Data Collector on a Windows Server
- Set the Maximum Memory for a Data Collector on a Virtual Appliance
- Select a Network Adapter
- Configure a Custom SSL Certificate
- Configure a Login Banner Message
- Configure Data Collector Ports
- Change Data Collector Data Source
- Change the Database Connection
- Configuring Environment Settings
- Configuring Monitoring Settings
- Configuring Virtual Appliance Settings
- Configuring General Settings
- Managing Available Storage Centers
- Managing Available PS Series Groups
- Managing Available FluidFS Clusters
- Managing the Storage Manager Virtual Appliance
- Migrate a Microsoft SQL Server Database
- Uninstalling the Data Collector
- Storage Manager User Management
- Storage Manager User Privileges
- Authenticating Users with an External Directory Service
- Managing Local Users Through the Data Collector
- Update the Information Displayed on the Users & System Tab
- Create a User
- Configure or Modify the Email Address of a User
- Change the Privileges Assigned to a User
- Change the Preferred Language for a Storage Manager User
- Force the User to Change the Password
- Change the Password for a User
- Set Storage Center Mappings for a Reporter User
- Delete a User
- Delete a Storage Center Mapping for a User
- Unlock a Local User Account
- Managing Local User Password Requirements
- Managing User Settings with the Storage Manager Client
- SupportAssist Management

Activate Disaster Recovery for a Single Restore Point
To activate DR for a replication or Live Volume, use the corresponding restore point.
Steps
1. Click the Replications & Live Volumes view.
2. Click the Restore Points tab.
3. Right-click the restore point, then select Activate Disaster Recovery. The Activate Disaster Recovery dialog box
appears.
If the restore point corresponds to a synchronous replication, the dialog box displays additional information about the state
of the replication:
● The Sync Data Status field displays the synchronization status for the replication at the time the restore point was
validated.
● A recommendation about whether the destination volume is currently synchronized with the source volume is displayed
below the Sync Data Status field in green or yellow text.
Figure 65. Activate Disaster Recovery Dialog Box
4. (Live Volume, Storage Center 6.5 and later only) Select the Preserve Live Volume check box to direct IO requests to the
secondary volume without deleting the Live Volume. If the Live Volume manages a replication, Preserve Live Volume must
be selected to preserve the managed replication later in the restore process.
● If Preserve Live Volume is selected, Storage Center directs IO requests to the secondary volume by promoting it to
primary. The Live Volume is not deleted and may be repaired when the original primary Storage Center comes back
online. Volume identity is preserved so that administrator intervention is not required on the servers mapped to the
volume. If a replication is managed by the Live Volume, it moves to follow the newly promoted primary volume. Fewer
volume settings are available because the existing Live Volume settings are used.
● If Preserve Live Volume is not selected, Storage Manager deletes the Live Volume, creates a view volume, and maps it
to a server. During the restore process, the Live Volume is recreated. If a replication is managed by the Live Volume, the
managed replication is removed later during the restore process.
5. In the Name field, type the name for the recovery volume.
6. Select a server to map the recovery volume to by clicking Change next to the Server label.
● A server is required for each restore point unless the Preserve Live Volume check box is selected.
● Click Advanced Mapping to configure LUN settings, restrict mapping paths, or present the volume as read-only.
7. Choose which snapshot will be used for the activated volume.
● If Preserve Live Volume is not available or not selected, use the current state of the volume by selecting Use Active
Snapshot, or select a frozen snapshot by clicking Change next to Snapshot. By default, the last frozen snapshot is
used.
● If Preserve Live Volume is selected, the last frozen snapshot is used unless Use Active Snapshot is selected.
NOTE:
For high consistency mode synchronous replications that are current, the Use Active Snapshot check box
is automatically selected.
Storage Center DR Preparation and Activation 549