
Users Guide


To add a VMFS datastore, use these options:
• Create New Dell Volume – Create and map a new Dell volume as a VMFS datastore.
• Map Existing Dell Volume – Select an existing Dell volume to map as a datastore.
NOTE: The existing volume must be a formatted VMFS datastore.
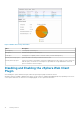
Adding a Datastore Using a New Dell Volume
A datastore can be created from a new Dell volume using the vSphere Web Client Plugin.
Prerequisites
• The active controller option is not available if the Storage Center user in Storage Manager has only volume manager privileges.
• The SAS mapping protocol selection is available on supported Storage Centers only. The SCv2000 Series and SC4020 Storage
Centers support FE-SAS.
• The options for selecting the VMFS versions depend on the version of ESXi that is running on the host. If the host is running ESXi 5.5
or ESXi 6.5, the VMFS version selection is available. The VMFS version selection does not appear when only ESXi 6.0 hosts are
available in the inventory. ESXi 6.0 supports only VMFS 5. ESXi 5.5 supports VMFS 3 and VMFS 5. ESXi 6.5 supports VMFS 5 and
VMFS 6.
• On the Volumes page, the values for Storage Profile and Disk Folder can be modified only if the preferences for the Storage Center
have been set to Allow. For information about managing the preferences, see the Dell Storage Manager Administrator’s Guide
Steps
1. Select an object in inventory that can be a parent of a datastore:
• Datacenter
• Host
• Cluster
2. Select Actions > All Dell Storage Actions > Add Datastore.
The Add Datastore wizard opens.
3. Select the VMFS datastore type and click Next.
The vSphere Web Client Plugin loads the Storage Center information.
4. If necessary, select one or more hosts to which to map the new volume.
5. Select the Storage Center and/or active controller for volume creation. Click Next.
6. Select Create New Dell Volume, and click Next.
7. Select from the following steps that pertain to your environment. The steps that apply depend on the user-preferences settings of the
Storage Center user in Storage Manager.
a) Type the name and size for the new volume, select the volume folder, and click Next.
b) Select the pagepool to use for creating the volume.
c) If applicable, select the storage options for this volume.
• If the preferences for the Storage Center have been set, you can select a Storage Profile for the volume.
• If the preferences for the Storage Center have been set, select a Disk Folder from the drop-down menu.
• Click Next.
NOTE:
If the Reduction Profile option has been set to enable Compression in the user preferences of Storage
Manager, Compression will be applied to the datastore. For information about managing the preferences, see the
Dell Storage Manager Administrator’s Guide
.
d) Select a Snapshot Profile for the volume, and click Next.
e) Specify the LUN for mapping the volume, and click Next.
f) If permitted, select the VMFS version, and click Next.
8. If necessary, select the protocol for mapping, and click Next.
NOTE:
The option to select protocol mappings is visible only when more than one protocol is available. If FE-SAS is
supported on the Storage Center, the SAS option is listed as available.
9. Type a name for the datastore, and select an inventory location in the datastore properties.
Depending on the VMFS file system version, you are also prompted to select the maximum file size and block size for the datastore.
10. (Optional) Select Create Replication/Live Volume if you want to replicate the volume data to a second Storage Center and allow
both Storage Centers to process I/O requests for the volume. For information, see Create and Manage Replications and Live Volumes.
Working With Dell Storage
19