Storage Manager 2018 R1 インストールガイド November 2018 Rev.
メモ、注意、警告 メモ: 製品を使いやすくするための重要な情報を説明しています。 注意: ハードウェアの損傷やデータの損失の可能性を示し、その問題を回避するための方法を説明しています。 警告: 物的損害、けが、または死亡の原因となる可能性があることを示しています。 ©2018 Dell Inc.またはその関連会社。All rights reserved.(不許複製・禁無断転載)Dell、EMC、およびその他の商標は、Dell Inc.
前書き 本書は、Storage Manager コンポーネントのインストールおよび設定方法を。 変更履歴 文書番号:680-028-024 リビジョン 日付 説明 A 2018 年 3 月 Storage Manager 2018 R1 のイニシャルリリース B 2018 年 5 月 Storage Manager 2018 R1.2 用にアップデート C 2018 年 8 月 Storage Manager 2018 R1.10 用にアップデート D 2018 年 11 月 Storage Manager 2018 R1.
Storage Center 関連文書 ● Storage Center リリース ノート 特定の製品バージョンに関する機能と、未解決および解決済みの問題に関する情報を示します。 ● Storage Center 導入ガイド Storage Center コントローラー、スイッチ、およびエンクロージャのケーブル接続手順と、新しい Storage Center の設定手順を 示します。 ● Storage Center ソフトウェア アップデート ガイド Storage Center ソフトウェアの以前のバージョンから最新バージョンへのアップデートの方法を説明します。 ● Storage Center Update Utility 管理者ガイド ストレージ システム上で Storage Center ソフトウェアをアップデートする方法を説明します。Storage Center アップデートユ ーティリティーを使用した Storage Center ソフトウェアのアップデートは、標準の Storage Center アップデート方法を使用し てもアップデートできないストレージ システムを対象としています。 ● S
Fibre Channel FS8600 アプライアンスの 1 Gb Ethernet クライアント接続から 10 Gb Ethernet クライアント接続へのアップグレ ードに関する情報を示します。この文書の対象読者は、FS8600 アプライアンスハードウェア サービスを実行する Dell の設置担 当者および認定ビジネス パートナーです。 Dell TechCenter ● Dell TechCenter Dell TechCenter は、Dell サポートサイトの別の場所に移動しました。デルのストレージ製品に関しては、次のサイトのテクニカ ルホワイトペーパー、ベストプラクティスガイド、FAQ を参照してください。 ○ TechCenter の移行に関する FAQ(TechCenter のコンテンツの移行に関する詳細) ○ Dell サポート(検索可能なナレッジベース) ○ Dell Technical Resources(ネットワーキング、サーバ、ストレージなど、移行された TechCenter のトピック分野) Dell へのお問い合わせ Dell では、オンラインおよび電話ベースのサポートとサ
目次 章 1: Storage Manager の概要........................................................................................................... 8 Storage Manager コンポーネント.....................................................................................................................................8 管理互換性.............................................................................................................................................................................9 ソフトウェアおよびハードウェアの要件...................
クライアントを使用した Data Collector への接続......................................................................................................27 Storage Manager への Storage Center の追加..............................................................................................................28 次の手順.............................................................................................................................................................................. 29 章 6: Storage Manager ソフトウェアのアップデート..........
1 Storage Manager の概要 Storage Manager は、集中管理コンソールから Storage Center SAN、FluidFS クラスタ、PS Series グループの監視、管理、および分 析ができます。Storage Manager Data Collector は、外部データベースまたは内蔵データベースのマネージドストレージデバイスか ら収集したデータと警告を保存します。 複数の Storage Center の監視および管理タスクを実行するには、Storage Manager Client または Unisphere Central を使用して、 Storage Manager Data Collector を接続します。 単一の Storage Center の監視および管理タスクを実行するには、Storage Manager Client または Unisphere を使用して、Storage Center を直接接続します。 トピック: Storage Manager コンポーネント 管理互換性 ソフトウェアおよびハードウェアの要件 Storage Manager
表 1. Storage Manager コンポーネント (続き) 説明 コンポーネント セットアップマニュアル によってロックされたままになりま す。 管理互換性 Storage Manager は、ストレージ製品を管理し、Microsoft 製品および VMware 製品の統合管理を提供します。 Storage Manager には、次の表に示されている製品との互換性があります。 製品 バージョン Storage Center 6.7~7.3 メモ: Storage Manager 2018 R1.10 を使用すると、Storage Center 6.6 を実行しているストレージシステムに接続し、後 でサポートされている Storage Center のバージョンにアッ プデートすることができます。 PS Series グループファームウェア 7.0 ~ 10.0 Dell FluidFS 6.0.300135 メモ: FluidFS ファームウェアを 6.0.
コンポーネント 要件 Windows ユーザー グループ 管理者 CPU 2 個以上のコアを搭載した 64 ビット(x64)マイクロプロセッサ 100,000 以上の Active Directory メンバーまたはグループで構成されている環境の場合、Data Collector には 4 コアが必要になります メモリ 次のストレージ環境のサイズに基づいて変わります。 ● 4 GB:1 ~ 10 台の Storage Center または最大 3000 の合計ボリューム ● 8 GB:11 台以上の Storage Center または最大 6000 の合計ボリューム ● 16 GB:11 台以上の Storage Center または最大 12,000 の合計ボリューム ● 32 GB:11 台以上の Storage Center または 12,000 を超える合計ボリューム ディスク容量 20 GB 以上、FluidFS クラスタソフトウェアアップデートを管理するために追加容量が必要 メモ: 外部データベースの代わりに、組み込みデータベースの使用を選択する場合は、ファイルシステム 上のデ
コンポーネント 要件 メモリ 次のストレージ環境のサイズに基づいて変わります。 ● 4 GB:1 ~ 10 台の Storage Center または最大 3000 の合計ボリューム ● 8 GB:11 台以上の Storage Center または最大 6000 の合計ボリューム ● 16 GB:11 台以上の Storage Center または最大 12,000 の合計ボリューム ● 32 GB:11 台以上の Storage Center または 12,000 を超える合計ボリューム ソフトウェア ● VMware vCenter Server ● VMware vSphere の高可用性 Storage Manager Client の要件 次の表に、Storage Manager Client の要件を示します。 コンポーネント 要件 オペレーティング システム 最新のサービスパックを搭載した次の 32 ビットまたは 64 ビットオペレーティングシステムのいずれか ● Windows 8 ● Windows 8.
● Mozilla Firefox メモ: Google Chrome が推奨ブラウザです。その他の Web ブラウザは動作する可能性はありますが、公式にはサポートされて いません。 Server Agent の要件 次の表に、Windows ベースのサーバ用 Storage Manager Server Agent を実行するための要件を示します。 コンポーネント 要件 オペレーティング システム 最新のサービスパックを搭載した次の 64 ビットオペレーティングシステムのいずれか: ● Windows Server 2012(フルまたはコアインストール) ● Windows Server 2012 R2(フルまたはコアインストール) ● Windows Server 2016 ● Windows Server 2019 CPU 64 ビット(x64)マイクロプロセッサ ソフトウェア Microsoft .NET Framework 4.
ポート プロトコル 名前 目的 25 TCP SMTP 電子メール通知の送信 443 TCP SSL ● 管理対象の Storage Center との通信 ● SupportAssist による診断データの送信 1199 TCP SIMS RMI 管理対象 PS Series グループとの通信 1433 TCP Microsoft SQL Server 外付けの Microsoft SQL Server データベースへの接続 3033 TCP SSL 管理対象の Storage Center との通信 3306 TCP MySQL 外付けの MySQL データベースへの接続 8080 TCP VMware SDK VMware サーバとの通信 27355 TCP Server Agent ソケットリ スニングポート Storage Manager Server Agent 通信 35451 TCP FluidFS 管理対象の FluidFS クラスタとの通信 44421 TCP FluidFS 診断 管理対象の Fluid
IPv6 サポート Storage Manager Data Collector では、Storage Manager Client との接続と管理対象 Storage Center SAN との通信に、IPv6 を使用する ことができます。 IPv6 を使用するには、次の表に説明されているとおりに IPv6 アドレスを割り当てます。 IPv6 接続 要件 Storage Manager Client から Data Collector ● Storage Manager Client コンピュータには、IPv6 アドレスが 必要です。 ● Data Collector サーバには、IPv4 アドレスおよび IPv6 アドレ スの両方が必要です。 Data Collector から Storage Center ● Data Collector サーバには、IPv4 アドレスおよび IPv6 アドレ スの両方が必要です。 ● Storage Center SAN には、管理インタフェースの IPv4 アド レスおよび IPv6 アドレスの両方が必要です。 14 Storage Manager の
2 計画および準備 Storage Manager をインストールする前に、構成を計画し、必要なソフトウェアをインストールします。 メモ: 既存の Data Collector のインストールをアップデートするのではなく、新しい Storage Manager Data Collector をインスト ールする予定の場合は、インストール中に新しい Data Collector データベースを作成する必要があります。 メモ: 既存の Data Collector データベースを使用する予定の場合は、このガイドの手順に従って、既存の Data Collector のイン ストールから Storage Manager Data Collector または Storage Manager Virtual Appliance の新しいインストールに移行します。 トピック: • • • データストレージ方法の選択 必要なインストール情報の収集 データベースの準備 データストレージ方法の選択 Data Collector は、外部データベースまたはホストサーバのファイルシステム上の内蔵データベースにデータを保存するよ
データベース情報の記録 このタスクについて SQL データベースを使用する場合は、インストールに必要なデータベース情報を記録します。 項目 情報を書き留めます [データベースのバージョン ] [データベースをホストしてい るサーバーの名前] [データベースのサーバーポー ト] [データベースのユーザー名] セキュリティ保護のため、データベースのユーザー名は安全な場所にのみ記録するようにしてく ださい。 [データベースのパスワード] セキュリティ保護のため、データベースのパスワードは安全な場所にのみ記録するようにしてく ださい。 データベースの準備 外部データベースの使用を計画している場合は、データベースごとに、データベースのタイプに対応するタスクを実行して準備し ます。 このタスクについて メモ: Data Collector データを内蔵データベースに保存する場合は、この手順をスキップします。 手順 ● Microsoft SQL Server データベースの準備 ● MySQL データベースの準備 Microsoft SQL Server データベースの準備 Data Collector 用に M
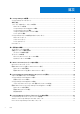
図 1. TCP/IP のプロパティダイアログボックスの IP アドレスタブ e. [IPALL ]の下で、 [TCP ポート] が有効なポート番号で設定されていることを確認します。SQL Server 用のデフォルト TCP ポートは、1433 です。 f. [適用] をクリックし、[OK] をクリックしてダイアログボックスを終了します。 6. TCP / IP プロトコルを有効にします。 a. ナビゲーションペインで、 [MSSQLSERVER のプロトコル] または [SQLEXPRESS のプロトコル] をクリックします。 b. [TCP / IP] を右クリックして、[有効にする] を選択します。 7. SQL Server を再起動します。 a. ナビゲーションペインで、[SQL Server サービス] をクリックします。 b. [SQL Server] を右クリックして、[再起動] を選択します。 MySQL データベースの準備 Data Collector 用のデータベース権限を設定します。 手順 1. 必要であれば、データベースソフトウェアをインストールします。 2.
3 Data Collector のインストールおよび設定 Data Collector をインストールし、Data Collector のセットアップ ウィザードを使用して設定を行います。 トピック: • • Data Collector のインストール 既存の Data Collector を新しい Data Collector に移行 Data Collector のインストール Storage Center へのネットワーク接続がある Windows サーバーに、Data Collector をインストールします。 前提条件 ● Windows サーバは、「Data Collector の要件 、p. 9」に記載されている要件を満たしている必要があります。 ● 「計画および準備 、p. 15」で説明されているタスクを完了する必要があります。 ● Data Collector をインストールしているユーザーは、Windows サーバの管理者グループのメンバーである必要があります。 手順 1.
パスワードを指定しない場合は、Data Collector 初期セットアップは、データベースユーザー(compmsauser)用に 13 文字 のデフォルトパスワードを作成します。 11. [次へ] をクリックします。 [ポート] ページが表示されます。 a. ウェブサーバサービスに別のポート番号を指定するには、[ウェブサーバサービスポートを有効にする] フィールドにポー ト番号を入力します。 b. サーバエージェントサービスを有効 / 無効にするには、[サーバエージェントサービスポートを有効にする] チェックボッ クスをオンにするかオフにします。 サーバエージェントサービスに異なるポート番号を指定するには、[サーバエージェントサービスポートを有効にする] フ ィールドにポート番号を入力します。 c. VASA サービスを有効または無効にするには、 [VASA サービスポートを有効にする] チェックボックスをオンにするかオフ にします。 VASA サービスに別のポート番号を指定するには、 [VASA サービスポートを有効にする] フィールドにポート番号を入力し ます。 d.
● パスワード設定 ● 内部データベースの情報 Data Collector の移行要件 既存の Data Collector を新しい Data Collector に移行するには、次の要件を満たす必要があります。 ● 既存の Data Collector が Microsoft SQL Server データベースを使用している場合、新しい Data Collector をホストする Windows サーバのファイアウォールは、ポート 1433 のアウトバウンド通信を許可するように設定されている必要があります。 ● 既存の Data Collector が MySQL データベースを使用している場合、新しい Data Collector をホストする Windows サーバのファ イアウォールは、ポート 3306 のアウトバウンド通信を許可するように設定されている必要があります。 ● 新しい Data Collector をホストする Windows サーバは、 「Data Collector の要件 、p.
サーバエージェントサービスに異なるポート番号を指定するには、[サーバエージェントサービスポートを有効にする] フ ィールドにポート番号を入力します。 c. VASA サービスを有効にするには、 [VASA サービスポートを有効にする] チェックボックスをオンにし、フィールドにサー ビスのポート番号を入力します。 VASA サービスに別のポート番号を指定するには、 [VASA サービスポートを有効にする] フィールドにポート番号を入力し ます。 d. SMI-S サービスを有効にするには、[SMI-S サービスポートを有効にする] チェックボックスをオンにし、フィールドにサ ービスのポート番号を入力します。 SMI-S サービスに別のポート番号を指定するには、[SMI-S サービスポートを有効にする] フィールドにポート番号を入力 します。 11.
4 Storage Manager Virtual Appliance のインスト ールと設定 本項では、Storage Manager Virtual Appliance のインストールおよび設定の手順を説明します。 トピック: • • • • vSphere の 仮想アプライアンス の要件 Storage Manager Virtual Appliance の導入 Storage Manager Virtual Appliance の設定 既存の Data Collector の Storage Manager Virtual Appliance への移行 vSphere の 仮想アプライアンス の要件 Storage Manager Virtual Appliance は、vSphere サーバからの以下の条件を必要とします。 ● 仮想アプライアンス は、標準データストア上に展開する必要があります。VVol データストアに 仮想アプライアンス を展開し ないでください。 ● vSphere サーバは、データストアのスナップショットを定期的に作成するように設定する必要があります。 Storage
10.[次へ] をクリックします。 [詳細の確認] ページが表示されます。 11. 仮想アプライアンスの詳細を確認し、[次へ] をクリックします。 [ライセンス契約] ページが表示されます。 12.[すべてのライセンス契約に同意します] チェックボックスを選択して、[次へ] をクリックします。 13.[次へ] をクリックします。 [ストレージの選択] ページが表示されます。 14.[仮想ディスクフォーマットの選択] ドロップダウンメニューから [シンプロビジョン] を選択します。 15. 仮想アプライアンスデータを格納するデータストアを選択します。 16.[次へ] をクリックします。 [ネットワークの選択] ページが表示されます。 17.[宛先ネットワーク] ドロップダウンメニューから仮想アプライアンスのネットワークを選択します。 18.[次へ] をクリックします。 [テンプレートのカスタマイズ] ページが表示されます。 a. [ホスト名] フィールドに仮想アプライアンスのホスト名を入力します。 b.
7. サービスのポート番号を変更する方法、またはサービスを有効 / 無効にする方法: a. 変更するサービスを選択し、[編集] をクリックします。 [ポートの編集] ダイアログボックスが開きます。 b. サービスのポート番号を変更するには、[ポート] フィールドに異なるポート番号を入力します。 c. サービスを有効または無効にするには、[有効] チェックボックスを選択または選択解除します。 d. [OK] をクリックします。 8. [次へ] をクリックします。 [データベース] ページが表示されます。 a. [データベースタイプ] ドロップダウンメニューから [Microsoft SQL Server] または [MySQL] を選択します。 b. データベースサーバのホスト名または IP アドレスを[ホストまたは IP アドレス] フィールドに入力します。 c. データベースサーバの TCP ポート番号を [ポート] フィールドに入力します。 d. e. f. g.
● Data Collector の Windows のインストールには、実行中のタスクが存在しないようにする必要があります。移行後、これらのタ スクが、Storage Manager Virtual Appliance に反映されないことがあります。 ● VVol を使用している場合、Data Collector の移行前に、VASA プロバイダの登録を解除してください。 既存の Data Collector の移行 Storage Manager Virtual Appliance を、既存の Data Collector 情報を格納したプライマリ Data Collector として使用するために、既存 の Data Collector を Storage Manager Virtual Appliance に移行します。 前提条件 仮想アプライアンス を導入して電源をオンにする必要があります。 手順 1. VMware vSphere で、Storage Manager Virtual Appliance インスタンスのスナップショットを作成します。 2.
5 Storage Manager クライアントのインストール および設定 クライアントを Windows コンピュータにインストールし、これを使用して、Data Collector に接続します。 トピック: • • • • • • Storage Manager アプリケーションページへの接続 Windows への Storage Manager Client のインストール Linux への Storage Manager Client のインストール クライアントを使用した Data Collector への接続 Storage Manager への Storage Center の追加 次の手順 Storage Manager アプリケーションページへの接続 Storage Manager Data Collector のインストールおよび設定後、Storage Manager アプリケーションページに接続し、Storage Manager Client をダウンロードできます。 Windows 用の Storage Manager Client または Linux 用の Storage Ma
Linux への Storage Manager Client のインストール Storage Manager Client は、Data Collector または直接 Storage Center に接続するアプリケーションです。Storage Manager Client は Storage Center を表示および管理できます。Data Collector サーバにネットワーク接続できる Linux コンピュータに Storage Manager Client をインストールします。 前提条件 ● ホストコンピュータは、「Storage Manager Client の要件 、p. 11」に記載されている要件を満たしている必要があります。 ● ユーザーは Linux コンピュータへの root 権限が必要です。 ● Linux コンピュータには完全な X-Windows 環境が必要です。 手順 1. Storage Manager Client インストーラを Data Collector からダウンロードします。 a.
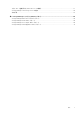
図 2.
● [既存の Storage Center から設定を継承する] チェックボックスがオンになっていない場合、その Storage Manager が Storage Center に追加されます。 ● [既存の Storage Center から設定を継承する] チェックボックスが選択されている場合、設定の継承 ダイアログボックスが 表示されます。 5. (設定の継承のみ)継承する Storage Center 設定を選択します。 a. 設定を継承する Storage Center を選択し、[次へ] をクリックします。ウィザードの次のページに進みます。 b. 継承する設定の各項目のチェックボックスにチェックを付けます。 c.
6 Storage Manager ソフトウェアのアップデート 次のタスクを使用して、Storage Manager Data Collector、Storage Manager Client、Storage Manager Server Agent、および Storage Manager Virtual Appliance をアップデートします。 トピック: • • • • Storage Manager Data Collector のアップデート Storage Manager Client のアップデート Storage Manager Server Agent のアップデート Storage Manager Virtual Appliance のアップデート Storage Manager Data Collector のアップデート Storage Manager Data Collector を新しいバージョンにアップデートするには、以下の手順に従います。 前提条件 ● アップデートしている Storage Manager Data Collector のバージョンは 15.3.
前提条件 ● Server Agent は Data Collector に接続している必要があります。 ● Data Collector は新しいバージョンにアップデートする必要があります。 手順 1. Server Agent Manager を起動します。 2. [アップグレードのチェック] をクリックします。 Data Collector から Server Agent インストーラがダウンロードされます。 3.