Citrix XenServer with Dell SC Series Storage Configuration and Deployment Dell Storage Engineering January 2017 A Dell EMC Deployment and Configuration Guide
Revisions Date Description January 2016 Initial XenServer 6.5 release January 2017 Updated for XenServer 7.0 and SCOS 7.1 Acknowledgements Author: Chuck Armstrong The information in this publication is provided “as is.” Dell Inc. makes no representations or warranties of any kind with respect to the information in this publication, and specifically disclaims implied warranties of merchantability or fitness for a particular purpose.
Table of contents Revisions.............................................................................................................................................................................2 Acknowledgements .............................................................................................................................................................2 1 2 3 Introduction ................................................................................................................
5.3 6 XenServer Storage using Fibre Channel HBA ...........................................................................................................42 6.1 7 Configure Server Objects in Dell Storage Manager .........................................................................................39 Configure Server Objects in Dell Storage Manager .........................................................................................42 Create new Storage Repository (SR) ..........................
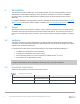
1 Introduction This document provides examples, tips, recommended settings, and other storage guidelines a system administrator can follow while configuring a Citrix ® XenServer® environment to connect to Dell EMC™ SC Series storage. Frequently asked questions regarding various SC Series storage features are also addressed.
1.4 Terminology The following terms are used throughout this document: Note: Definitions identified with an asterisk (*) are provided by the Citrix XenServer 7.0 Administrator’s Guide, which is available on the Citrix Product Documentation website. Fault domain (FD): A set of hardware components that share a single point of failure. For controller-level redundancy, fault domains are created for SC Series storage to maintain connectivity in the event of a controller failure.
Storage Repositories (SRs)*: A Storage Repository is a particular storage target, in which virtual machine (VM) Virtual Disk Images (VDIs) are stored. Virtual Block Devices (VBDs)*: Virtual Block Devices are connector objects (similar to the PBD described previously) that allows mappings between VDIs and VMs.
2 Citrix XenServer and Dell Storage product overview This section provides an overview of Citrix XenServer and the Dell SC Series storage technologies presented in this paper. 2.1 Citrix XenServer Citrix XenServer is a leading server virtualization and hypervisor management platform that enables reductions in total cost of ownership for desktop, cloud, and server virtualization infrastructures.
3 XenServer storage overview XenServer environments utilize shared storage as part of the virtualization platform. Shared storage can be connected through iSCSI, Fibre Channel (FC), or NFS. The information contained in this document is focused on iSCSI and Fibre Channel block storage connectivity because the SC Series storage platform is a block storage platform.
Shared iSCSI storage using iSCSI HBAs 3.1.1 NIC bonding compared to iSCSI MPIO NIC bonding improves XenServer host resiliency by using two physical NICs as if they were one. If one NIC within the bond fails, the host network traffic will automatically be rerouted through the second NIC. NIC bonding supports active/active mode, but only supports load balancing of VM traffic across the physical NICS. Each virtual network interface will only use one of the links in the bond at a time.
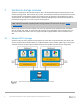
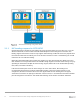
3.2 Shared Fibre Channel storage XenServer using SC Series storage provides support for shared SRs on FC-attached LUNs using FC HBAs. Figure 3 illustrates how an environment using FC HBAs looks conceptually. Shared Fibre Channel storage 3.3 SR-to-VM mapping XenServer is capable of deploying a many-to-one, VM-to-SR (volume) deployment. The best number of VMs per SR largely depends on the workload and IOPS requirement of the VMs being deployed.
multipathing requires a restart of the XenServer host and should be enabled before storage is added to the server. Only use multipathing when there are multiple paths to the storage. Note: Additional information on multipathing with XenServer hosts can be found in the Citrix XenServer 7.0 Administrator’s Guide, which is available on the Citrix Product Documentation website. 3.4.1 Enabling multipathing in XenCenter 1. 2. 3. 4. 5. 12 Right-click the server in XenCenter and select Enter Maintenance Mode.
4 XenServer storage using Open-iSCSI initiator (software) XenServer iSCSI storage repositories are supported with SC Series storage through the use of the OpeniSCSI initiator. Shared iSCSI SRs using the software-based host initiator are capable of supporting VM agility using XenMotion — VMs can be started on any XenServer host in a resource pool and migrated between them with no noticeable interruption. iSCSI SRs utilize the entire LUN specified at creation time and may not span more than one LUN.
To set the host IQN using XenCenter: Right-click the host, select Properties, enter the desired iSCSI IQN, and click OK. XenCenter: Set host IQN To set the host IQN using the XE CLI: From the XE CLI, execute the following command to modify the host IQN. xe host-param-set uuid=host_uuid other-config:iscsi_iqn=new_initiator_iqn XE CLI: Set host IQN Caution: Do not change the XenServer host IQN with iSCSI SRs attached. Doing so can result in failures connecting to new targets or existing SRs.
4.1 Open-iSCSI initiator setup with SC Series arrays When planning an iSCSI network, isolate the iSCSI traffic from management traffic through the use of separate switches and subnets. Failure to follow this best practice may result in compromised reliability or performance. When implementing multipathing with iSCSI storage, be certain none of the redundant iSCSI paths are configured within the same subnet or on the same physical network as the management interface.
Open-iSCSI: dual subnets and MPIO 4.2.1 XenServer Open-iSCSI initiator configuration The XenCenter management GUI or the XE CLI can be used to configure dedicated NICs for iSCSI storage traffic use. Assigning a NIC for iSCSI use will prevent the use of the NIC for other functions such as host management. However, appropriate network configuration is also required to ensure the NIC is used for the desired traffic.
4.2.2 Assign NIC functions using the XenCenter management GUI To perform these steps using the CLI rather than the XenCenter GUI, see section 4.2.3. Be sure Multipathing has been enabled as shown in section 3.4.1. 4.2.2.1 Optional steps: implementing Jumbo Frames 1. In the XenCenter management GUI, navigate to the Infrastructure view, navigate through the objects, select the desired XenServer host, select the Networking tab, select the desired Network from the list, and click Properties. 2.
4.2.2.2 Required steps Note: If Jumbo Frames are to be used, the steps in section 4.2.2.1 must be completed prior to executing the following steps. 1. In the XenCenter management GUI, navigate to the Infrastructure view, navigate through the objects, select the desired XenServer host, select the Networking tab, and click Configure.
2. Click Add IP address, enter the desired name, select the Network from the drop-down box, and enter the IP address settings for the dedicated iSCSI storage NIC. Click OK. 3. Repeat steps 1-2 for each additional NIC dedicated for iSCSI storage. 4.2.3 Assign NIC functions using the XE CLI If NIC functions were assigned using the XenCenter GUI in section 4.2.2, please skip to section 4.2.4 to configure the server objects in Dell Storage Manager. Be sure Multipathing has been enabled as shown in section 3.
xe pif-param-set other-config:mtu=9000 uuid=Pif-UUID 3. Repeat this process for each eth interface dedicated for iSCSI storage traffic on each XenServer host connecting to the SC Series storage. 4.2.3.2 Required steps Note: If Jumbo Frames are to be used, the steps in section 4.2.3.1 must be completed prior to executing the following steps. 1.
4.2.4 Configure Server Objects in Dell Storage Manager Use the following steps to configure the server object for access to the SC Series storage: 1. In Dell Storage Manager Client, go to the Storage tab, drill down through the array to highlight the Servers object, click Create Server. 2. Enter the name to identify the XenServer host, select the operating system from the drop-down list, and click Manually Add HBA.
3. Select iSCSI from the HBA Port Type drop-down list, enter the previously defined iSCSI IQN in the WWN or iSCSI Name field, and click OK. 4. In the completed Create Server window, click OK. 5. Repeat steps 1–3 for each XenServer to be added to the pool. 6. With Servers still highlighted, click Create Server Cluster.
7. Enter the Name to identify the XenServer Cluster, select the Operating System from the drop-down list, and click Add Server to Cluster. 8. Select the server from list and click OK. 9. Repeat steps 6-7 for each XenServer host that will be part of the XenServer pool. 10. Click OK to create the server cluster.
After creating the server and server cluster objects, volumes can be created and mapped to the servers. For XenServers in a pool, map LUNs to the server cluster object to ensure all servers use the same LUN number. Continue to section 7 to create Storage Resources from these volumes on the XenServer or XenServer pool. Note: See the Create a Cluster Object in Enterprise Manager and Creating and mapping a volume in Enterprise Manager videos for additional information. 4.
Open-iSCSI: single subnet and MPIO 4.3.1 Configure bonded storage NICs In this configuration, redundancy to the network is provided by two bonded NICs. Bonding the two NICs will create a new bonded interface that network interfaces will be associated with. This will create multiple paths with one storage IP address on the server. The creation of the bonded interface differs based on membership in a pool.
4.3.1.1 Optional steps: implementing Jumbo Frames on a host participating in a pool 1. In the XenCenter management GUI, navigate to the Infrastructure view, drill down through the objects, select the desired XenServer host, select the Networking tab, select the desired network from the list, and click Properties. 2. Select Network Settings, input the MTU of 9000 (default value is 1500), and deselect the checkbox so this network will not be added to new VMs. 3.
4.3.1.2 Creating a NIC bond in a XenServer host participating in a pool 1. From the XenCenter GUI, select the server, click the NIC tab, and click Create Bond. 2. Select the NICs you would like to participate in the bond, select the Bond mode (default is Activeactive), modify the MTU (default is 1500), and click Create. Note: If Jumbo Frames are to be used, the MTU must be set (as shown in section 4.3.1.1) prior to creating the bonded interface.
3. Once complete, there will be a new bonded NIC displayed in the list of NICs. 4.3.1.3 Optional steps: implementing Jumbo Frames on a standalone host 1. Get the PIF UUID for the interface: • For a standalone XenServer host: Execute xe pif-list to list the PIFs on the server. • If the XenServer host is part of a pool: a. Execute xe host-list to retrieve a list of the hosts and UUIDs. b. Execute xe pif-list host-uuid=host-uuid to list the PIFs on the selected host. 2.
4.3.2 Assign NIC functions to the bond using the XenCenter management GUI To perform these steps using the CLI rather than the XenCenter GUI, see section 4.3.3. Be sure Multipathing has been enable a shown in section 3.4.1. 1. In the XenCenter management GUI, navigate to the Infrastructure view, drill down through the objects, select the desired XenServer host, select the Networking tab, and click Configure. 2.
4.3.3 Assign NIC functions to the bond using the XE CLI If NIC functions were assigned using the XenCenter GUI in section 4.3.2, please skip to section 4.3.4 to configure the server objects in Dell Storage Manager. Be sure Multipathing has been enable a shown in section 3.4.1. 1. Get the PIF UUID for the bond interface: • If on a standalone server, use xe pif-list to list the PIFs on the server. • If on a host in a resource pool: a. Type xe host-list to retrieve a list of the hosts and UUIDs. b.
4.3.4 Configure Server Objects in Dell Storage Manager Use the following steps to configure the server object for access to the SC Series storage: 1. In Dell Storage Manager Client, go to the Storage tab, navigate through the array to highlight the Servers object, click Create Server. 2. Enter the name to identify the XenServer host, select the operating system from the drop-down list, and click Manually Add HBA. 3.
4. In the completed Create Server window, click OK. 5. Repeat steps 2–3 for each XenServer to be added to the pool. 6. With Servers still highlighted, click Create Server Cluster. 7. Enter the Name to identify the XenServer Cluster, select the Operating System from the drop-down list, and click Add Server to Cluster.
8. Select the server from list and click OK. 9. Repeat steps 6-7 for each XenServer host that will be part of the XenServer pool. 10. Click OK to create the server cluster. After creating the server and server cluster objects, volumes can be created and mapped to the servers. For XenServers in a pool, map LUNs to the server cluster object to ensure all servers use the same LUN number. Continue to section 7 to create Storage Resources from these volumes on the XenServer or XenServer pool.
5 XenServer Storage using iSCSI HBA If using an iSCSI HBA to create an iSCSI SR, use the CLI from the XenServer host or the BIOS-level management interface to update target information. Depending on which HBA is being used, the initiator IQN for the HBA needs to be configured. Given the type of HBA used, the documentation for that HBA should be consulted to configure the IQN. Once the IQN has been configured for the HBA, use Dell Storage Manager Client to create a new LUN.
2. Configure the IP address for the iSCSI HBA: a. To set the IP address for the HBA, choose option 4 (Port Level Info & Operations), then option 2 (Port Network Settings Menu). b. Enter option 4 (Select HBA Port) to select the appropriate HBA port, then select option 2 (Configure IP Settings). c. 35 Enter the appropriate IP settings for the HBA adapter port. When finished, exit and save or select another HBA port to configure. In this example another HBA port will be configured.
d. From the Port Network Settings menu, select option 4 to select an additional HBA port to configure. Enter 2 to select the second HBA port. e. Once the second HBA port is selected, choose option 2 (Configure IP Settings) from the Port Network Settings menu to input the appropriate IP settings for the second HBA port.
f. Choose option 5 (Save changes and reset HBA (if necessary), then select Exit until the main menu is displayed. The iSCSI name or IQN can also be changed using the qaucli utility: 1. 2. 3. 4. 5. 6. 37 Select option 4 (Port Level Info & Operations) from the main menu. Select option 3 (Edit Configured Port Settings). Select option 3 (Port Firmware Settings). Select option 7 (Configure Advanced Settings). Press until reaching iSCSI_Name. Enter a unique IQN name for the adapter.
5.2 Connect to SC Series iSCSI control ports The next step is to establish a target from XenServer so that it registers with the SC Series storage. 1. From the main interactive qaucli menu, select option 4 (Port Level Info & Operations). 2. From the Port Level Info & Operations menu, select option 7 (Target Level Info & Operations). 3. On the HBA target menu screen, select option 6 (Add a Target). a. Press [Enter] until reaching the TGT_TargetIPAddress option. b.
5.3 Configure Server Objects in Dell Storage Manager Use the following steps to configure the server object for access to the SC Series storage: 1. In Dell Storage Manager Client, go to the Storage tab, drill down through the array to highlight the Servers object, and click Create Server. 2. Enter the Name to identify the XenServer host, select the Operating System from the drop-down list, select the appropriate IQN listed in the Host Bus Adapters section, and click OK. 3.
4. With Servers still highlighted, click Create Server Cluster. 5. Enter the Name to identify the XenServer Cluster, select the Operating System from the drop-down list, and click Add Server to Cluster.
6. Select the server from the list and click OK. 7. Repeat steps 5–6 for each XenServer host that will be part of the XenServer pool. 8. Click OK to create the server cluster. After creating the server and server cluster objects, volumes can be created and mapped to the servers. For XenServers in a pool, map LUNs to the server cluster object to ensure all servers use the same LUN number. Continue to section 7 to create Storage Resources from these volumes on the XenServer or XenServer pool.
6 XenServer Storage using Fibre Channel HBA XenServer Fibre Channel (FC) Storage Repositories are supported with SC Series storage through the use of FC HBAs. Supported HBA brands include QLogic and Emulex. Shared FC SRs using a FC HBA are capable of supporting VM agility using XenMotion: VMs can be started on any XenServer host in a resource pool and migrated between them with no noticeable interruption.
2. Enter the name to identify the XenServer host, select the operating system from the drop-down list, select the appropriate FC WWN listed in the Host Bus Adapters section, and click OK. 3. Repeat steps 1–2 for each XenServer to be added to the pool. 4. With Servers still highlighted, click Create Server Cluster.
5. Enter the name to identify the XenServer cluster, select the operating system from the drop-down list, and click Add Server to Cluster. 6. Select the server from the list and click OK. 7. Repeat steps 5–6 for each XenServer host that will be part of the XenServer pool. 8. Click OK to create the server cluster.
After creating the server and server cluster objects, volumes can be created and mapped to the servers. For XenServers in a pool, map LUNs to the server cluster object to ensure all servers use the same LUN number. Continue to section 7 to create Storage Resources from these volumes on the XenServer or XenServer pool. Note: See the Create a Cluster Object in Enterprise Manager and Creating and mapping a volume in Enterprise Manager videos for additional information.
7 Create new Storage Repository (SR) Once the volumes are mapped to the servers, they can be added to the XenServer using XenCenter or the CLI. The following steps detail adding storage using XenCenter. The steps for adding storage through the CLI can be found in the Citrix XenServer 7.0 Administrator’s Guide available on the Citrix Product Documentation website. 7.1 Software iSCSI SRs 7.1.
7.1.2 Create new Software iSCSI SR 1. In XenCenter, navigate to the XenServer Pool, select the Storage tab, and click New SR. 2. Under Virtual disk storage, select the iSCSI option, and click Next. 3. Give the new storage repository a name and click Next. Note: Uncheck the box, Autogenerate description based on SR settings, to enter additional description information such as SC Series array IP address, array model information, capacity, or administrative contact information.
4. In the Target hostname/IP address field, enter both SC Series storage iSCSI control port IP addresses, comma-separated, and click Scan Target Host. 5. In the Target IQN drop-down list, select the *(Control Port IP Address). 6. In the Target LUN drop-down list, select the LUN on which the new SR will reside. 7. Click Finish.
8. Click Yes to format the disk. The new SR is now available to the server or pool. Repeat these steps for mapping and adding storage for any additional SRs.
7.1.3 Verify multipath status To view the status of the multipath from the XenCenter GUI, select the new SR from the list of object and expand the Multpathing dropdown section as shown in Figure 10. Display multipath status from GUI To view the status of the multipath from the CLI, use the following command: mpathutil status Display multipath status from CLI Note: If mpathutil status does not show multiple paths as expected, confirm multipathing was enabled as shown in section 3.4.1.
7.2 Create SR with hardware HBA (iSCSI and FC) 1. In XenCenter, navigate to the XenServer pool, select the Storage tab, and click New SR. 2. Under Virtual disk storage, select the Hardware HBA option, and click Next. 3. Give the new storage repository a name and click Next.
Note: Uncheck the box, Autogenerate description based on SR settings, to enter additional description information such as SC Series array IP address, array model information, capacity, or administrative contact information. 4. Select the desired LUN from the list and click Next.
5. If this is a new SR (has not been created or used before), click Format to prepare the SR for use. 6.
A Technical support and resources Dell.com/support is focused on meeting customer needs with proven services and support. Dell TechCenter is an online technical community where IT professionals have access to numerous resources for Dell EMC software, hardware and services. Storage Solutions Technical Documents on Dell TechCenter provide expertise that helps to ensure customer success on Dell EMC Storage platforms. A.