Using Dell PS Series Asynchronous Replication Best practices for replication, planning, and recovery with PS Series arrays Dell Storage Engineering June 2015 A Dell Best Practices Guide
Revisions Date Description January 2010 Initial release June 2015 Updated for Dell PS Series firmware v8.0 Acknowledgements Original author: Keith Swindell Updated by: Michael Pacheco THIS WHITE PAPER IS FOR INFORMATIONAL PURPOSES ONLY, AND MAY CONTAIN TYPOGRAPHICAL ERRORS AND TECHNICAL INACCURACIES. THE CONTENT IS PROVIDED AS IS, WITHOUT EXPRESS OR IMPLIED WARRANTIES OF ANY KIND. © 2010-2015 Dell Inc. All Rights Reserved. Dell, the Dell logo and Dell brand are trademarks of Dell Inc.
Table of contents Revisions ............................................................................................................................................................................................. 2 Acknowledgements .......................................................................................................................................................................... 2 Introduction .........................................................................................
6.1.4 Interactions with other programs that create replicas ........................................................................................... 46 A 4 Additional resources................................................................................................................................................................ 47 A.1 Technical support and customer service ................................................................................................................. 47 A.
Introduction Replication provides a method for protecting volume data without setting the volumes offline and without causing disruption to applications and users. It also provides a disaster-recovery option in case the original group or volume is destroyed or unavailable. Dell™ PS Series Asynchronous Replication is used to copy volume data from one PS Series group to another PS Series group. The two groups must be connected through a TCP/IP network, and can be an unlimited distance apart.
1 About Asynchronous Replication A replica represents the contents of a volume at the time the replica was created. Each replicated volume has a replica set, which is the set of replicas created over time. A volume and its replicas are always stored on different groups connected by a robust network link. Separating the groups geographically protects volume data in the event of a complete site disaster.
2 Replication planning Below are some guidelines for getting started with replication planning. 1. 2. 3. 4. 5. 6. Plan the replication configuration for your groups and volumes. For each volume, determine the replication space requirements (section 2.2) for the primary and secondary groups. This will help in determining the local space required for replication and choosing the best replication partner for each volume. Configure one or more replication partners (section 3).
2.1 Primary and secondary group administration Because replication involves two groups, group administrators must coordinate their efforts. To configure groups as replication partners, each administrator needs the following information: 2.
Because replicas and failback snapshots are a representation of the volume data at a precise point in time, the group must maintain that state until the replication completes. To allow the volume to remain online and in use during this time, the group uses the local replication reserve to temporarily track changes to the volume while the operation is underway.
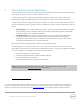
2.3 Volumes Up to 128 volumes per group can be configured for replication (and active replication) at any time. A volume can have only one replication partner. However, different volumes on the same PS Series group can replicate to different partners. For example, on GroupA, the replication partners are GroupB and GroupC. On GroupA, the volumes and their replication partners can be set up in the following example: 2.
2.6 Schedules Using schedules can help ensure your volumes and volume collections are replicated at the best intervals and times to meet your business needs. For example, consider a volume that rarely changes. You can configure a schedule that replicates its data once a week on Sunday mornings at 2:00 a.m. If you decide to increase or decrease the replication frequency, you can modify the schedule at any time. 2.
If you decide to enable failback support, you can specify it at the time you initially configure replication on the volume, or at any time thereafter. Note: You must create a replica to establish the failback snapshot before you attempt to failback. Because the failback snapshot uses space from the volume’s local replication reserve, you may want to increase that value to ensure replication continues to succeed. The general overview of the failback process is as follows. 1.
3 Configuring group replication To enable replication between groups, you must perform a configuration task on both the primary and secondary groups. 1. 2. 3. 4. 5. 6. Identify the names and IP addresses for the primary and secondary groups. Log in to Group Manager on the primary group. Select the Replication View. Click Replication Partners in the tree view. In the Activities Pane, click Configure partner. Identify the replication partner: a. b. c. d. 13 Enter the group name of secondary group.
7. Specify the inbound and outbound passwords: a. Enter the Inbound password used by the partner for authentication to perform replication with this group: b. Enter the obtained partner’s Outbound password that will be used by this group for authentication to perform replication with the partner. c. Click Next.
8. Select the storage pools and configure the delegated space: a. Pick one, or more (PS Series firmware v8 or later), storage pools to hold the replica set from the replication partner. b. Specify the delegated space for one, or more (PS Series firmware v8 or later) selected storage pools. c. Click Next. 9. Review the summary and click Finish.
10. 11. 12. 13. Log in to Group Manager on the secondary group. Click to select the Replication View. Click Replication Partners in the tree view. Identify the replication partner: a. b. c. d. e. 16 In the Activities Pane, click Configure partner. Enter the group name of primary group. Enter the group IP address of primary group. Optionally, enter the partner contact information. Click Next.
14. Specify the inbound and outbound passwords: a. Enter the Inbound password that will be used by the partner for authentication to perform replication with this group. b. Enter the obtained partner’s Outbound password that will be used by this group for authentication to perform replication with the partner. c. Click Next.
15. Select the storage pools and configure the delegated space: a. Pick one, or more (PS Series firmware v8 or later), storage pools to hold the replica set from the replication partner. b. Specify the delegated space for one, or more (PS Series firmware v8 or later) selected storage pools. c. Click Next. 16. Review the summary and click Finish.
3.1 Configuring volume replication Once replication has been configured in the group (section 3), you can enable replication on volumes. 1. In Group Manager, select the Volumes View. 2. Right-click a volume and select Configure replication. a. Select the replication partner. b. Specify the Total replica reserve. c. Specify the Local replication reserve.
e. f. Optionally, select Keep failback snapshot. If selected, the most recent complete replica will be retained in the local replication reserve to allow the partners to synchronize by replicating only changes. Click Next. g. Review the summary and click Finish.
3. Optionally, select Perform manual replication to use external media to transfer the data manually with the Manual Transfer Utility, rather than transferring automatically over the network. Manual replication is recommended for large amounts of data that would otherwise be transferred over slow network connections. For additional information on the Manual Transfer Utility, refer to the Manual Transfer Utility Version 1.2.3 Installation and User's Guide on eqlsupport.dell.com. 4.
3.1.1 Configuring volume replication schedules Once replication has been configured for the group (section 3) and desired volumes (section 3.1), you can configure replicas to be created on a schedule. 1. In Group Manager, select the Volumes view. 2. Right-click a volume that is already configured for replication (section 3.1) and select Create schedule. The following example schedule creates a volume replica every 12 hours for 4 days, keeping 8 replicas, if possible. a. b. c. d.
Note: The maximum-keep value for a schedule affects only the number of replicas to be retained that were created by the schedule. It does not include replicas created individually, or by another schedule. For this reason, it is important to periodically check the space usage on the partner to make sure you are not inadvertently using up the volume’s replica reserve with other replicas. 23 e. Specify the time settings and click Next.
4 Replicating a volume Once replication has been configured for the group (section 3) and desired volumes (section 3.1), you can create replicas of a volume. 1. In Group Manager, right-click a volume that is already configured for replication (section 3.1) and select Create replica. 2. Optionally, select Perform manual replication to use external media to transfer the data manually with the Manual Transfer Utility, rather than transferring automatically over the network.
5 Managing replication Some common replication management tasks, include: 5.1.1 Monitoring replication Monitoring replication space Managing delegated space Promoting a replica to a recovery volume Connecting to a recovery volume Replicating a recovery volume Failback a recovery volume to primary Monitoring replication You can monitor replication from multiple areas in Group Manager of the primary and secondary groups.
Figure 5 Viewing outbound replicas in the Replication pane of the primary group Figure 6 Viewing inbound replicas in the Replication pane of the secondary group Using Dell PS Series Asynchronous Replication | TR1052
5.1.2 Monitoring replication space From the Group Manager Replication panel, you can view delegated space statistics, including the amount of configured delegated space, and the percent that is still available. Note: If you have a replication schedule and you also create replicas on demand (click Create replica). All replicas will be part of the replica set for the volume and will compete for its replica reserve.
5.1.3 Managing delegated space You can modify the space delegated to a partner, however, you cannot decrease the space delegated to a lower capacity than is currently reserved for the partner’s replicas. To modify the space delegated to a partner: 1. In Group Manager of the secondary group, select the Replication view. 2. Select Volume Replication. 3. In the Activities panel, click Manage delegated space. 4.
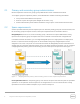
5. In the Replica Set Placement tab (PS Series firmware v8 and later), you can optionally configure a mapping between primary Pools and secondary Pools for initial replica set placement (Figure 1). If a pool mapping is not manually configured here, the system will automatically choose a pool for replica set placement when creating a replica set, based on available delegated space in the pools.
5.1.3.1 Space borrowing for replication Dell PS Series firmware version 8.0 provides the ability for snapshots, local and remote replicas, and deleted volumes in the Group Volume Recovery Bin to temporarily borrow space beyond the configured reserves. This feature, called space borrowing, simplifies configuring reserve space, improves space utilization, and enhances management of snapshots and replica reserves.
5.1.4 Promoting a replica to a recovery volume If a failure or maintenance in the primary group makes a volume unavailable, you can fail over to the secondary group by promoting to a recovery volume to allow hosts to access it. If the primary group becomes available, you can failback to the primary group (section 5.1.7). 31 1. 2. 3. 4. In Group Manager of the secondary group, select the Replication view. Click Replication Partners in the tree view.
6. Optionally, select the Volume options: 7. 32 Set volume online Retain target name of the original volume (this helps initiators discover the recovery volume automatically) Keep ability to demote to replica set Click Next.
8. Select the access type and define iSCSI access accordingly to allow the appropriate initiator to connect to the recovery volume from a host operating system. 9. Optionally, select Yes or No when asked, "Do you want to allow simultaneous access to the volume from more than one iSCSI initiator?" 10. Click Next.
11. Optionally, assign volume tags to the recovery volume. 12. Click Next.
13. Review the summary and click Finish to promote the Inbound Replica Set to a recovery volume. In the Volumes pane of Group Manager, the recovery volume will display a special icon that indicates it is a recovery volume. 14. You can connect an initiator to the recovery volume (section 5.1.5), allowing hosts to continue to use it as if it were the original volume.
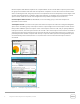
5.1.5 Connecting to a recovery volume From the host operating system iSCSI initiator, connect to the recovery volume as if it were a regular volume. Use the secondary group IP as the discovery address. 5.1.5.1 Connecting to a recovery volume from Microsoft Windows 1. 2. 3. 4. 36 Launch iSCSI Initiator. Click the Targets tab. Click to select the recovery volume. Click Connect.
5. 37 Click OK in the Connect to Target and iSCSI Initiator Properties windows.
6. Online the volume from the server (if required) a. Launch Disk Manager. b. Click Action > Rescan Disks. c. Right-click the DR volume and select Online.
5.1.6 Replicating a recovery volume When the primary group and the original volume are back online, you can optionally replicate the new data back to the primary group. 1. 39 On the secondary group, in the Group Manager Volumes pane, select the recovery volume and click Replicate to partner.
2. Enter the group administrator account and password for the primary group, 3. Optionally, choose to Perform manual replication with the Manual Transfer Utility. For additional information on the Manual Transfer Utility, refer to the Manual Transfer Utility Version 1.2.3 Installation and User's Guide on eqlsupport.dell.com 4. Optionally, choose to Remember these credentials in this session. 5. Click OK.
The following occurs: a. The primary group demotes the original volume to a failback replica set. b. The secondary group replicates the recovery volume to the primary group (shown below). 6. Replication completes, as shown below. Note: If you do not plan to failback soon, set up a replication schedule on the recovery volume (section 3.1.1).
5.1.7 Failback a recovery volume to primary If a failure or maintenance in the primary group makes a volume unavailable, you can fail over to the secondary group by promoting to a recovery volume (section 5.1.4) to allow hosts to access it. If the primary group becomes available, you can failback to the primary group. 1. From the host operating system, disconnect active connections to the primary volume, if required. 2. In Group Manager, on the secondary group, select the Volumes view. 3.
4. Click Yes to set the Recovery Volume offline and failback to the primary group. 5. Enter the account name and password. 6. Optionally, choose to Perform manual replication with the Manual Transfer Utility. For additional information on the Manual Transfer Utility, refer to the Manual Transfer Utility Version 1.2.3 Installation and User's Guide on eqlsupport.dell.com 7. Optionally, choose Remember these credentials in this session. 8. Click OK.
The following occurs: a. The secondary group performs one final replication to transfer any changes since the last replication. This synchronizes the data between the two groups. b. The secondary group demotes the recovery volume to a replica set (its original status). c. The primary group promotes the failback replica set to a volume. It now contains all the data that was in the recovery volume. 9. You can then connect to the volume again (section 5.1.
6 Troubleshooting This section addresses common problems with replication. 6.1.1 Replication fails due to lack of local replication reserve Local replication reserve is the amount of space needed on the original group to keep track of changes that occur to the volume while it is being replicated.
replicas; that is, 3.5 days’ worth of replicas, not 7 days. Therefore, in this scenario, you could increase the maximum-keep value to 14. You can increase (or decrease) the maximum-keep value at any time. Additionally, you may also consider increasing the volume’s replica reserve to handle the increased number of replicas you want to keep. 6.1.
A Additional resources A.1 Technical support and customer service Offering online and telephone-based support and service options, Dell support service can answer your questions about PS Series arrays, groups, volumes, array software, and host software. Availability varies by country and product, and some services might not be available in your area. Visit Dell.com/support or call 800-945-3355 (United States and Canada). For international support of Dell PS Series products, visit http://www.dell.