Data Migration from Dell PS Series or PowerVault MD3 to Dell EMC SC Series Storage using Thin Import Abstract The Thin Import feature of Dell™ Storage Center Operating System offers solutions for data migration when replacing Dell PS Series or Dell PowerVault™ MD3 arrays with Dell EMC™ SC Series arrays.
Revisions Revisions Date Description October 2015 Initial release June 2016 Added SCOS 7.0 and VMware content August 2017 Renamed doc; added PowerVault MD3 content March 2018 Minor updates Acknowledgments Author: Chuck Armstrong The information in this publication is provided “as is.” Dell Inc.
Table of contents Table of contents Revisions.............................................................................................................................................................................2 Acknowledgments ...............................................................................................................................................................2 Table of contents ................................................................................................
Introduction 1 Introduction This document provides an overview of the Dell EMC™ SC Series Thin Import feature, and introduces best practice guidelines and additional guidance for migrating data from a Dell™ PS Series or PowerVault™ MD3 series array to an SC Series array. Thin Import functionality was included as part of the Dell Storage Center Operating System (SCOS) 6.7 release and was enhanced to include VMware® support in SCOS 7.0. Support for importing from a PowerVault MD3 array was added in SCOS 7.
Overview and requirements 2 Overview and requirements The Thin Import process allows copying data from an external device and placing it onto an SC Series array. This process works at a block level and uses synchronous replication to import the data. When the source LUN is thin provisioned, all blocks on the source LUN are read and then written to the target volume on the SC Series arrays with the exception of zeroed blocks, which are not actually committed to disk.
Overview and requirements Note: Any discrepancies in MTU size will cause the Thin Import process to fail. It is recommended to set the MTU size to 1500 bytes on the SC Series array.
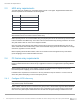
Overview and requirements 2.3 MD3 array requirements To import data from an MD3 array, the SCOS version must be 7.2 or higher. Supported MD3 models and firmware requirements are detailed in the following table: Model Minimum firmware version MD32xxi 08.20.21.61 MD36xxi 08.20.21.61 MD36xxf 08.20.21.61 MD38xxi 08.25.09.61 MD38xxf 08.25.09.
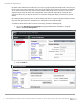
Overview and requirements By default, iSCSI initiators that use discovery try to log in to group targets protected by CHAP, even if they do not have the correct access credentials. In the case of Thin Import, when a remote connection is created from an SC Series to a PS Series array, the SC Series initiators automatically discover and try to connect to the VDS/VSS target on the PS Series array. Authentication to the VDS/VSS target will fail, causing all other connections to the array to drop and reconnect.
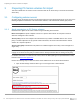
Overview and requirements 3. In the iSCSI Discovery section, click to enable the filter, Prevent unauthorized hosts from discovering targets. 4. Click the Save icon.
Preparing PS Series volumes for import 3 Preparing PS Series volumes for import This section details how to create a remote connection from the SC Series array to an iSCSI-connected PS Series array. 3.1 Configuring volume access SC Series arrays are granted access to the PS Series volumes by specifying permission to one or more of the following endpoints: IP addresses of SC Series iSCSI initiators, or SC Series iSCSI initiator (IQN) names.
Preparing PS Series volumes for import Note: The Dell Storage Client can connect to a Dell Storage Manager Data Collector or connect directly to an SC Series array. The instructions in this section focus only on connecting directly to an SC Series array. 2. Log in to the Dell Storage Client with administrative credentials. 3. Open the Storage tab and navigate to Fault Domains > iSCSI. Select the iSCSI fault domain that will be used for the import process.
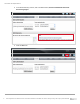
Preparing PS Series volumes for import Perform the following steps to create and apply a PS Series access policy. Note: An access policy created to allow SC Series arrays access to PS Series volumes can be used simultaneously with other access policies already in place. Refer to section 3.3 for more details. 1. Log in to the EqualLogic Group Manager with group administrator credentials. 2. Click Volumes to display the volumes subtree. 3. Expand the Volumes subtree and select a volume to modify. 4.
Preparing PS Series volumes for import 5. In the Add Access Policies window, click New. 6. Assign a name to the policy and click New to add an access point. The new extended access point window is displayed. At this point, the SC Series array can be granted access by using the iSCSI initiator name or the IP address. Note: The access method used to grant SC Series permission to PS Series volumes is a matter of personal preference. The Thin Import process works the same using either access method.
Preparing PS Series volumes for import 3.1.2 Grant access using iSCSI initiator name Perform the following steps to allow SC Series storage access using the iSCSI initiator name: 1. In the New Extended Access Point window, enter the SC Series iSCSI Initiator Name and click OK. 2. In the New Access Policy window, click New.
Preparing PS Series volumes for import 3. Enter an additional SC Series iSCSI initiator name and click OK. 4. Repeat this process until all SC Series iSCSI initiator names are entered. 5. When finished, click OK.
Preparing PS Series volumes for import 6. Click OK again to apply the new access policy to the volume. 7. The newly applied access policy is displayed in the Access Control List.
Preparing PS Series volumes for import 3.1.3 Grant access using iSCSI initiator IP address Perform the following steps to allow SC Series storage access using the iSCSI initiator IP address: 1. In the New Extended Access Point window, click Add. 2. Enter an SC Series array iSCSI initiator IP address.
Preparing PS Series volumes for import 3. Click any area within the window to activate the menu options. 4. Click Add and enter another SC Series iSCSI initiator IP address.
Preparing PS Series volumes for import 5. Repeat this process until all SC Series iSCSI initiator IP addresses are entered. 6. Click OK to close the New Extended Access Point window. 7. In the New Access Policy window, verify the correct IP addresses are listed and click OK.
Preparing PS Series volumes for import 8. Click OK to apply the new access policy to the volume. 9. The newly applied access policy is displayed in the Access Control List. 3.2 Applying access policies to multiple volumes The access policy created in section 3.1 must be applied to all PS Series volumes that will be used during the Thin Import process.
Preparing PS Series volumes for import 3.2.1 Apply access policy to multiple volumes To apply the SC Series access policy to multiple volumes, perform the following steps: 1. In EqualLogic Group Manager, click Group to display the group subtree. 2. Select Group Configuration and click the Access Policies tab.
Preparing PS Series volumes for import 3. To apply a single access policy to multiple volumes, in the Targets area, select the policy, and click Add. Any volumes for which the policy is currently applied are displayed in the Targets window. 4. In the Pick Volumes window, select the volumes the policy will be applied to and click OK.
Preparing PS Series volumes for import The newly selected volumes appear in the Targets area. 3.2.2 Apply access policy to volumes with existing access policies Apply the SC Series access policy to volumes with existing access policies using an access policy group. Note: Multiple access policies can be applied to a volume without the use of an access policy group. For ease of administration, an access policy group allows multiple access policies to be managed as a single entity. 1.
Preparing PS Series volumes for import 2. Assign a Name to the new access policy group and click Add. 3. Select the access policies to add to the group and click OK.
Preparing PS Series volumes for import 4. Verify the policies added to the group and click OK. 5. The new access policy group is listed.
Preparing PS Series volumes for import 3.2.3 Apply access policy to an existing access policy group Apply the SC Series access policy to an existing access policy group with the following steps. 1. Select the existing access policy group and click Modify. 2. In the Modify Access Policy Group window, click Add. 3. Select the SC Series access policy and click OK.
Preparing PS Series volumes for import 4. Verify the access policies in the group and click OK. The SC Series access policy is automatically applied to all volumes that are part of the existing access policy group. 3.2.4 Apply access policy group to multiple volumes Perform the following steps to apply an access policy group to multiple volumes: 1. In the Targets area, select the access policy group and click Add. 2.
Preparing PS Series volumes for import 3. The newly selected volumes now appear in the Targets area. 3.3 Allow simultaneous iSCSI connections to volumes By default, PS Series volumes allow access to a single iSCSI initiator. When connected to a PS Series array, each individual SC Series iSCSI network connection is treated as a separate initiator.
Preparing PS Series volumes for import 4. In the Activities menu, select Set access type. 5. In the Set access type window > Shared access area, select the option to Allow simultaneous connections from initiators with different IQNs. 6. Click OK. 3.4 Establishing an SC Series remote iSCSI connection to a PS Series array 1. Open the Dell Storage Client and click Log in to a Storage Center or Data Collector.
Preparing PS Series volumes for import Note: The Dell Storage Client can connect to a Dell Storage Manager Data Collector or connect directly to SC Series storage. Both options are supported with the Thin Import process. The instructions in this section focus only on connecting directly to SC Series storage. Using Thin Import with PS Series volumes requires Dell Storage Client/Dell Storage Manager Data Collector version 2015 R2 or later. 2.
Preparing PS Series volumes for import 6. In the Configure iSCSI Connection window, enter the group IP address of the PS Series array and set the iSCSI network type to Gigabit or greater. Click Finish. 7. Once the connection has been established, on the displayed confirmation window, click OK. 8. The remote connection to the PS Series array is displayed in a new tab. Volumes available for import are listed with a status of Up.
Preparing MD3 volumes for import 4 Preparing MD3 volumes for import This section details how to create a remote connection from the SC Series array to an iSCSI-connected or FC-connected MD3 array. 4.1 Configuring iSCSI volume access In order to present volumes to the SC Series array, a server host object needs to be created on the MD3 array. The server host object is mapped to the SC Series array by using the SC Series iSCSI initiatiors.
Preparing MD3 volumes for import 3. In the Specify Host Name window, enter the name of the SC Series array. Select No to use storage partitions. Click Next. 4. Verify that Add by selecting a known unassociated host port identifier is selected. Select an SC Series IQN from the drop-down list. 5. Assign a user label and click Add. 6. Repeat this process for all listed SC Series IQNs. When complete, click Next.
Preparing MD3 volumes for import c. In the Host type drop-down menu, select Windows. Note: Selecting a host type other than Windows will cause imports from the MD3 array to fail. d. Click Next. e. Click Finish to create the host. 4.2 Configuring Fibre Channel volume access In order for the MD3 array to present volumes to the SC Series array, a server host object representing the SC Series array needs to be created on the MD3 array.
Preparing MD3 volumes for import 5. The WWNs used for that fault domain are listed under Physical Ports. Note: On SC Series arrays with more than one fault domain, record the Physical Port WWNs for each fault domain zoned to the MD3 Series array. 6. Open the PowerVault Modular Disk Storage Manager (Array Management window) and connect to the MD3 array. 7. Click the Host Mappings tab. 8. Right-click the array, and select Define > Host.
Preparing MD3 volumes for import 9. In the Specify Host Name window, enter the name of the SC Series array. Select No to use storage partitions. Click Next. 10. Verify that Add by selecting a known unassociated host port identifier is selected. Select an SC Series WWN from the drop-down list. 11. Assign a user label and click Add. 12. Repeat this process for all listed SC WWNs. When complete, click Next.
Preparing MD3 volumes for import a. In the Host type drop-down, select Windows. Note: Selecting a host type other than Windows will cause imports from the MD3 array to fail. b. Click Next. c. Click Finish to create the host. 4.3 Mapping MD3 volumes to an SC Series array Prior to importing MD3 volumes to an SC Series array, the volume(s) to import must be mapped to the SC Series server host object that was created on the MD3 array previously.
Preparing MD3 volumes for import 4. Select the iSCSI fault domain to be used for the import process. Note: On systems with more than one iSCSI fault domain, select a fault domain that is configured on the same network as the MD3 array. 5. Right-click the iSCSI fault domain and select Create Remote Connection. 6. In the Configure iSCSI Connection window, enter the iSCSI IP address of the first MD3 array controller (controller 0) and set the iSCSI network type to Gigabit or greater. Click Finish.
Preparing MD3 volumes for import 7. Once the connection has been established, on the displayed confirmation window, click OK. 8. The remote connection to the MD3 array is displayed in the Remote Connections tab. 9. The SC Series array is now remotely connected to the MD3 array. 10. Right-click the fault domain that was used to create the connection to the MD3 array, and select Rediscover iSCSI Remote Connections. Note: When importing from an FC-connected MD3 array, step 10 is not required.
Offline and online mode explained 5 Offline and online mode explained As mentioned in section 2, both offline and online modes of the import process affect service. If possible, it is recommended to test the Thin Import process in a non-production environment to establish an accurate outage timeframe. Note: Total time required for the import process can vary greatly depending on the array configuration, available bandwidth, and amount of data transferred.
Importing PS Series Windows Server volumes 6 Importing PS Series Windows Server volumes Prior to starting the online or offline import process from a PS Series array, the target server must be iSCSI mapped to the SC Series array. For information on mapping a server to an SC Series array, refer to the Dell Storage Manager Administrator’s Guide, available on the Knowledge Center at the SC Series customer portal.
Importing PS Series Windows Server volumes c. The volume is taken offline. d. Open the iSCSI initiator from the Windows control panel. e. Click the Targets tab and locate the iSCSI target name of the PS Series volume that needs to be disconnected.
Importing PS Series Windows Server volumes Note: To locate the PS Series iSCSI target name of the volume in EqualLogic Group Manager, click the Volumes menu, select the volume in the Volumes tree, and select the Connections tab. The iSCSI volume name is listed under Volume iSCSI Settings as the iSCSI target. f. 43 Select the volume and click Disconnect.
Importing PS Series Windows Server volumes g. Click Yes to disconnect from all sessions. h. To prevent the server from trying to reconnect to the PS Series volume in the future, remove the iSCSI target from the favorite targets list. Click the Favorite Targets tab, locate the iSCSI target name of the PS Series volume, and click Remove.
Importing PS Series Windows Server volumes 6.1 Online import process – PS Series 1. Open the Dell Storage Client and select Log in to a Storage Center or Data Collector. Note: The Dell Storage Client can connect to a Dell Storage Manager Data Collector or connect directly to an SC Series array. Both options are supported with the Thin Import process. The instructions in this section focus only on connecting directly to an SC Series array.
Importing PS Series Windows Server volumes 5. The Remote Connections tab appears in the iSCSI fault domain window showing the remote connection to the PS Series array. Volumes available for import are listed with a status of Up. 6. In the SC subtree, expand External Devices. A folder with the IP address of the PS Series array is shown. Expand this folder to display volumes available for import. 7. Right-click the volume to import and select Online Import from External Device.
Importing PS Series Windows Server volumes 8. The Online Import from External Device window appears. Click Next. 9. Select the server to map to the destination volume. Click Next. a. If a Quality of Service (QoS) definition does not exist on the SC Series array, a prompt will appear to create one. Click Yes to continue. Clicking No will cancel the import process.
Importing PS Series Windows Server volumes 10. Configure attributes for the destination volume such as name, folder location, replay profiles, and QoS definition. Click Next. Note: The import process includes the option to import data to the lowest tier of storage. It is a best practice to leave this option enabled because importing data into tier one can cause performance problems and potentially fill all available tier one space.
Importing PS Series Windows Server volumes 11. Review the import settings. Click OK to start the import. 12. As soon as the online import starts, bring the SC Series volume online on the server. Log in to the Windows server as an administrative user, and open Disk Management by clicking Start > Run > diskmgmt.msc.
Importing PS Series Windows Server volumes 13. Click Action > Rescan Disks. The disk rescan process begins. When the scan has completed, the SC Series volume appears in the Disk Management window.
Importing PS Series Windows Server volumes 14. Right-click the disk and select Online. The disk is brought online with the same drive letter, and can now be used during the online import process. Note: A new MPIO provider will need to be installed for the SC Series array, which will require a reboot of the server. 15. While the import process is running, monitor progress in the volume details window. Click the refresh icon to update the progress.
Importing PS Series Windows Server volumes 16. When the import process is complete, locate the new volume in the Volumes subtree. Verify that the configured and used storage is listed correctly. The Statistics tab shows the storage tier where the imported data resides. Note: When the online import process is complete, all server I/O to the PS Series volume is stopped. 17. Repeat steps 7–16 for any other volumes to import.
Importing PS Series Windows Server volumes 6.2 Offline import process – PS Series Perform the following steps to import data from a PS Series volume to an SC Series array in offline mode: 1. Open the Dell Storage Client and select Log in to a Storage Center or Data Collector. Note: The Dell Storage Client can connect to a Dell Storage Manager Data Collector or connect directly to an SC Series array. Both options are supported with the Thin Import process.
Importing PS Series Windows Server volumes 5. The Remote Connections tab appears in the iSCSI fault domain window showing the remote connection to the PS Series array. Volumes available for import are listed with a status of Up. 6. In the SC Series subtree, expand External Devices. A folder with the IP address of the PS Series array is shown. Expanding this folder shows volumes available for import. 7. Right-click a volume to import it and click Offline Import from External Device.
Importing PS Series Windows Server volumes 8. The Offline Import from External Device window appears. Click Next. a. If a Quality of Service (QoS) definition does not exist on the SC Series array, a prompt will appear to create one. Click Yes to continue. Clicking No will cancel the import process. Note: The purpose of the QoS definition is to limit or throttle the bandwidth available to the Thin Import process, because the import process will use all available bandwidth to transfer data.
Importing PS Series Windows Server volumes 9. Configure attributes for the destination volume such as the Name, Volume Folder location, Replay Profiles, and QoS Node definition. Click Next. Note: The import process includes the option to import data to the lowest tier of storage. It is a best practice to leave this option enabled because importing data into tier one can cause performance problems and potentially fill all available tier one space. 10.
Importing PS Series Windows Server volumes 11. While the import process is running, monitor the progress in the volume details window. Click the refresh icon to update the progress. 12. When the import process is complete, locate the new volume in the Volumes subtree. Verify the configured and used storage is correct. The Statistics tab shows the storage tier in which the imported data resides. 13. When the import has finished, the volume can be mapped to a server.
Importing PS Series Windows Server volumes Note: Importing another volume can be initiated immediately following the completion of the import wizard. Be advised that each individual import will utilize all allocated bandwidth as defined in the QoS definition used during the import. Running multiple volume imports simultaneously could cause system performance problems if available bandwidth becomes limited. SC Series storage supports a maximum of ten simultaneous volume imports. 15.
Importing MD3 Windows Server volumes 7 Importing MD3 Windows Server volumes Prior to starting the online or offline import process from an MD3 array, the target server must be iSCSI or FC mapped to the SC Series array. For information on mapping a server to an SC Series array, refer to the Dell Storage Manager Administrator’s Guide, available on the Knowledge Center at the SC Series customer portal.
Importing MD3 Windows Server volumes c. The volume is taken offline. Note: Steps d through h only apply to iSCSI-connected MD3 Series volumes. Skip to step 2 for FC-connected MD3 volumes. d. Open the iSCSI initiator from the Windows control panel. e. Click the Targets tab and locate the iSCSI target name of the MD3 volume that needs to be disconnected. f. Select the volume and click Disconnect.
Importing MD3 Windows Server volumes g. Click Yes to disconnect from all sessions. h. To prevent the server from trying to reconnect to the MD3 volume in the future, remove the iSCSI target from the favorite targets list. Click the Favorite Targets tab, locate the iSCSI target name of the MD3 volume, and click Remove. 2. Connect to the MD3 array using the PowerVault Modular Disk Storage Manager client.
Importing MD3 Windows Server volumes 3. Under Discovered Storage Arrays, right-click the array to manage and select Manage Storage Array. 4. When the Array Management window appears, click the Host Mappings tab. 5. Select the Windows server host from the list. Right-click the name of the volume to be imported, and select Change. 6. Select the SC Series server host object from the drop-down list, and select a LUN number.
Importing MD3 Windows Server volumes 7. In the Change Mapping window, click OK and select Yes. 8. Select the SC Series server host object and verify the volume has been successfully mapped. 7.1 Online import process – MD3 arrays 1. Connect to the SC Series array using Dell Storage Manager Client. Note: When importing from an FC-connected MD3 array, step 2 is not required. Volumes that were mapped to the SC server host object on the MD3 will automatically appear in the External Devices subtree. 2.
Importing MD3 Windows Server volumes 5. The Online Import from External Device window appears. Click Next. 6. Select the Windows Server to map the destination volume to. Click Next. a. If a Quality of Service (QoS) definition does not exist on the SC Series array, a prompt will appear to create one. Click Yes to continue. Clicking No will cancel the import process.
Importing MD3 Windows Server volumes 7. Configure attributes for the destination volume such as the Name, Volume Folder location, Replay Profiles, and QoS Node definition. Click Next. Note: The import process includes the option to import data to the lowest tier of storage. It is a best practice to leave this option enabled because importing data into tier one can cause performance problems and potentially fill all available tier one space.
Importing MD3 Windows Server volumes 8. Review import settings. Click OK to start the import. 9. As soon as the online import starts, bring the SC Series volume online on the server. Log in to the Windows server as an administrative user, and open Disk Management by clicking Start > Run > diskmgmt.msc.
Importing MD3 Windows Server volumes 10. Click Action > Rescan Disks. The disk rescan process begins. When the scan has completed, the SC Series volume appears in the Disk Management window.
Importing MD3 Windows Server volumes 11. Right-click the disk and select Online. Note: A new MPIO provider will need to be installed for the SC Series array, which will require a reboot of the server. 12. The disk is brought online with the same drive letter, and can now be used during the online import process.
Importing MD3 Windows Server volumes 13. While the import process is running, monitor progress in the volume details window. Click the refresh icon to update the progress. 14. When the import process is complete, locate the new volume in the Volumes subtree. Verify that the configured and used storage is listed correctly. The Statistics tab shows the storage tier where the imported data resides. Note: When the online import process is complete, all server I/O to the MD3 volume is stopped. 15.
Importing MD3 Windows Server volumes 16. When all imports are complete, refer to section 9 for post-import steps. 7.2 Offline import process – MD3 arrays 1. Connect to the SC Series array using Dell Storage Manager Client. Note: When importing from an FC-connected MD3 array, step 2 is not required. Volumes that were mapped to the SC Series server host object on the MD3 array will automatically appear in the External Devices subtree. 2.
Importing MD3 Windows Server volumes 5. The Offline Import from External Device window appears. Click Next. a. If a Quality of Service (QoS) definition does not exist on the SC Series array, a prompt will appear to create one. Click Yes to continue. Clicking No will cancel the import process. Note: The purpose of the QoS definition is to limit or throttle the bandwidth available to the Thin Import process, because the import process will use all available bandwidth to transfer data.
Importing MD3 Windows Server volumes 6. Configure attributes for the destination volume such as the Name, Volume Folder location, Replay Profiles, and QoS Node definition. Click Next. Note: The import process includes the option to import data to the lowest tier of storage. It is a best practice to leave this option enabled because importing data into tier one can cause performance problems and potentially fill all available tier one space. 7. Review the import settings and click OK to start the import.
Importing MD3 Windows Server volumes 8. While the import process is running, monitor the progress in the volume details window. Click the refresh icon to update the progress. 9. When the import process is complete, locate the new volume in the Volumes subtree. Verify the configured and used storage is correct. The Statistics tab shows the storage tier in which the imported data resides. 10. When the import has finished, the volume can be mapped to a server.
Importing MD3 Windows Server volumes Note: Importing another volume can be initiated immediately following the completion of the import wizard. Be advised that each individual import will utilize all allocated bandwidth as defined in the QoS definition used during the import. Running multiple volume imports simultaneously could cause system performance problems if available bandwidth becomes limited. SC Series storage supports a maximum of ten simultaneous volume imports. 12.
Importing PS Series and MD3 VMware volumes 8 Importing PS Series and MD3 VMware volumes SCOS 7.0 and newer supports using the Thin Import process to import volumes from a VMware ESXi® server (version 5.5 Update 2 or higher) connected to a PS Series array. SCOS 7.2.10 and newer supports using the Thin Import process to import volumes from an ESXi server (version 5.5 Update 2 or higher) connected to an MD3 array.
Importing PS Series and MD3 VMware volumes 3. Click the Virtual Machines tab. 4. For each virtual machine listed, right-click the VM and select Power > Shut Down Guest. 5. Repeat this process for all guests stored on the datastore. All guests should be in a Powered Off state. 6. To remove each guest from inventory, right-click the guest and select Remove from Inventory.
Importing PS Series and MD3 VMware volumes 7. When all guests have been successfully removed from inventory, unmount the datastore by rightclicking the datastore and selecting Unmount. 8. Confirm the datastore can be unmounted and click OK.
Importing PS Series and MD3 VMware volumes 9. To navigate to the software iSCSI initiator for the ESXi server, click Home > Inventory > Hosts and Clusters. Select the ESXi server in the left pane and select the Configuration tab. In the Hardware window, select Storage Adapters. 10. Right-click the iSCSI software adapter and select Properties. 11.
Importing PS Series and MD3 VMware volumes 8.2.2 Change volume access on the PS Series array Note: See section 3 for more detailed steps on volume access and access control lists. 1. Log in to the EqualLogic PS Group Manager. Select Volumes from the menu, and select the volume to import. Select the Access tab and remove any access policies applied to the volume. 2. In the Connections tab, verify there are no connections to the volume.
Importing PS Series and MD3 VMware volumes 3. Apply the access control list to allow the SC Series array to access this volume. 4. In the volume Activities window, select Modify settings. Select the Advanced tab, and verify that Allow simultaneous connections from initiators with different IQNs is enabled on the volume.
Importing PS Series and MD3 VMware volumes 8.2.3 Change volume access on the MD3 array Note: See section 4 for more detailed steps on volume access and access control lists. 1. Connect to the MD3 array using the PowerVault Modular Disk Storage Manager client. 2. Under Discovered Storage Arrays, right-click the array to manage and select Manage Storage Array. 3. When the Array Management window appears, click the Host Mappings tab. 4. Select the ESXi server host from the list.
Importing PS Series and MD3 VMware volumes 5. Select the SC Series server host object from the drop-down list, and select a LUN number. Note: To maintain consistency, the LUN number used to map the volume to the SC Series array should be the same as the LUN number used to map the volume to the ESXi server. 6. On the Change Mapping window, click OK and select Yes. 7. Select the SC Series server host object and verify the volume has been successfully mapped.
Importing PS Series and MD3 VMware volumes 2. Right-click the iSCSI software adapter and select Rescan. 3. When the rescan completes, the PS Series or MD3 volume should no longer appear in the Details pane. 8.2.5 Perform an online import of the volume: 1. Expand the External Devices folder to show the IP address of the PS Series array and the volume to import. Right-click the volume name and select Online Import from External Device.
Importing PS Series and MD3 VMware volumes 2. Click Next when prompted and select the ESXi host server to map the volume to. Click Next when finished. 3. If a Quality of Service (QoS) definition does not exist on the SC Series array, a prompt will appear to create one. Click Yes to continue. The import process will not proceed until a QoS node is defined and selected.
Importing PS Series and MD3 VMware volumes 6. Configure attributes for the destination volume such as the Name, Volume Folder location, Snapshot Profiles, Data Reduction Profile, and QoS Node definition. Click Next. Note: The import process includes the option to import data to the lowest tier of storage. It is a best practice to leave this option enabled because importing data into tier one can cause performance problems and potentially fill all available tier one space. 7.
Importing PS Series and MD3 VMware volumes 8. While the import process is running, monitor the progress in the volume details window. Click the refresh icon to update the progress. 9. When the import starts, the External Device Mappings tab shows the PS Series or MD3 volume is mapped to the server. Note: In the case of an offline import, upon successful completion of the import process, the new volume on the SC Series array can be mapped to the ESXi host and the following steps can be performed. 10.
Importing PS Series and MD3 VMware volumes 11. Right-click the iSCSI software adapter and select Rescan. 12. In the Hardware pane, select Storage. In the right-hand corner of the Storage view, click Add Storage. 13. Verify the Storage Type is Disk/LUN and click Next. 14. Select the disk labeled COMPELNT iSCSIDisk that matches the name of the volume to import. Scroll to the right to see the VMFS Label (volume name). Click Next.
Importing PS Series and MD3 VMware volumes 15. Select Keep the existing signature and click Next. Click Finish to add the SC Series volume to the ESXi host server. The SC Series volume will now show as a datastore.
Importing PS Series and MD3 VMware volumes 16. To add the guests hosted on the datastore to inventory, right-click the datastore and select Browse Datastore. 17. Select a guest in the folders pane. Right-click on the .vmx file and select Add to Inventory.
Importing PS Series and MD3 VMware volumes 18. Assign the guest a name and select the inventory location. Click Next. 19. Verify the guest will be added to the ESXi host server, and click Next. 20. Click Finish to add the virtual machine to the ESXi server. 21. Repeat this process for any other virtual machines that are stored on the datastore. 22. To power on the virtual machines, right-click each virtual machine and select Power > Power On.
Importing PS Series and MD3 VMware volumes Note: At this point, the virtual machines are in a usable state. As mentioned previously in this document, the ESXi volume and associated virtual machines could experience increased I/O latency while the import is running. When the import has completed, there may be a slight pause in I/O when all activity is moved to the SC Series volume.
Post-import steps 9 Post-import steps Perform the steps in the section after all PS Series or MD3 volume imports have been completed. Be sure to review the best practices guides to configure hosts properly: Dell EMC SC Series Storage and Microsoft Windows Server 2016, Windows Server 2012 R2 Best Practices for Dell Compellent Storage Center, or Dell EMC SC Series Best Practices with VMware vSphere 5.x-6.x. 9.
Post-import steps 3. The connection to the PS Series array is removed and the External Devices folder displays a status of disconnected for all remote volumes. 4. Select all the volumes listed. Right-click the selection and click Delete.
Post-import steps 5. Click OK to permanently delete all disconnected external volumes. Note: The PS Series or MD3 Series volumes are only removed from the SC Series array, and still remain on the PS Series or MD3 array. 6. When the external volumes are deleted, the External Devices folder is automatically removed.
Post-import steps 1. Connect to the MD3 array using the PowerVault Modular Disk Storage Manager (Array Management window). 2. Click the Host Mappings tab. 3. In the left window pane, right-click the SC Series server host object and select Remove.
Post-import steps 4. Type yes and click OK to delete the host. The host is removed and all mapped volumes are returned to the disk pool.
Additional resources A Additional resources A.1 Technical support and resources Dell.com/support is focused on meeting customer needs with proven services and support. Dell TechCenter is an online technical community where IT professionals have access to numerous resources for Dell EMC software, hardware, and services. Storage Solutions Technical Documents on Dell TechCenter provide expertise that helps to ensure customer success on Dell EMC storage platforms. A.