
White Papers


21 BP1043 | Configuring Windows Server 2008 R2 for iSCSI SAN Boot with EqualLogic Storage
c. Internal SD Card Port: Off (To prevent a conflict during Windows 2008 install process.)
d. Embedded NIC: If using an embedded NIC then enable iSCSI Boot for that particular NIC only.
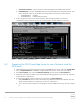
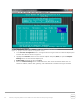
Select “Enabled” option for all the NICs not being used for iSCSI Boot, as shown below.
i. Embedded NICx: Enabled
ii. Embedded NICx: Enabled with iSCSI Boot
4. These changes are shown in the following figure. After changing, escape out and save.
Immediately continue with the process for configuring the network adapters in Section 7.
Figure 7 Settings for “Integrated devices”
6.2 Preparing the 12G PowerEdge server to use a Network card for
iSCSI boot
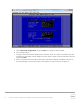
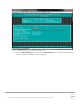
1. Start/Reboot the system and during System boot press [F2] to enter Setup, and enter System BIOS.
2. Enter “Integrated Devices” and disable “Integrated RAID Controller”. Once done press “Back”.
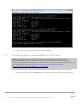
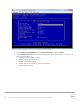
3. Enter Boot settings, then enter the BIOS Boot Settings and then enter the Boot Sequence.
4. Adjust the boot sequence order so that the Broadcom/Intel/Qlogic NIC is first in the list, followed
by the DVD/CD- ROM device.
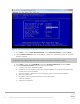
5. If the network adapter used for iSCSI boot is not listed in the Boot Sequence:
a. Make Hard drive C: the top choice followed by any additional boot devices desired. Intel and
Qlogic network adapters are reported in the GUI as “Hard Drive C:”.
b. Go to “Hard-Disk Drive Sequence” and bring the network adapter to the top. As seen in Figure
6.