
Users Guide
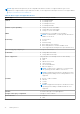
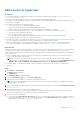

Table Of Contents
- SupportAssist Enterprise Version 2.0.70 User's Guide
- Contents
- Overview
- Getting started with SupportAssist Enterprise
- Set up SupportAssist Enterprise on local system
- Setting up SupportAssist Enterprise for remote devices
- Evaluating SupportAssist Enterprise
- Download the SupportAssist Enterprise installation package
- Installing or upgrading SupportAssist Enterprise
- Minimum requirements for installing and using SupportAssist Enterprise
- Installing SupportAssist Enterprise
- Upgrading SupportAssist Enterprise
- Migrating to SupportAssist Enterprise
- Using SupportAssist Enterprise without registration
- Register SupportAssist Enterprise
- Set up an SELinux enabled system to receive alerts
- Open the SupportAssist Enterprise user interface
- Log in to SupportAssist Enterprise
- Log out of SupportAssist Enterprise
- Adding devices
- Methods of adding devices
- Device types and applicable devices
- Add a server or hypervisor
- Add an iDRAC
- Add a chassis
- Add a Networking device
- Add a PowerVault storage array
- Add an EqualLogic PS Series storage solution
- Add a Compellent SC Series storage solution
- Add a Fluid File System NAS device
- Add a software
- Add a solution
- Add a virtual machine
- Add a device by duplication
- Managing device discovery rules
- Viewing cases and devices
- Monitoring site health
- Using Extensions
- Types of extensions
- Support for setting up adapter or Remote Collector
- Getting started with adding devices managed by systems management consoles
- Adapters overview
- Set up OpenManage Essentials adapter
- Set up the Microsoft System Center Operations Manager adapter
- Management Packs for inventorying devices managed by Operations Manager
- Set up OpenManage Enterprise adapter
- View the adapter overview pane
- View devices inventoried by the adapter
- Synchronize adapter
- Edit adapter
- Delete adapter
- Approximate time required to assign Credential Profile
- Remote Collectors overview
- Device grouping
- Managing device credentials
- Validating device inventory
- Maintaining SupportAssist Enterprise capability
- Enable or disable monitoring of a device
- Perform deep discovery
- Install or upgrade OMSA by using SupportAssist Enterprise
- Configure SNMP settings by using SupportAssist Enterprise
- View and update the contact information
- View and update parts dispatch information
- Integrate SupportAssist Enterprise with your TechDirect account
- Configure proxy server settings
- Connectivity test
- Test the case creation capability
- Clear the System Event Log
- Automatic update
- Delete a device
- Configuring email notifications
- Configuring collection settings
- Prerequisites for collecting system information
- Enable or disable the automatic collection of system information on case creation
- Enable or disable analytics collections
- Enable or disable the periodic collection of system information from all devices
- Enable or disable the collection of identity information
- Enable or disable the collection of system information
- Enable or disable the automatic upload of collections
- Enable or disable analytics collections
- Viewing collections
- Using SupportAssist Enterprise to collect and send system information
- Understanding maintenance mode
- SupportAssist Enterprise user groups
- Manually configuring SNMP settings
- Manually configuring the alert destination of a server
- Manually configuring the alert destination of a server by using the script file on server running Windows
- Manually configuring the alert destination of a server running Windows
- Manually configuring the alert destination of a server by using the script file on a server running Linux
- Manually configure alert destination of server running Linux
- Manually configure alert destination of iDRAC using the web interface
- Manually configure alert destination of networking device
- Manually configuring the alert destination of a server
- Managing SupportAssist Enterprise alerts in TechDirect
- Other useful information
- Monitoring servers for hardware issues
- Support for automatically installing or upgrading OMSA
- Support for automatically configuring SNMP settings
- Installing patch for SupportAssist Enterprise
- Enable or disable API interface settings
- Signing in to TechDirect
- Deep discovery
- Device correlation
- Association view
- Detection of hardware issues in attached storage devices
- Support for OEM devices
- Install Net-SNMP on a server running Linux
- Configure sudo access for SupportAssist Enterprise on server running Linux
- Ensuring successful communication between the SupportAssist Enterprise application and the SupportAssist server
- Accessing the SupportAssist Enterprise application logs
- Event storm handling
- View SupportAssist Enterprise product information
- Uninstalling SupportAssist Enterprise
- Troubleshooting
- Installing SupportAssist Enterprise
- SupportAssist Enterprise registration
- Opening the SupportAssist Enterprise user interface
- Logging in to SupportAssist Enterprise
- Unable to add device
- Unable to add adapter
- Unable to add Remote Collector
- Disconnected
- OMSA not installed
- SNMP not configured
- New version of OMSA available
- Unable to configure SNMP
- Unable to verify SNMP configuration
- Unable to install OMSA
- Unable to verify OMSA version
- OMSA not supported
- Unable to reach device
- Unable to gather system information
- Insufficient storage space to gather system information
- Unable to export collection
- Unable to send system information
- Authentication failed
- Clearing System Event Log failed
- Maintenance mode
- Auto update
- Unable to edit device credentials
- Automatic case creation
- Scheduled tasks
- SupportAssist Enterprise services
- Unable to view tool tips in Mozilla Firefox
- Other services
- Security
- Logs
- SupportAssist Enterprise user interface
- SupportAssist Enterprise Registration Wizard
- Login page
- Site Health
- Cases page
- Devices page
- Site Inventory Validation
- Device Groups page
- Manage Device Discovery Rule
- Manage Account Credentials
- Manage Credential Profiles
- Collections page
- Analytics Collections
- Extensions
- Settings
- Network Connectivity Test
- SupportAssist Enterprise test
- Error code appendix
- SupportAssist Enterprise resources
- Contacting Dell EMC

}
#============= snmpd_t ==============
allow snmpd_t websm_port_t:tcp_socket name_connect;
allow snmpd_t root_t:dir write;
allow snmpd_t root_t:dir add_name;
allow snmpd_t root_t:file { write create open getattr };
3. Save the policy file.
4. Browse to the folder where you saved the policy file.
5. Type checkmodule -M -m -o supportassistpolicy.mod supportassistpolicy.te and press Enter.
6. Type semodule_package -o supportassistpolicy.pp -m supportassistpolicy.mod and press Enter.
7. Type semodule -i supportassistpolicy.pp and press Enter.
Open the SupportAssist Enterprise user interface
Steps
You can open the SupportAssist Enterprise user interface by using one of the following methods:
● If you are logged in to the server where SupportAssist Enterprise is installed:
○ Double-click the SupportAssist Enterprise desktop icon.
○ Open a web browser and type the address in the following format:
http://localhost:9099/SupportAssist
NOTE:
If you entered a custom port number during the installation of SupportAssist Enterprise, you must replace 9099
with the custom port number in the web address.
● To access SupportAssist Enterprise from a remote system, open a web browser and type the address in the following
format:
https://<IP address or host name of the server where SupportAssist Enterprise is
installed>:5700/SupportAssist
For example, https://10.25.35.1:5700/SupportAssist
NOTE: When typing the address, ensure that you type SupportAssist with the S and A in uppercase.
○ If you are using Internet Explorer, the following message may be displayed: There is a problem with this website’s
security certificate. To open SupportAssist Enterprise, click Continue to this website (not recommended).
○ If you are using Mozilla Firefox, the following message may be displayed: This Connection is Untrusted. To open
SupportAssist Enterprise, click I Understand the Risks, and then click Add Exception. In the Add Security Exception
window, click Confirm Security Exception.
The SupportAssist Enterprise login page is displayed in the web browser.
NOTE:
The recommended screen resolution for optimally viewing the SupportAssist Enterprise user interface is 1280 x 1024
or higher.
Log in to SupportAssist Enterprise
Steps
1. In the SupportAssist Enterprise login page, type the username and password in the appropriate fields.
NOTE:
If SupportAssist Enterprise is installed on a Linux operating system, you can also provide the username and
password of a user account that is a member of the root or users user group. For information about the SupportAssist
Enterprise user groups, see SupportAssist Enterprise user groups.
NOTE: If the server where SupportAssist Enterprise is installed is a member of a Windows domain, you must provide the
username in the [Domain\Username] format. For example, MyDomain\MyUsername. You can also use a period [ . ] to
indicate the local domain. For example, .\Administrator.
Getting started with SupportAssist Enterprise 33