SupportAssist Version 2.2 for Dell OpenManage Essentials User's Guide February 2021 Rev.
Notes, cautions, and warnings NOTE: A NOTE indicates important information that helps you make better use of your product. CAUTION: A CAUTION indicates either potential damage to hardware or loss of data and tells you how to avoid the problem. WARNING: A WARNING indicates a potential for property damage, personal injury, or death. © 2017 - 2021 Dell Inc. or its subsidiaries. All rights reserved. Dell, EMC, and other trademarks are trademarks of Dell Inc. or its subsidiaries.
Contents Chapter 1: Overview...................................................................................................................... 6 What is new in this release................................................................................................................................................6 Key features..........................................................................................................................................................................
Viewing the device inventory......................................................................................................................................... 29 Filtering the displayed data.............................................................................................................................................30 Filtering options..........................................................................................................................................................
Chapter 5: Dell SupportAssist user interface............................................................................... 47 Case List..............................................................................................................................................................................48 Device Inventory................................................................................................................................................................49 Device Groups.......
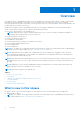
1 Overview Dell SupportAssist for OpenManage Essentials is a service capability that collects information about your Dell system hardware and software, and automatically creates support cases when issues arise. This helps Dell to provide you an enhanced, personalized, and efficient support experience. Dell uses this data to help solve common problems, and to design and market the products and services features you use most.
Key features The key features of SupportAssist include: ● Monitoring — Monitors your hardware and accelerates identification of issues with e-mail alerts from Dell at the time of hardware failure. ● Automatic support case creation — When a critical alert is received from your hardware by OpenManage Essentials, the alert information is sent to Dell and a Service Request is automatically created. A Dell Technical Support agent contacts you about the alert and helps you resolve the issue.
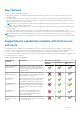
Table 1. SupportAssist capabilities (continued) SupportAssist capability Description Proactive parts dispatch Based on examination of the collected system information, if the Dell Technical Support agent determines that a part needs to be replaced to resolve the issue, a replacement part is dispatched to you with your consent.
NOTE: If the security policy of the company restricts sending some of the collected data outside of the company network, you can configure SupportAssist to filter the collected data before sending it to Dell. For more information, see Filtering the system log collection. NOTE: For more information about the data collected by SupportAssist and how the collected data is used by Dell, see the Dell SupportAssist: Security Considerations technical document at Dell.com/SupportAssistGroup.
2 Installing, upgrading, and uninstalling SupportAssist The following sections provide information about installing, upgrading, and uninstalling SupportAssist. Topics: • • • • • Prerequisites Minimum requirements Installing SupportAssist Upgrading SupportAssist Uninstalling SupportAssist Prerequisites The following are the prerequisites: ● Dell OpenManage Essentials version 2.2 or earlier should be installed in your device. ● Dell PowerEdge servers running Dell OpenManage Essentials version 2.
● All managed PowerEdge, EqualLogic, PowerVault, iDRAC, CMC, Networking (previously Force10 and PowerConnect), PowerEdge VRTX, and PowerEdge FX2 devices must be configured to send SNMP traps to the OpenManage Essentials server. ● All managed PowerEdge, EqualLogic, PowerVault, iDRAC, CMC, Networking (previously Force10 and PowerConnect), PowerEdge VRTX, and PowerEdge FX2 devices must be discovered, categorized, and inventoried by the OpenManage Essentials server.
○ https://ftp.dell.com/ — for new SupportAssist release information. NOTE: To verify if the destinations are reachable, follow the instructions in Ensuring successful communication between the SupportAssist application and the SupportAssist server. The following table lists the ports that must be open on the management server and the managed nodes: Table 3. Port details Device Port Usage Management server 2607 Console launch NOTE: The default port for console launch is 2607.
The Ready to Install the Program window is displayed. 4. Click Install. The Installing SupportAssist window is displayed briefly, and then the Installation Wizard Completed window is displayed. 5. Click Finish. The SupportAssist Setup Wizard is displayed in a new browser window. NOTE: You must complete all applicable steps in the SupportAssist Setup Wizard before you can use SupportAssist.
The proxy settings are validated. If the validation is unsuccessful, verify the proxy settings and try again or contact your network administrator for assistance. e. In the Validation Successful dialog box, click OK. The Installing SupportAssist window is displayed briefly, and then the Installation Completed window is displayed. 9. Click Finish. When you start SupportAssist, the SupportAssist Setup Wizard is displayed.
NOTE: The user account must be a member of the OpenManage Essentials Administrators, Power Users, or Site Administrators group. NOTE: If you change the credentials of the user account because of the security policy requirements of your company or for other reasons, make sure that you also update the System Credentials in SupportAssist. It is recommended that you create a service account with credentials that do not expire, and provide the service account credentials. 6. Click Next.
Upgrading SupportAssist using the OpenManage Essentials installer package To upgrade: 1. Double-click the OpenManage Essentials executable file. The Dell OpenManage Install window is displayed. NOTE: If SupportAssist is already installed on the system, by default, the Dell SupportAssist option is selected and grayed out. 2. Click Install. The Welcome to Dell SupportAssist Installer window is displayed. 3. If the Proxy Settings window is displayed, provide the following: a.
4. Select Remove, and click Next. The SupportAssist feedback window is displayed. 5. Select an appropriate reason from the Select an option drop-down list, provide your comments, and click Next. The Remove the Program window is displayed. 6. Click Remove. The Uninstalling SupportAssist window is displayed. 7. Click Finish. SupportAssist and the associated components are now uninstalled from the server running OpenManage Essentials.
3 Using Dell SupportAssist The following sections provide information about configuring and using SupportAssist.
○ If the server is running Windows Server 2012 — Move the mouse pointer to the bottom-left corner, and then click the Start icon. On the Start screen, click the SupportAssist tile. ● To start SupportAssist from a remote system, open a web browser and type the address in the following format: https://:Port Number/DIS. For example, https:// 10.25.35.1:2607/DIS. SupportAssist opens in a web browser window and displays the Cases page.
● Server ● Storage ● Switch 3. Select the Credential Type from the list. The options listed vary based on the Device Type you selected. The options for Server are: ● Windows ● Linux ● ESX/ESXi ● iDRAC ● CMC The options for Storage are: ● EqualLogic ● MD Series The option for Switch is Dell Networking. 4. Type the credentials in the corresponding fields: NOTE: For Dell Networking switches (previously Force10 and PowerConnect), the Username, Password, and Enable Password fields are optional.
○ The SMTP server settings are not configured in SupportAssist. ○ The SMTP server credentials you have provided in SupportAssist are incorrect. ○ The Secure Socket Layer (SSL) certificate of the SMTP server is expired. ○ An anti-virus software is blocking the SMTP server port configured in SupportAssist. ● An SMTP server is not available in your environment.
NOTE: The device status e-mail is sent only if there are devices with setup issues that were not notified earlier. For more information on the device status, see the status descriptions in Device Inventory.
Editing device credentials The Default Device Type Credentials that you provided for each Device Type and Credential Type in the System Logs page is used to run the collection component on your managed devices and gather the system logs. If the credentials for a particular device differ from the Default Device Type Credentials you provided, you can edit the credentials for that device.
belonging to a particular Device Type and Credential Type at a time, see Overwriting the device-specific credentials with the default device type credentials. To reset the device-specific credentials to the default device type credentials: NOTE: To reset the device-specific credentials to the Default Device Type Credentials, you must be logged on as a member of the OpenManage Essentials Administrators, Power Users, or Site Administrators group. 1. Click the Devices tab. The Device Inventory is displayed. 2.
Related references System Logs on page 53 Related tasks Editing device credentials on page 23 Filtering the system log collection The system logs collected by SupportAssist includes personally identifiable information (PII) such as the complete configuration snapshot of storage systems, hosts, and network devices which can contain host identification and network configuration data. In most cases, part or all of this data is required to properly diagnose issues.
To send the system logs manually: NOTE: The Send System Logs option is enabled only if you are logged on as a member of the OpenManage Essentials Administrators, Power Users, or Site Administrators group. 1. Click the Devices tab. The Device Inventory is displayed. 2. Select a device in the Device Inventory table. The Send System Logs link is enabled. 3. Click Send System Logs. The Collection Status column in the Device Inventory displays the status of the collection and upload of the system logs.
2. Click Preferences. The Preferences page is displayed. 3. Under Support Collection, select or clear Enable system log collection scheduling, to enable or disable scheduling of the collection of system logs. NOTE: By default, the Enable system log collection scheduling option is selected. 4. Click Save Changes.
Related references System Logs on page 53 Default system log collection schedule on page 28 Related tasks Disabling the scheduling of system log collection for a specific device type on page 28 Default system log collection schedule The following table provides the default system log collection schedule for each supported device. Table 4.
3. Select the Credential Type for which you want to disable scheduling. The options available vary based on the Device Type you selected. 4. In System Log Collection Schedule section, set the Frequency to None. 5. Click Save Changes. The following message is displayed in the System Log Collection Schedule section: System Log Collection scheduling is turned off for the current Device Type and Credential Type.
NOTE: Dell PowerVault MD 38XX series storage arrays are not displayed on the device inventory page. Related concepts Device Inventory on page 49 Related tasks Filtering the displayed data on page 30 Removing filters from the displayed data on page 30 Sorting the displayed data on page 30 Error code appendix on page 64 Filtering the displayed data You can filter the data displayed in the Device Inventory, Case List, and the device group Manage Devices pages based on your preference.
Device grouping The Device Groups page on the Devices tab allows you to create groups of devices based on your preference.
The Device Inventory page is displayed. 2. Click the Groups tab. The Device Groups page is displayed. 3. Click Create Group. The Create Group window is displayed. 4. Type a unique name and description for the device group and click Save. The device group that you created is displayed in the Device Groups page. Managing devices in a device group After creating a device group, you can select the devices you want to add or remove from the device group.
2. Click the Groups tab. The Device Groups page is displayed. 3. Select a device group. 4. In the Select group actions list, select Manage Credentials. The Manage Credentials window is displayed. 5. Type the user name and password for the device type highlighted in the left pane. 6. If more than one device type is included in the device group, click Next. The next device type is highlighted in the left pane. 7.
Editing device group details You can edit the name and description of a device group based on your preference. NOTE: You can edit the device group details only if you are logged on as a member of the OpenManage Essentials Administrators, Power Users, or Site Administrators group. To edit the device group details: 1. Click the Devices tab. The Device Inventory page is displayed. 2. Click the Groups tab. The Device Groups page is displayed. 3. Select a device group. 4.
Related references Editing device credentials on page 23 Managing the credentials of a device group on page 32 Configuring the default device type credentials on page 19 Configuring the system credentials System credentials refers to the credentials of a user account that is a member of the OpenManage Essentials Administrators, Power Users, or Site Administrators group. SupportAssist requires the system credentials to connect to OpenManage Essentials for retrieving device and alert information.
NOTE: The Settings tab is accessible only if you are logged on as a member of the OpenManage Essentials Administrators, Power Users, or Site Administrators group. 1. Click the Settings tab. The System Logs page is displayed. 2. Click Preferences. The Auto Update,Email Settings, Support Collection, and Maintenance Mode page is displayed. 3. Under Auto Update, select Enable auto update. 4. Click Save Changes.
2. Click Proxy Settings. The Proxy Settings page is displayed. 3. Ensure that the proxy settings has been configured correctly. See Configuring proxy server settings. 4. Click Apply. A dialog box appears to inform the status of the connection through the proxy server. Opting in or opting out from ProSupport Plus server recommendation report emails Ensure that you are logged In to SupportAssist with elevated or administrative privileges.
4. To set the language in which you want to receive e-mail notifications, from the Preferred Email Language list, select a language. NOTE: The Preferred Email Language is enabled only when the Receive email notification when a new support case is opened option is selected. 5. Click Save Changes. Related references Preferences on page 56 Setting SupportAssist to maintenance mode SupportAssist can also be set in or out of Maintenance Mode.
NOTE: The Settings tab is accessible only if you are logged on as a member of the OpenManage Essentials Administrators, Power Users, or Site Administrators group. 1. Click the Settings tab. The System Logs page is displayed. 2. Click Contact Information. The Contact Information page is displayed. 3. If required, edit the company name. 4. Select the type of contact: ● Primary ● Secondary 5.
Accessing and viewing the system log collection When a support case is automatically generated by SupportAssist, data required to troubleshoot the issue is collected and sent to Dell Technical Support. The collected troubleshooting information is also compressed and stored on your OpenManage Essentials server at C:\Program Files (x86)\Dell\Dell Integrated Support\reports. The filename includes the device’s IP address, Dell service tag, and the date/time when the file was created.
4 Troubleshooting The following sections describe procedures you can use to troubleshoot Dell SupportAssist issues Topics: • • • • • • • • • • • • Installing SupportAssist Registration problem Ensuring successful communication between the SupportAssist application and the SupportAssist server Verifying the installation of the collection components Launching SupportAssist Services Collection error Collection upload error Security Troubleshooting SSL connection failure Service contract Service Tag warnings
To ensure that the SupportAssist application is able to successfully communicate with the SupportAssist server: ● The management server on which the SupportAssist application is installed must be able to connect to the following destinations: ○ https://apidp.dell.com/support/case/v2/WebCase and https://api.dell.com/support/case/v2/WebCase?wsdl— end point for the SupportAssist server. On the management server, verify if you can access the following location using the web browser: https://apidp.dell.
● There may be a Microsoft Windows registry configuration problem with the SupportAssist Windows service. To resolve this issue, uninstall and then reinstall SupportAssist. ● The SupportAssist dashboard requires some DLLs that are installed in OpenManage Essentials. The SupportAssist installer checks that OpenManage Essentials is installed, and then checks the OpenManage Essentials version. If the DLLs are manually removed, the following error appears during installation: Error 1920.
3. Verify the credentials you have provided for the device. You must provide the Administrator credentials in the Settings > System Logs page. For more information, see Configuring the default device type credentials and Editing device credentials. Collection upload error If you receive a SupportAssist e-mail notification indicating an issue uploading the collection for a specific device and the Status of the device displays Error: 1.
6. Click Details. 7. Click Copy to File. The Certificate Export Wizard is displayed. 8. Click Next. 9. In the Export File Format page, click Next. 10. In the File to Export page, click Browse. The Save As window is displayed. 11. Navigate to the location you want to save the certificate file. 12. Type a file name and click Save. 13. In the Export File Format page, click Next. 14. Click Finish. The status of the export is displayed. 15. Click OK.
15. Click Finish. 16. Perform step 11 to step 15 until all three certificate files are imported. 17. Right-click Intermediate Certification Authorities > All Tasks > Import. The Certificate Import Wizard is displayed. 18. Perform step 12 to step 15 until all three certificate files are imported. 19. In Console Root, click Certificates – Local Computer. 20. Right-click Trusted Root Certification Authority, point to All Tasks and click Import. The Certificate Import Wizard is displayed. 21.
5 Dell SupportAssist user interface The top-right of the SupportAssist header area displays links that you can use to navigate the interface. The following table describes the links that are displayed. Table 6. SupportAssist header links Link Description SupportAssist Community Opens the SupportAssist User Group website in a new browser window.
• • • • Device Groups Settings Connectivity Test Setup Wizard Case List The Case List is the default view of SupportAssist. The following table describes the automatically-generated support case information for the supported Dell devices in your environment, as displayed in the Case List page. Table 7. Case List Column Description Case Status Displays the current state of the support case. The status of a case may be: ● Open — Dell Technical Support has opened the submitted case.
Device Inventory The Device Inventory page displays the supported devices that are discovered in OpenManage Essentials. The device inventory displays the device list as a group. If no device group is created, below the column headers, the device inventory displays Ungrouped devices (Total devices: n) and the list of devices. If device groups are created, for each device group, the device inventory displays (Total devices: n) and the list of devices in the group.
Table 8. Device Inventory (continued) Field Description ○ ○ ○ ○ ○ The support case service hosted by Dell is currently unavailable. The collection component had started, but failed to run on the device. The system log collection was not successfully uploaded to Dell. The device or device type credentials are not configured. The device is not set up correctly. There may be an issue with either the configured credentials or connectivity.
Table 10. Manage Devices Field Description Name Displays the NetBIOS name of the device as discovered by OpenManage Essentials. Type Displays the type of device as discovered by OpenManage Essentials: ● PowerVault Storage Device — The device is a Dell PowerVault MD Series storage array. ● PowerVault Server — The device is a Dell PowerVault NX Network Attached Storage (NAS) device. ● EqualLogic Storage — The device is a Dell EqualLogic storage array.
Table 11. Manage Credentials (continued) Field Description Close Click to close the Manage Credentials window. NOTE: SupportAssist does not require the credentials for collecting system logs from Dell PowerVault MD series storage arrays. Related references Managing the credentials of a device group on page 32 Manage Contacts The Manage Contacts window allows you to provide the contact information and parts dispatch information for a device group.
Edit/Delete Group The Edit/Delete Group window allows you to edit the device group details or delete a device group. The following table provides information about the fields displayed on the Edit/Delete Group window. Table 13. Edit/Delete Group Field Description Name Allows you to view or edit the name of the device group. Description Allows you to view or edit the description of the device group. Update Click to save the edited device group information. Delete Click to delete the device group.
Table 14. System Logs (continued) Field Description Credential Type Select the specific device for which you want to provide the credentials. The options displayed depend on the Device Type you have selected. The available options for Server are: ● Windows ● Linux ● ESX/ESXi ● iDRAC ● CMC The available options for Storage are: ● EqualLogic ● MD Series The available option for Switch is Dell Networking. Username Enables you to view or edit the user name.
Table 15. System Logs (continued) Field Description ● Monthly Specify day and time Enables selecting the day and time when you want to collect the system logs. If the Frequency is set to Weekly, the available options are: weeks (1 or 2), day of the week (sunday, monday, tuesday, wednesday, thursday, friday, and saturday), hour (in hh:mm format), and AM/PM.
Preferences The Preferences page enables you to configure Auto Update, Email Settings, Support Collection, and Maintenance Mode. The following table provides information about the fields displayed in the Preferences page. Table 17. Preferences Field Description Auto Update Enable auto update Select this option to automatically download and install the latest SupportAssist and collection component updates, when they are available. The download and installation of the updates occur in the background.
Contact Information The Contact Information page enables you to view and edit the contact information and parts dispatch address. The following table provides information about the fields displayed in the Contact Information page. Table 18. Contact Information Field Description Company Name Enables you to view or edit the company name. Primary Select this option to view the primary contact information. Secondary Select this option to view the secondary contact information.
Table 19. System Credentials (continued) Field Description NOTE: If the server on which SupportAssist is installed is a member of a domain, the user name must be provided in the domain\user name format. Password Enables you to provide or edit the password required to connect to OpenManage Essentials. NOTE: The credentials you provide must of an user account that is a member of the OpenManage Essentials Administrators, Power Users, or Site Administrators group.
Table 21. Connectivity Test Field Description Check box Select the appropriate check boxes to test the connectivity status you want to verify. Test Displays the dependent network resources that you can test. The available options are: ● Internet ● Local SMTP server ● Dell FTP server ● Dell Upload Server ● OpenManage Essentials Service ● Dell SupportAssist Server Description Provides a description of the test. Connectivity Status Displays an icon and a message that indicates the connectivity status.
Table 22. Proxy Settings Field Description Use proxy settings Select this option to enable configuring the proxy server settings. Proxy Server Address or Name The proxy server address or name. Proxy Port Number The proxy server port number. Proxy requires authentication Select this option if the proxy server requires authentication. Username The user name required to connect to the proxy server. Password The password required to connect to the proxy server.
Table 24. System Credentials Field Description Username The user name required to connect to OpenManage Essentials. NOTE: If the server on which SupportAssist is installed is a member of a domain, the user name must be provided in the domain\user name format. Password The password required to connect to OpenManage Essentials. Back Click to navigate to the Registration page. Next Click to verify connectivity to OpenManage Essentials using the provided credentials.
6 Related documents and resources Other documents you may need In ● ● ● ● ● ● ● ● ● ● ● addition to this guide, you can access the following guides available at the Dell Support website: Dell OpenManage Essentials Version 2.2 User’s Guide Dell SupportAssist Version 2.2 for Dell OpenManage Essentials Support Matrix Dell SupportAssist Version 2.2 for Dell OpenManage Essentials Quick Start Guide Dell SupportAssist Version 2.
○ For iDRAC—https://www.dell.com/idracmanuals ○ For Dell EMC OpenManage Connections Enterprise Systems Management—https://www.dell.com/ OMConnectionsEnterpriseSystemsManagement ○ For Dell EMC Serviceability Tools—https://www.dell.com/serviceabilitytools ● Dell EMC support site: 1. Go to https://www.dell.com/support. 2. Click Browse all products. 3. From the All products page, click Software, and then click the required link. 4. Click the required product and then click the required version.
7 Error code appendix The following table lists the error codes, error messages, and possible resolutions. Table 25. Error codes Error code Error message Possible resolution 1000_1 SupportAssist is unable to run a collection component on because the component is not supported on the operating system running on the device. For information on the supported devices and operating systems, see the Dell SupportAssist for Dell OpenManage Essentials Support Matrix at https:// www.dell.
Table 25. Error codes (continued) Error code Error message Possible resolution 1000_9 SupportAssist is unable to run a collection component on . Ensure the following: ● Dell OpenManage Server Administrator (OMSA) is installed and the OMSA services are running on the device. ● iDRAC firmware is updated, if applicable. 1000_10 SupportAssist is unable to run a collection component on .
Table 25. Error codes (continued) Error code Error message Possible resolution 1000_28 SupportAssist is unable to run a collection component on because of an internal error. If the problem persists, the log files may be required for further troubleshooting. Contact Dell Technical Support for assistance. 1000_29 SupportAssist is unable to upload the collection file from . Ensure that the proxy server is reachable.
Table 25. Error codes (continued) Error code Error message Possible resolution 2000_26 SupportAssist is unable to upload the collection file from because of an internal error. If the problem persists, the log files may be required for further troubleshooting. Contact Dell Technical Support for assistance. 2000_27 SupportAssist is unable to upload the collection file from because the upload process exceeded the predefined time limit.
Table 25. Error codes (continued) Error code Error message Possible resolution 2000_199 SupportAssist is unable to run a collection component on . Ensure that the Administrator credentials you have provided for the device in SupportAssist is correct. 2000_298 SupportAssist is unable to run a collection component on because of an internal error. If the problem persists, the log files may be required for further troubleshooting. Contact Dell Technical Support for assistance.
Table 25. Error codes (continued) Error code Error message Possible resolution 2. Open the NAS.properties file using any text editor. 3. Increase the value of the nas.ftp.connection.timeout property. 4. Save the NAS.properties file. 2000_499 SupportAssist is unable to run a collection component on . Perform the following: 1. Ensure that the Administrator credentials you have provided for the device in SupportAssist is correct. 2.
Table 25. Error codes (continued) Error code Error message Possible resolution SA_23 SupportAssist is unable to upload the collection file because of an internal error. If the problem persists, the log files may be required for further troubleshooting. Contact Dell Technical Support for assistance. SA_24 SupportAssist is unable to upload the collection file because of an internal error. If the problem persists, the log files may be required for further troubleshooting.
Table 25. Error codes (continued) Error code Error message Possible resolution SA_108 SupportAssist is unable to run a collection component on . Ensure that the Administrator credentials you have provided for the device in SupportAssist is correct.