
Users Guide
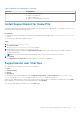


Change language setting
About this task
SupportAssist is available in 25 languages. By default, SupportAssist is set to the same language as that of the operating
system. You can change the language according to your preference.
Steps
1. On the top-right corner of the SupportAssist user interface, click the settings icon and click Select language.
The list of languages is displayed.
2. Select your preferred language.
3. Click Yes to restart SupportAssist in the selected language.
SupportAssist restarts in the selected language and
is displayed next to the selected language.
Create SupportAssist profile
Prerequisites
You must have administrator rights on the PC.
About this task
A SupportAssist profile enables you to receive the automated support capabilities available for your PC service plan. You can
create a SupportAssist profile by using your Dell My Account or your social media account.
Steps
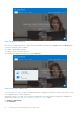
1. On the top-right corner of the SupportAssist user interface, click Profile and click Complete Profile.
● If you have not accepted the SupportAssist terms and conditions, a message is displayed. Click the Read SupportAssist
terms & conditions link, accept the terms and conditions, click Save, and then try again.
● If SupportAssist is unable to connect to the Internet, an appropriate message is displayed. You can click the
troubleshooting links displayed below the error message to fix the issue and try again.
2. On the Dell My Account Sign In page, perform one of the following steps:
● If you already have a Dell My Account and want to sign in using a one-time passcode, perform the following steps:
a. Enable the Email me a one-time passcode toggle switch.
b. Enter the email address and click Send passcode to receive a passcode to your email address.
c. Enter the passcode and click Sign In.
● If you already have a Dell My Account, enter your Dell My Account credentials, and then click Sign In.
● If you do not have a Dell My Account, create an account to sign in. For instructions on creating an account, see Create
Dell My Account on page 15.
● Sign in with your social media account. For instructions on using your social media account, see Sign in with social media
account on page 15.
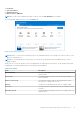
3. On the Contact and Shipping Address page, enter your contact information and shipping details.
4. Select your preferred contact method and preferred contact time.
NOTE:
The preferred contact time is applicable only for PCs with an active Premium Support or Premium Support Plus
service plans in the U.S. or Canada.
5. To add a secondary contact, select Add secondary contact and enter the details.
6. If you do not want SupportAssist to automatically create a support request, clear the Automatically create Support
Requests check box.
NOTE:
The automatic support request creation capability is available and enabled only for PCs with an active
ProSupport, ProSupport Plus, Premium Support, or Premium Support Plus service plan.
7. Click Done.
14
Getting started with SupportAssist for Home PCs