SupportAssist for Home PCs Version 3.9 User’s Guide May 2021 Rev.
Notes, cautions, and warnings NOTE: A NOTE indicates important information that helps you make better use of your product. CAUTION: A CAUTION indicates either potential damage to hardware or loss of data and tells you how to avoid the problem. WARNING: A WARNING indicates a potential for property damage, personal injury, or death. © 2021 Dell Inc. or its subsidiaries. All rights reserved. Dell, EMC, and other trademarks are trademarks of Dell Inc. or its subsidiaries.
Contents Chapter 1: Introduction................................................................................................................. 5 Key features..........................................................................................................................................................................5 Document purpose..............................................................................................................................................................
Scan specific hardware component..............................................................................................................................28 Run quick hardware scan................................................................................................................................................ 29 Run stress test...................................................................................................................................................................
1 Introduction SupportAssist automates support from Dell by proactively and predictively identifying hardware and software issues on your PC. SupportAssist addresses PC performance and stabilization issues, prevents security threats, monitors and detects hardware failures, and automates the engagement process with Dell Technical support. Depending on your Dell service plan, SupportAssist also automates support request creation for issues that are detected during a scan.
● ● ● ● Display service offers applicable for your PC. Automatic or manual installation of SupportAssist OS Recovery. Improved notifications for hardware issues detected on your PC. Enhanced virtual assistant features to identify and resolve PC issues more effectively. Supported PCs SupportAssist is supported on the following Dell PCs: ● ● ● ● ● ● ● ● Inspiron G Series XPS Alienware Vostro Latitude Precision OptiPlex NOTE: SupportAssist is not supported on virtual machines.
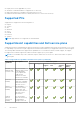
Table 1. SupportAssist capabilities and Dell service plans (continued) SupportAssist capabilities Description Dell service plans Basic ProSupport Premium Support ProSupport Premium Plus Support Plus Dell Software Support (DSS) efficient and reliable network. Troubleshoot issues manually You can fix common PC issues by using the step-by-step instructions and video tutorials that are available on the troubleshooting page.
Table 1. SupportAssist capabilities and Dell service plans SupportAssist capabilities Description Predictive issue detection and support request creation for failure prevention 3 If a part is identified for possible failure, an alert is sent to you. SupportAssist opens a support request, and a Dell Technical Support agent contacts you to ship the replacement part.
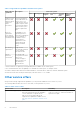
Table 2. Other service offers Service offer Description Availability Dell Migrate Securely migrate your personal data to your new PC from any PC running the Windows operating system. After you migrate your data, you can erase and reset your old PC before you sell, gift, or trade in the PC. NOTE: In this document, the term data refers to the files and settings that you want to migrate.
2 Getting started with SupportAssist for Home PCs SupportAssist is preinstalled on all PCs shipped out of the Dell factory. If SupportAssist is not preinstalled, follow the instructions in this section to install, configure, and use SupportAssist. Minimum PC requirements The following table lists the minimum PC requirements for installing and using SupportAssist: Table 3.
Install SupportAssist for Home PCs By default, SupportAssist is installed on all PCs shipped from the Dell factory. If SupportAssist is not installed on your PC, you can manually download and install SupportAssist. Prerequisites ● The PC must meet the minimum PC requirements for installing and using SupportAssist. See Minimum PC requirements. ● You must be logged in as an administrator. Steps 1. Go to www.dell.com/supportassistforpcs. 2. Click Download Now. The SupportAssistInstaller.exe file is downloaded.
● ● ● ● ● ● Warranty details —service plan and service offers applicable for the PC, its start date, and expiration date. Service Tag—the unique identifier of the PC. The Service Tag is an alpha-numeric identifier. Express Service Code—numerical sequence that can be used during automated phone help, for example, 987-674-723-2. Memory—amount of RAM installed in the PC, for example, 16 GB. Processor—type of processor installed in the PC, for example, Intel Core i5 6200U.
NOTE: The automatic support request creation capability is available and enabled only for PCs with an active ProSupport, ProSupport Plus, Premium Support, or Premium Support Plus service plan. 7. Click Done. ● If the shipping details are invalid, a message is displayed to update the details. Click Update and Finish to update the details. ● If the shipping details are valid, the first name and last name are displayed on the top-right corner of the SupportAssist user interface.
Use different SupportAssist profile Prerequisites You must be logged in as an administrator. Steps 1. On the top-right corner of the SupportAssist user interface, click the username and click Use a different profile. 2. Click Continue. The current profile is deactivated, access to the saved contact information and shipping details is removed, and the Home page is displayed. A link to create a profile is displayed on the top-right corner of the SupportAssist user interface. See Create SupportAssist profile.
3. Select the time, frequency, and day when you want to run the scan. The date of the next scheduled scan is displayed. 4. Click Save. The automatic scans and optimizations are scheduled and the Home page is displayed. Manually upgrade SupportAssist Prerequisites ● You must be logged in as an administrator. ● You must have created a SupportAssist profile. See Create SupportAssist profile. About this task Upgrading SupportAssist ensures that the latest SupportAssist features are available on your PC.
Table 4. Notifications on the SupportAssist user interface When the notification is displayed Action You have not optimized your PC in the last 28 days ● Click Run all to run all the scans and optimizations on your PC. ● Click Remind Me Later to view the notification when you reopen SupportAssist after 24 hours. ● Click Cancel to hide the notification. Your PC service plan is about to expire, or has expired. ● Click Renew to renew the PC service plan.
Table 5. Taskbar or Windows Action Center notifications When the notification is displayed Action For other components, perform one of the following steps: ● Click the notification to view issue details. ● Click Remind me tomorrow to view the notification later. A hardware component must be replaced for an issue that is detected during a manually initiated or scheduled scan.
For information about notifications that are displayed on the taskbar or Windows Action Center, see Notifications on taskbar or Windows Action Center. The following table describes the banners that are displayed on the Home page: Table 6. Banners on SupportAssist Home page When the banner is displayed Action If you have purchased Dell Migrate service and Click Yes to go to the Dell Migrate home page. have not migrated your files and settings within 90 days.
Results Dell SupportAssist is uninstalled.
3 System reset and repair overview SupportAssist OS Recovery enables you to reset or repair your PC. You can invoke SupportAssist OS Recovery from the SupportAssist for Home PCs user interface. After you manually install or upgrade to SupportAssist for Home PCs version 3.9, it verifies if SupportAssist OS Recovery version 5.3.1 or later is applicable for your PC. If applicable, SupportAssist automatically initiates the installation of SupportAssist OS Recovery on your PC.
● Your PC must be connected to a power outlet. About this task The Reset to factory settings option resets your operating system and default applications to the state they were in when your PC was shipped from the Dell factory. Steps 1. Open SupportAssist and go to Troubleshooting > Erase everything and reset my PC to its original state, and then click Reset my PC. 2. Click Yes, reboot. The PC restarts, and the SupportAssist OS Recovery user interface is displayed.
Repair your PC About this task System repair feature enables you to diagnose and troubleshoot common issues that may occur before your PC boots to the operating system. It checks and fixes the partition table, start-up file, and the health of the Windows operating system. Steps 1. Open SupportAssist and go to Troubleshooting > Restore my PC with System Repair, and then click Launch System Repair. 2. Click Yes, restart. The PC restarts , and the SupportAssist OS Recovery user interface is displayed.
4 Dell Migrate overview Dell Migrate is an on-demand service that enables you to securely migrate your personal files and settings to your Dell PC from any PC running the Windows operating system. After you migrate your data, you can erase and reset your old PC before you sell, gift, or trade in the PC. To purchase the Dell Migrate service for your PC, go to https://www.dell.com/Migrate. NOTE: The Dell Migrate service is available only for the Inspiron, G Series, XPS, and Alienware PCs in the U.S.
Migrate data from old to new PC Prerequisites Ensure the following: ● Dell Migrate service is available for your new PC. For instructions to purchase, go to https://www.dell.com/Migrate. ● The operating system that is installed on your old PC is Windows 8.1 or later. ● The operating system that is installed on your new PC is Windows 10. ● Both the PCs are connected to an electrical outlet. ● You are logged in to your old and new PCs as an administrator.
● If some of your data was not migrated, click Show skipped files, review, and select the data that you want to migrate, and then click Retry. 7. Optionally, click to provide your feedback, click about erasing your old PC. to migrate data from another PC or user account, or click to learn 8. Click Close. The Home page is displayed. Next steps To erase and reset your old PC, click Erase This PC on the Dell Data Assistant user interface. See Erase and reset old PC.
5 Drivers and downloads overview Updating the drivers helps improve PC performance and patch security risks. By default, SupportAssist scans your PC every week to detect updates available for drivers and Dell applications that are installed on your PC. If required, you can configure the frequency in which SupportAssist performs the scan. SupportAssist categorizes the updates based on their severity as Urgent, Security, Recommended, and Optional.
Uninstall driver updates Prerequisites You must be logged in as an administrator. About this task If you encounter problems with your PC after updating a driver, uninstall the update and return the PC to its previous state. Steps 1. Open SupportAssist and click History. 2. On the History page, click the required Restore System link. A message is displayed stating that the PC will be restored to the state when the restore point was created. 3. Click Restore.
6 Scanning PC hardware Running a hardware scan enables you to detect hardware issues on your PC. By default, SupportAssist scans your PC hardware once a month to detect hardware issues. You can also manually perform one of the following to identify a hardware issue: ● Scan a specific hardware component ● Run a quick hardware scan ● Run a stress test NOTE: If SupportAssist is minimized and an issue is detected during a scan, a notification is displayed on the Scan Hardware tile.
Results ● If no issue is detected, Passed status and are displayed. ● If an issue is detected and it does not require creating a support request, Failed status and are displayed. ● If an issue is detected and requires creating a support request, the issue details page is displayed. For instructions to create a support request, see Create support request for issue detected by a scan. Run quick hardware scan Prerequisites You must be logged in as an administrator.
● If an issue is detected and does not require creating a support request, the issue title is displayed above the tiles, a notification is displayed on the Scan Hardware tile, and the optimization tiles are disabled. To enable the tiles, click OK.
7 Optimizing your PC SupportAssist helps you optimize your PC by running a series of diagnostics to identify modifications to files and settings of your PC.
Optimize network About this task SupportAssist updates your PC settings to keep your network efficient and reliable. Steps 1. Open SupportAssist and click . 2. On the Optimize Network tile, click Run. During the optimization, the name of task that is running is displayed above the tiles and the progress of scan is displayed on the tile. CAUTION: If you cancel the optimization while it is in progress, the changes that were performed are not reversed.
About this task Potentially unwanted programs (PUPs) are programs that are installed in the background when you install an application. PUPs reduce your PC performance or display unwanted advertisements. SupportAssist detects PUPs on your PC through a manually initiated or automated virus and malware scan. If PUPs are detected, the Remove Viruses & Malware tile icon is displayed in red color and the number of PUPs that were detected is displayed on the tile.
NOTE: The manual support request creation capability is applicable only for PCs with an active Premium Support, ProSupport, Premium Support Plus, or ProSupport Plus service plan. The support request page is displayed. For instructions to manually create a support request, see Manually create a support request.
8 Virtual assistant overview Use the virtual assistant from any page to troubleshoot PC issues such as slow performance and hardware issues or chat with a Dell technical support agent. To troubleshoot an issue, the virtual assistant may prompt you to update your drivers, run optimizations, or create a support request, if necessary.
9 Creating support request SupportAssist helps you proactively and periodically monitor your PC for hardware or software issues. If an issue is detected on your PC, SupportAssist enables you to create a support request with Dell technical support. Depending on the service plan of your PC, SupportAssist may also automatically create a support request for the issue. NOTE: The automatic support request creation capability is not available for PCs with an expired warranty.
Manually create a support request About this task Depending on the service plan of your PC, you can manually create a support request for issues that are not detected by SupportAssist. For information about the SupportAssist capabilities for different service plans, see SupportAssist capabilities and Dell service plans. Steps 1. Open SupportAssist and click the Get Support tab. 2. Click Open a Support Request.
Issue summary page The following table describes the information that is displayed on the issue summary page: Table 10. Issue summary page Information Description Service Tag The unique identifier of the PC. The Service Tag is an alphanumeric identifier. Warranty The service plan and its expiry date. Issue The details of the issue for which the support request is created. Support Request # The support request number for the issue.
10 Troubleshooting overview The Troubleshooting page enables you to troubleshoot issues with network connectivity and PC performance. It also enables you to scan your PC for hardware issues and provides links to video tutorials to troubleshoot common hardware and software issues. The troubleshooting links enabled for you depends on your user account type. For instructions to know your user account type, see the operating system documentation at https://support.microsoft.com/.
11 History overview The History page displays information about the SupportAssist activities and events such as software optimizations, troubleshooting tasks, driver updates, hardware scans, virtual assistant conversation, and so on. The information for the activities performed in the last 90 days in a chronological order. The History page displays links to view the transcripts of your chat conversations with the virtual assistant and to check the status of your support requests online.
12 Getting support SupportAssist enables you to contact Dell technical support agents through phone, chat, or social media. The Get Support page lists the help and support options available for your PC. The help and support options that you can access depend on the service plan of your PC and your region. For information about the help and support options available for various service plans, see SupportAssist capabilities and Dell service plans.
Send files to Dell technical support About this task If requested by a Dell technical support agent, you can send files describing the issue on your PC or any other specific file that is requested by the support agent. You can send a ZIP, RAR, TXT, JPG, JPEG, PNG, GIF, DOCX, DOC, ODT, PDF, XLS, or XLSX file. NOTE: The maximum size of the file that you can send is 4 MB. NOTE: You can send up to three files in a day. If you have multiple files, compress the files to .zip format and send the ZIP file. Steps 1.
Results The technical support agent can access your PC remotely.
13 Frequently asked questions 1. How can I identify the build number of the operating system that is installed on my PC? Perform the following steps: a. Search and open the Run application. b. Enter winver and click OK. The operating system build number is displayed, for example, OS Build 15063.1266. 2. How can I check if SupportAssist is installed on my PC? To verify if SupportAssist is installed, perform the following steps: a. Go to Control Panel > Programs > Programs and Features. b.
d. From the programs menu, search and open the Command Prompt application. e. Type netstat -a -v | findstr /C:"5700" and press Enter. ● If no application uses the 5700 port, no result is displayed. ● If any other application uses the 5700 port, the port number and LISTENING status are displayed. f. Restart the Dell SupportAssist service. 12. It is taking a long time to open SupportAssist. What should I do? If it is taking a long time to open SupportAssist, you must restart the SupportAssist service.
If SupportAssist could not scan a component during the hardware scan, the Misconfigured status is displayed. Hence, no notification is displayed on the Scan Hardware tile. SupportAssist scans the component again during the next manually initiated or automated scan. 23. Where can I view the summary of the files and settings that were migrated using Dell Migrate? To view the files and settings that were migrated in the last session, go to the Dell Migrate home page and click View Summary.
14 SupportAssist for Home PCs resources This section lists the documentation resources and other useful links that provide more information about SupportAssist for Home PCs. Table 12. SupportAssist for Home PCs resources Contents Resource Go to Minimum requirements, installation, and product features SupportAssist for Home PCs Version 3.9 User's Guide SupportAssist for Home PCs manuals New features, enhancements, known issues, and limitations in the release SupportAssist for Home PCs Version 3.
15 Contacting Dell Dell provides several online and telephone-based support and service options. Availability varies by country or region and product, and some services may not be available in your area. If you do not have an active Internet connection, you can find contact information in your purchase invoice, packing slip, bill, or Dell product catalog. Steps 1. To contact Dell for sales, technical support, or customer service issues, perform the following steps: a. Go to https://www.dell.com/support. b.