
Users Guide
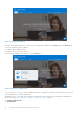
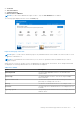
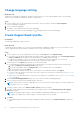
Table Of Contents
- SupportAssist for Home PCs Version 3.8.1 User’s Guide
- Introduction
- Getting started with SupportAssist for Home PCs
- Minimum PC requirements
- Install SupportAssist for Home PCs
- SupportAssist user interface
- Change language setting
- Create SupportAssist profile
- Update contact and shipping information
- Use different SupportAssist profile
- Configure Internet settings
- Scheduled scans and optimizations
- Manually upgrade SupportAssist
- Notifications
- Uninstall SupportAssist
- System repair overview
- System reset overview
- Dell Migrate overview
- Drivers and downloads overview
- Scanning PC hardware
- Optimizing your PC
- Virtual assistant overview
- Creating support request
- Troubleshooting overview
- History overview
- Getting support
- Frequently asked questions
- SupportAssist for Home PCs resources
- Contacting Dell

Steps
1. On the top-right corner of the SupportAssist user interface, click the username and click Use a different profile.
2. Click Continue.
The current profile is deactivated, access to the saved contact information and shipping details is removed, and the Home
page is displayed. A link to create a profile is displayed on the top-right corner of the SupportAssist user interface. See
Create SupportAssist profile on page 14.
Configure Internet settings
Prerequisites
You must have administrator rights on the PC.
About this task
Your PC must be connected to an active Internet connection to experience the automated support capabilities of SupportAssist.
You can configure SupportAssist to connect to the Internet directly or through a proxy server.
Steps
1. On the top-right corner of the SupportAssist user interface, click the settings icon, click Settings, and then click Internet.
2. If SupportAssist can directly connect to the Internet, select Connect directly.
3. If SupportAssist must connect to the Internet using a proxy network, perform the following steps:
a. Select Connect using proxy.
The proxy settings fields are displayed.
b. Enter the address, port number, username, and password details.
NOTE: You can enter a maximum of five digits for the port number.
4. Click Save.
The Internet settings are configured and the Home page is displayed.
Scheduled scans and optimizations
By default, SupportAssist scans your PC to detect hardware issues, driver updates, and the required PC optimizations. The
default frequency of the scans depend on your PC service plan.
If an urgent driver update, hardware issue, or a virus or malware is detected during the scan, a notification is displayed. The
type of notification depends on the operating system that is installed on your PC. If your PC has an active ProSupport Plus or
Premium Support Plus service plan, SupportAssist automatically optimizes your PC after the scan.
Schedule automatic scans and optimizations
Prerequisites
You must have administrator rights on the PC.
About this task
SupportAssist automatically scans your PC for driver updates, hardware issues, and the required optimizations. You can select
the preferred time, frequency, and day when you want SupportAssist to scan your PC.
Steps
1. On the top-right corner of the SupportAssist user interface, click the settings icon, click Settings, and then click Schedule
scans and Optimizations.
2. Ensure that the Turn on automatic system scans and optimizations check box is selected.
3. Select the time, frequency, and day when you want to run the scan.
The date of the next scheduled scan is displayed.
16
Getting started with SupportAssist for Home PCs