Dell SupportAssist Version 1.
Notes, Cautions, and Warnings NOTE: A NOTE indicates important information that helps you make better use of your computer. CAUTION: A CAUTION indicates either potential damage to hardware or loss of data and tells you how to avoid the problem. WARNING: A WARNING indicates a potential for property damage, personal injury, or death. Copyright © 2014 Dell Inc. All rights reserved. This product is protected by U.S. and international copyright and intellectual property laws.
Contents 1 Overview......................................................................................................................7 Key Features...........................................................................................................................................7 Features Supported With Dell Service Contracts.................................................................................8 Case Data Handling.........................................................................
Network Bandwidth Consumption And Recommendations For Scheduling Periodic Collection............................................................................................................................................ 32 Default System Log Collection Schedule...........................................................................................32 Disabling The Scheduling Of System Log Collection For A Specific Device Type...........................
Service Contract..................................................................................................................................49 Service Contract Warning.............................................................................................................49 Service Contract Type Is Unknown.............................................................................................. 50 Service Tag Warnings.............................................................................
Overview 1 Dell SupportAssist collects information about your computer hardware and software, and automatically creates support cases when issues arise. This helps Dell to provide you an enhanced, personalized, and efficient support experience. Dell uses this data to help solve common problems and design and market the products and services features you use most.
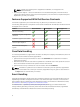
NOTE: Support cases opened prior to SupportAssist installation, do not appear in the SupportAssist dashboard. • Proactive parts dispatch — Based on examination of the troubleshooting data, if the Dell technical support agent determines that a part needs to be replaced in your environment, a replacement part is dispatched to you with your consent. Features Supported With Dell Service Contracts The features supported in your environment may vary based on your Dell service contract.
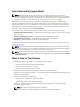
Data Collected By SupportAssist NOTE: By default, SupportAssist collects data from all supported devices in an environment, irrespective of the service contract type of the devices, and uploads the data to Dell. The collection of data is staggered, and the data is collected from 5 to 10 devices at a time. For information about the default frequency of data collection, see Default System Log Collection Schedule.
Installing, Upgrading, And Uninstalling Dell SupportAssist 2 The following sections provide information about installing, upgrading, and uninstalling Dell SupportAssist. Prerequisites The following are the prerequisites: • Dell PowerEdge servers running Dell OpenManage Essentials version 1.
• All managed PowerEdge, EqualLogic, EqualLogic FluidFS NAS, PowerVault, iDRAC7, CMC, Force10, PowerConnect, and PowerEdge VRTX devices discovered, categorized, and inventoried by the OpenManage Essentials server. • PowerVault Modular Disk Storage Manager (MDSM) installed on the OpenManage Essentials server to support PowerVault MD Series arrays. • A trust relationship must exist between the domains of the management server and the managed nodes. • Microsoft .Net Framework 4.5 • Microsoft ASP.
– https://ddldropbox.us.dell.com/upload.ashx/ — the file upload server where the diagnostic test results are uploaded. – https://ftp.dell.com/ — for new SupportAssist release information. NOTE: To verify if the destinations are reachable, follow the instructions in Ensuring Successful Communication Between The SupportAssist Application And The SupportAssist Server.
NOTE: Before you begin, make sure that: 1. • The system is able to connect to the Internet. • You have Administrator privileges on the system. • On the firewall, port 443 is open to access https://ftp.dell.com. On the Dell OpenManage Essentials management server, right-click the SupportAssist installer package, and select Run as administrator.
5. Click Install. The Install Wizard Completed dialog box is displayed. NOTE: By default, SupportAssist is installed at: C:\Program Files (x86)\Dell\Dell Integrated Support. 6. Click Finish. The SupportAssist application opens in a web browser and the First-Time Setup dialog box is displayed. The SupportAssist application installed on the system registers with the SupportAssist server hosted by Dell, and sends the registration confirmation email to your primary contact.
NOTE: If the installation of SupportAssist fails, you can retry the installation at a later time. To retry the installation, right-click the DellSupportAssistSetup.exe file available at C:\Program Files\Dell \SysMgt\Essentials\SupportAssistSetup or the OpenManage Essentials custom installation folder, and select Run as administrator. 1. Extract the OpenManage Essentials installation package. 2. Double-click the Autorun.exe file available in the folder where you extracted the installation package.
9. Provide the following information for the primary contact to whom Dell must send alert notifications, case status notifications, and so on: – Company Name — The company name must contain one or more printable characters, and must not exceed 256 characters. – Country/Territory — Select your country or territory. – First Name — The first name can contain letters, quotation marks [ ’ ], periods [ . ], spaces, and must not exceed 50 characters.
11. In the Installation Completed window, select Launch SupportAssist and click Finish. The SupportAssist application opens in a web browser and the First-Time Setup dialog box is displayed. The SupportAssist application installed on the system registers with the SupportAssist server hosted by Dell, and sends the registration confirmation email to your primary contact.
Upgrading SupportAssist Using The SupportAssist Installation Package To upgrade: 1. On the Dell OpenManage Essentials management server, right-click the SupportAssist installer package, and select Run as administrator. NOTE: UAC requires that the installation is performed with elevated privileges that are obtained only through the Run as administrator option. If you are logged on to the OpenManage Essentials server as an administrator, double-click the installer package to install SupportAssist.
3. If the Proxy Settings window is displayed, provide the following: a) In the Server Address field, type the proxy server address or name. b) In the Port field, type the proxy port number. NOTE: If the proxy server credentials are not provided, SupportAssist connects to the proxy server as an anonymous user.
Using Dell SupportAssist 3 The following sections provide information about configuring and using SupportAssist. Launching SupportAssist To launch SupportAssist: 1. On the OpenManage Essentials management server: – Double-click the Dell SupportAssist desktop icon. – Click Start→ All Programs→ Dell OpenManage Applications→ SupportAssist→ SupportAssist. – In OpenManage Essentials console, click the Extensions tab, and then click the SupportAssist Launch link.
Configuring Proxy Server Settings If your system connects to the Internet through a firewall or proxy server, the proxy settings must be configured in SupportAssist. Configuring the proxy settings enables the SupportAssist application to communicate with the SupportAssist server hosted by Dell. To configure the proxy server settings: NOTE: The Settings tab is accessible only if you are logged on as a member of the OpenManage Essentials Administrators or Power Users group. 1. Click the Settings tab.
NOTE: Whenever the Administrator credentials of supported devices are changed, you must ensure that the Default Device Type Credentials are also updated in SupportAssist. Alternately, you can create a service account that never expires, and provide the service account credentials in SupportAssist. For example, if the managed PowerEdge servers are part of a domain, you can create a service account on the domain controller, and add the service account to the Local Administrators group of the managed server.
4. Type the credentials in the corresponding fields: NOTE: For Force10 and PowerConnect Ethernet switches, the Username, Password, and Enable Password fields are optional. However, information must be provided for these fields if the Force10 or PowerConnect Ethernet switch is configured with these details. – Username — The user name must contain one or more printable characters, and not exceed 104 characters. NOTE: Windows user names must be of the form [Domain\Username]. You can also use a period [ .
NOTE: The Connectivity Test link is enabled only if you are logged on as a member of the OpenManage Essentials Administrators or Power Users group. 1. Move the mouse pointer over the user name link that is displayed beside the Help link, and then click Connectivity Test. The Connectivity Test page is displayed. 2. Click Send. NOTE: If you have opted to not receive email notification when a new support case is generated, SupportAssist does not send the connectivity confirmation email as well.
• DNS server • Processes • Environment variables • Registry • Logs • iSCSI data NOTE: When the Send network identification information to Dell option is cleared, some of the data about your network is not transmitted to Dell. This may impede Dell technical support from resolving your issue.
NOTE: Editing the credentials for a device is enabled only if you are logged on as a member of the OpenManage Essentials Administrators or Power Users group. 1. Click the Devices tab. The Device Inventory page is displayed. 2. Select a device in the Device Inventory table. The Edit Device Credentials link is enabled. 3. Click Edit Device Credentials. NOTE: If the device you selected does not require credentials to generate the system log collection, a message is displayed on the dashboard.
NOTE: To reset the device-specific credentials to the Default Device Type Credentials, you must be logged on as a member of the OpenManage Essentials Administrators or Power Users group. 1. Click the Devices tab. The Device Inventory is displayed. 2. Select a device in the Device Inventory table. The Edit Device Credentials link is enabled. 3. Click Edit Device Credentials. The Edit Device Credentials dialog box is displayed. 4. Click Reset to Default Device Type Credentials.
4. Select Overwrite the device-specific credentials with the Default Device Type Credentials for all devices belonging to the current Device Type and Credential Type. The Confirmation dialog box is displayed. CAUTION: If you select the Do not show this reminder again option, SupportAssist does not prompt for your confirmation when you attempt to overwrite the device-specific credentials the next time. 5. Click Yes. 6. Click Save Changes.
NOTE: The Settings tab is accessible only if you are logged on as a member of the OpenManage Essentials Administrators or Power Users group. 1. Click the Settings tab. The System Logs page is displayed. 2. Click Preferences. The Preferences page is displayed. 3. Under Support Collection, select or clear Automatically start a log collection when a new support case is generated, to enable or disable the automatic collection of system logs.
Scheduling The Periodic Collection Of System Logs Before you begin, ensure that the Enable system log collection scheduling option is enabled in the Preferences page. NOTE: To receive the full benefits of the support, reporting, and maintenance offering of your ProSupport Plus service contract, you must configure SupportAssist to collect the system logs at periodic intervals for each supported device type.
8. Click Save Changes. Related Links System Logs Default System Log Collection Schedule Disabling The Scheduling Of System Log Collection For A Specific Device Type Network Bandwidth Consumption And Recommendations For Scheduling Periodic Collection NOTE: In an environment that consists of less than 300 devices, the network bandwidth consumed for uploading the system log collection is about 4 MB/second.
Device Type Device or Operating System Schedule Storage Dell EqualLogic Weekly; Monday at 12:00 AM Dell PowerVault MD series Weekly; Monday at 12:00 AM NAS appliance Weekly; Monday at 12:00 AM Dell PowerConnect Monthly; Monday of the first week at 12:00 AM Dell Force 10 Weekly; Monday at 12:00 AM Switch Related Links Scheduling The Periodic Collection Of System Logs Disabling The Scheduling Of System Log Collection For A Specific Device Type Disabling The Scheduling Of System Log Collection
Confirming Connectivity Through The Proxy Server To test if SupportAssist can connect to the Internet through the proxy server: NOTE: The Settings tab is accessible only if you are logged on as a member of the OpenManage Essentials Administrators or Power Users group. 1. Click the Settings tab. The System Logs page is displayed. 2. Click Proxy Settings. The Proxy Settings page is displayed. 3. Ensure that the proxy settings has been configured correctly. See Configuring Proxy Server Settings. 4.
NOTE: The Settings tab is accessible only if you are logged on as a member of the OpenManage Essentials Administrators or Power Users group. 1. Click the Settings tab. The System Logs page is displayed. 2. Click Preferences. The Auto Update,Email Settings, Support Collection, and Maintenance Mode page is displayed. 3. Under Auto Update, select Enable auto update. 4. Click Save Changes.
NOTE: The Settings tab is accessible only if you are logged on as a member of the OpenManage Essentials Administrators or Power Users group. 1. Click the Settings tab. The System Logs page is displayed. 2. Click Preferences. The Auto Update, Email Settings, Support Collection, and Maintenance Mode page is displayed. 3. 4. Under Maintenance Mode, select or clear Temporarily suspend case generation activity (for example, for purposes of downtime, external troubleshooting, etc.
Setting The Number Of Cases Displayed Per Page Refreshing The Case List Or Device Inventory Display Data Sorting The Case List Data By Column Name To sort the case list display data by column name, click any column header. The report refreshes to display the data in an ascending or descending order of the column header you clicked. Related Links Case List Viewing The Case List Filtering The Case List Data By Column Name And Keyword To filter the case list display data by column name and keyword: 1.
• 10 per page • 20 per page • 30 per page • 50 per page • 100 per page By default, the dashboard is set to display 50 cases per page. Related Links Case List Viewing The Case List Viewing The Device Inventory To view the Device Inventory, click the Devices tab on the SupportAssist dashboard. NOTE: By default, the Device Inventory is sorted by Device Name, in ascending order. See the following sections for more sorting options.
4. Click Apply Filters. The report refreshes to display the data according to your criteria. If there are no matches, the following message is displayed: No support cases found. Please review your search criteria and try again. 5. To clear the search criteria and try again, click Clear Filters. The report refreshes to display the default content. 6. Repeat step 2 through step 3. The report refreshes to display the data according to your criteria.
• Click the Refresh button on the web browser to regenerate the last sort operation. The web browser may display a dialog box with the following message: To display the webpage again, the web browser needs to resend the information you’ve previously submitted. If you were making a purchase, you should click Cancel to avoid a duplicate translation. Otherwise, click Retry to display the webpage again. In the dialog box that is displayed, click the Retry button to continue.
• Automatically create a support case if there is a problem with a device in your environment. • Upload the generated system log collection to Dell. • Verify if an updated version of SupportAssist is available. To ensure that the SupportAssist application is able to successfully communicate with the SupportAssist server: • The management server on which the SupportAssist application is installed must be able to connect to the following destinations: – https://api.dell.
To verify if a compatible version of the collection tool is installed: 1. Navigate to the Control Panel. 2. Click Programs → Programs and Features. The Uninstall or change a program window is displayed. 3. In the list of installed applications, verify if the compatible version of DSET and Lasso are installed. NOTE: For information on the version of DSET and Lasso that is compatible with SupportAssist, see the Dell SupportAssist Support Matrix at dell.com/serviceabilitytools.
• Lasso_Report_for[10.94.216.76_SvcTag_897672S_2012-08-21T094147].zip.gpg (without PII) • Lasso_Report_for[10.94.216.76_SvcTag_897672S_2012-08-21T094147].xml.gpg (with PII) The report file is encrypted with the password, dell (all lowercase). The report information can then be viewed by opening the dsetreport.hta file in your web browser. NOTE: You should open the reports only when asked to do so by Dell technical support. Your report will not be reviewed unless you have an open support case.
Troubleshooting 4 The following sections describe procedures you can use to troubleshoot Dell SupportAssist issues Installing SupportAssist SupportAssist installation requires elevated Microsoft User Authentication (UAC) privileges, and may fail if you attempt to install by double-clicking on the installer executable. If this occurs, install SupportAssist as follows: 1. Right-click the installer executable. 2. Select Run as administrator.
– Verify that you have sufficient privileges to start system services. – Check the log-file.txt file in the logs directory (typically, C:\Program Files (x86)\Dell\Dell Integrated Support\logs in 64-bit operating systems and at C:\Program Files\Dell\Dell Integrated Support \logs in 32-bit operating systems) to see which component failed to load.
Collection Failure If you receive a SupportAssist email notification indicating a collection issue with a specific device and the Collection Status of the device displays Failed to Run: 1. Verify if the device is connected to the network. 2. Verify the credentials you have provided for the device. You must provide the Administrator credentials in the Settings → System Logs page. For more information, see Configuring The Default Device Type Credentials and Editing Device Credentials. 3.
To verify if the certificate is installed in Internet Explorer: 1. Click Tools → Internet Options. The Internet Options dialog box is displayed. 2. Click the Content tab, and then click Certificates. The Certificates dialog box is displayed. 3. Click the Trusted Root Certification Authorities tab. 4. Scroll to verify if GTE CyberTrust Global Root is listed in the Issued To and Issued By columns. If GTE CyberTrust Global Root is not listed, you must install the required certificates.
To install the root certificate: 1. Click Start → Run. The Run dialog box is displayed. 2. In the Open box, type mmc, and click OK. The Console1 – [Console Root] window is displayed. 3. Click File → Add/Remove Snap-in. The Add or Remove Snap-ins dialog box is displayed. 4. Under Available snap-ins, select Certificates, and click Add >. The Certificates snap-in dialog box is displayed. 5. Ensure that My user account is selected, and then click Finish. 6.
If any cases display a warning icon in the Service Contract column: 1. Move the pointer over the warning icon to display a tooltip. 2. Click the Dell Support link displayed in the tooltip to open the service contract information page. You can obtain current service contract information for your Dell devices, obtain new service contracts, and so on. Service Contract Type Is Unknown The Service Contract column on Case List report displays unknown for all existing support cases.
Dell SupportAssist Interface 5 The top-right corner of the SupportAssist dashboard displays links that you can use to navigate the interface. The following table describes the links that are displayed. Link Description SupportAssist Community Opens the SupportAssist User Group website in a new browser window.
Case List The Case List is the default SupportAssist dashboard view. You can filter the cases that are displayed by selecting an option from the Filter By drop-down box. The are displayed. icon enables you to refresh the cases that The following table describes the automatically-generated support case information for your supported Dell devices, as displayed in the Case List page. Column Description Case Status The current state of the support case.
Column Description • Service Contract The Dell service contract level under which the device is covered. The service contract column may display: • • • • • • • Device Type Collection Failed to Upload — Collection information was not successfully uploaded to Dell. Unknown — SupportAssist cannot determine the service contract. Invalid Service Tag — The service tag of the device is invalid. No Service Contract — This device is not covered under a Dell service contract.
Column Description Device Type Indicates the type of device as discovered by OpenManage Essentials: • • • Storage — The device is a PowerVault MD Series or EqualLogic storage array, or EqualLogic FluidFS NAS appliance. Server — The device is a Dell PowerEdge, PowerEdge VRTX, iDRAC7, or CMC device. Switch — The device is a Force10 or PowerConnect Ethernet switch. Service Tag A unique, alphanumeric identifier that enables Dell to individually recognize each Dell device.
Settings The Settings tab enables you to configure SupportAssist. By default, the System Logs page is displayed when the Settings tab is opened.
Field Description • Force10 Username Enables you to view or edit the user name. Password Enables you to view or edit the password in a masked format. Enable Password Enables you to view or edit the enable password in a masked format. NOTE: The Enable Password field is displayed only when the Device Type selected is Switch. Community String Enables you to view or edit the community string in a masked format.
Field Description If the Frequency is set to Weekly, the available options are: weeks (1 or 2), day of the week (sunday, monday, tuesday, wednesday, thursday, friday, and saturday), hour (in hh:mm format), and AM/PM. If the Frequency is set to Monthly, the available options are: week of the month (first, second, third, fourth, and last), day of the week (sunday, monday, tuesday, wednesday, thursday, friday, and saturday), hour (in hh:mm format), AM/PM, and months (1 or 3).
Field Description Auto Update Enable auto update Select this option to automatically download and install the latest SupportAssist and collection tool updates, when they are available. The download and installation of the updates occur in the background. A message will be displayed if problems occur during the update process. NOTE: It is recommended that you select the Enable auto update option, to ensure that SupportAssist is up-to-date with the latest features and enhancements.
Contact Information The Contact Information page enables you to view and edit the primary and secondary contact information. The following table provides information about the items displayed in the Contact Information page. Field Description Company Information Enables you to view or edit the company name. Primary Select this option to view the primary contact information. Secondary Select this option to view the secondary contact information.
Related Documents And Resources 6 Other Documents You May Need In addition to this guide, you can access the following guides available at the Dell Support website: • Dell OpenManage Essentials Version 1.3 User’s Guide • Dell SupportAssist Version 1.3 For Dell OpenManage Essentials Support Matrix • Dell SupportAssist Version 1.3 For Dell OpenManage Essentials Quick Start Guide • Dell SupportAssist Version 1.
* Serviceability Tools – To view the document, click the required product version. • Using search engines as follows: – Type the name and version of the document in the Search box. Related Links Related Documents And Resources Contacting Dell NOTE: If you do not have an active Internet connection, you can find contact information on your purchase invoice, packing slip, bill, or Dell product catalog. Dell provides several online and telephone-based support and service options.