Configuration and Deployment Guide Enable OpenManage Secure Enterprise Key Manager (SEKM) on Dell EMC PowerEdge Servers This Dell EMC Configuration and Deployment Guide describes the process of enabling the SEKM feature on PowerEdge servers. Key tips and troubleshooting techniques for using SEKM are also discussed. Abstract Keeping your business-critical operations and IT infrastructure safe and secure is key to providing seamless services.
Revisions Revisions 2 Date Description July 2019 Initial release June 25, 2020 Added procedures related to KeySecure Classis, Thales Data Security Manager (DSM), and Next Generation KeySecure September 2020 Added extra information about including IP information during setup and configuration Enable OpenManage Secure Enterprise Key Manager (SEKM) on Dell EMC PowerEdge Servers
Acknowledgements Acknowledgements This Configuration and Deployment Guide was produced by the following members of the Dell EMC Enterprise Server Solutions team: Author—Sanjeev Dambal, Texas Romer, Xavier Conley, and Craig Phelps Other—N/A The information in this publication is provided “as is.” Dell Inc.
Contents Contents Revisions.............................................................................................................................................................................2 Acknowledgements .............................................................................................................................................................3 Contents ............................................................................................................................
Contents 4.5 Get the CSR file signed by Next Generation KeySecure .................................................................................45 4.5.1 Download the server CA from Next Generation KeySecure and upload to iDRAC .........................................47 5 4.6 Configure the Key Management Server (KMS) settings on iDRAC .................................................................48 4.7 Enable SEKM on the iDRAC PERC ...............................................................
Executive summary Executive summary Advantages of SEKM over LKM in Dell EMC PowerEdge servers The OpenManage SEKM enables you to use an external Key Management Server (KMS) to manage keys that can then be used by iDRAC to lock and unlock storage devices on a Dell EMC PowerEdge server. iDRAC requests the KMS to create a key for each storage controller, and then fetches and provides that key to the storage controller on every host boot so that the storage controller can then unlock the SEDs.
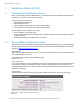
KeySecure Classic (k150v) 1 KeySecure Classic (k150v) 1.1 Prerequisites for KeySecure Classic Before you start setting up iDRAC SEKM support, you must first ensure that the following prerequisites are fulfilled. Else, you cannot successfully set up SEKM.
KeySecure Classic (k150v) Password authentication It is recommended that you set this setting to “Required (most secure)”. When set to this option, the password for the user account that represents the iDRAC on the KMS must be provided to iDRAC as explained later in Set up SEKM on iDRAC. Client certificate authentication It is recommended that you set to “Used for SSL session and username (most secure)”.
KeySecure Classic (k150v) 1.4 Configure SEKM by using the iDRAC GUI Key processes in configuring SEKM on PowerEdge servers by using iDRAC GUI For the Key Management Server, this workflow will be using Gemalto KeySecure as the Key Management Server. 1. Start iDRAC by using any supported browser. 2. Click iDRAC Settings Services. 3. Expand the SEKM Configuration menu and click Generate CSR. Generate CSR by using the iDRAC GUI 4.
KeySecure Classic (k150v) 6. Save it to your system. Enter or select data in the CSR dialog box of iDRAC 7. Get the full CSR file contents signed on Gemalto. See Get the CSR file signed on Gemalto. 8. Download the signed image file, and then upload it to iDRAC. 1.4.
KeySecure Classic (k150v) 1. Log in to Gemalto. 2. Click Security Tab Local CAs. 3. Click Sign Request. Enter or select data in the Select Request section of Gemalto 4. Select Client as the purpose of generating the certificate. 5. Paste the complete CSR content in the Certificate Request box.
KeySecure Classic (k150v) 6. Click Sign Request.
KeySecure Classic (k150v) 7. After the request is signed, click Download, to save the signed CSR file to your system. Download and save the CSR file on Gemalto 8. To upload the file that you just got signed on Gemalto, access the iDRAC GUI, go to the SEKM Certificate page, and click Upload Signed CSR. A message is displayed to indicate the successful upload.
KeySecure Classic (k150v) 1.4.2 Download the server CA file from KeySecure Classic and upload to iDRAC 1. On the Gemalto GUI, click Security Tab Local CA. 2. Select the Server CA you are using and click Download. The file is saved to your local system. Download the server CA file from Gemalto 3. On the iDRAC GUI, in the KMS CA Certificate section, click Upload KMS CA Certificate. 4. Upload the Server CA you just downloaded from Gemalto. A message is displayed to indicate the successful upload.
KeySecure Classic (k150v) 1.4.3 Configure the Key Management Server (KMS) settings on iDRAC 1. Enter or select data in the fields, and then click Apply. IMPORTANT—Make sure you already have a user created on the KMS you will be using for key exchange with the iDRAC.
KeySecure Classic (k150v) 3. If you see any job status failures, view Lifecycle Logs for more information about the failure. iDRAC SEKM configuration is now complete.
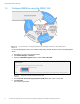
Enable SEKM by using the iDRAC PERC 2 Enable SEKM by using the iDRAC PERC 1. 2. 3. 4. 5. On the iDRAC GUI, click Configuration Storage Configuration. Select your storage controller. Expand Controller Configuration. From the Security (Encryption) down-down menu, select Secure Enterprise Key Manager. Click Add to Pending Operations. Enable SEKM on iDRAC PERC 6. Select At Next Reboot. A message is displayed indicating that the job ID is created. 7.
Enable SEKM by using the iDRAC PERC 8. Restart the server to run the configuration job. A job is created to enable SEKM on IDRAC PERC A job is scheduled to enable SEKM on iDRAC PERC After restarting the server, the configuration job is run in the Automated Task Application to enable SEKM on the PERC. The server is automatically restarted. 9. After the POST or Collecting Inventory operation is completed, ensure that the job ID has been marked as “Completed” on the Job Queue page.
Enable SEKM by using the iDRAC PERC 2.1 Ensure that SEKM is enabled on iDRAC PERC 1. On the iDRAC GUI, click Storage Overview. 2.
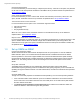
Thales Data Security Manager (DSM) 3 Thales Data Security Manager (DSM) 3.1 Prerequisites for Thales Data Security Manager (DSM) Before you start setting up iDRAC SEKM support, you must first ensure that the following prerequisites are fulfilled. If these prerequisites are not fulfilled, you will not be able to successfully set up SEKM.
Thales Data Security Manager (DSM) 3. To add a new host, click Hosts Hosts Add. Adding a new host in Thales Vormetric Data Security Manager Note—The host name must match the Common Name (CN) in the iDRAC SSL certificate, otherwise certificate import will fail. In the example shown above, the system service tag is used as the host name. 3.2.2 Set up SEKM on iDRAC 3.2.3 Configure SEKM by using the iDRAC GUI See Set up SEKM on iDRAC. See Configure SEKM by using the iDRAC GUI.
Thales Data Security Manager (DSM) 3.2.4 Get for a CSR file to be signed by an external certificate authority CSR signed by external certificate authority Note—The Microsoft CA below was specifically configured for our testing purposes. Your external certificate authority may vary. It is not required to use a Microsoft CA; just a valid 3rd party certificate signer is sufficient. For more information, see the Thales Vormetric Administration Guide. 1. Go to your Certificate Authority and sign the CSR.
Thales Data Security Manager (DSM) 7. To save the signed CSR file to your system, click Download Certificate. Download certificate 8. On the iDRAC GUI, on the SEKM Certificate page, click Upload Signed CSR to upload the file you just got signed by your Certificate Authority. A message is displayed to indicate the successful upload.
Thales Data Security Manager (DSM) 3.2.5 Upload the signed CSR to Thales DSM 1. Select your host. Select your host on Thales Vormetric Data Security Manager 2. Import the KMIP certificate. Import the CSR that was signed by your Certificate Authority. 3. Click Ok. After you import the KMIP certificate, a message and the certificate fingerprint are displayed. 4. Click Apply.
Thales Data Security Manager (DSM) 3.2.6 Download the Root CA that has signed the Thales DSM appliance and upload to iDRAC 1. From the Thales web interface, download the Root CA. Chrome browser is used in this example. Process may vary based on the browser type you use. 2. Click Not Secure → Certificate (Invalid).
Thales Data Security Manager (DSM) 3. Select Certification Path CG CA S on XXX.XXX.XXX.XXX (this is the Root CA). 4. Click View Certificate. View Root CA 5. 6. 7. 8. Click Details Copy to File Next. Select Base-64 encoded X.509 (.CER). Click Next. Enter a file name the file, click Save, and then click Finish.
Thales Data Security Manager (DSM) 9. Upload the file you just saved by using it as the KMS CA Certificate on the iDRAC. A message is displayed to indicate the upload was successful.
Thales Data Security Manager (DSM) 3.3 Configure the Key Management Server (KMS) settings on iDRAC 1. Enter or select data in the fields, and then click Apply. Configure the KMS properties on the iDRAC GUI Note—User Authentication is not supported on Thales Vormetic Data Security Manager, so the User ID and Password fields on iDRAC GUI are not required. 2. Go to the Job Queue page and ensure that the job ID is marked as successfully completed. 3.
Thales Data Security Manager (DSM) 5. Click Add to Pending Operations.
Thales Data Security Manager (DSM) 6. Select At Next Reboot. A message is displayed indicating that the job ID is created 7. Go to the Job Queue page and ensure that this job ID is identified as Scheduled. 8. Restart the server to run the configuration job. A job is now scheduled to enable SEKM on iDRAC PERC After restarting the server, the configuration job is run in the Automated Task Application to enable SEKM on the PERC. The server is automatically restarted. 10.
Thales Data Security Manager (DSM) 3.3.2 Ensure SEKM is enabled on iDRAC PERC 1. On the iDRAC GUI, click Storage Overview. 2. Expand your storage controller and ensure the following statuses: • Security Status = Security Key Assigned • Encryption Mode = Secure Enterprise Key Manager Ensure that SEKM is enabled on your controller 3.3.3 Viewing Key ID on Thales DSM 1. Log in to Thales as an Administrator. 2. Switch to the domain where your keys are being managed. 3. Click Keys KMIP Objects.
Next Generation KeySecure (k170v) 4 Next Generation KeySecure (k170v) 4.1 Prerequisites for Next Generation KeySecure Before you start setting up iDRAC SEKM support, you must first ensure that the following prerequisites are fulfilled. If these prerequisites are not met, you will not be able to successfully set up SEKM.
Next Generation KeySecure (k170v) 3. Enter or select data in the Add Profile dialog box. Add profile information on KMIP Note—For the Common Name (CN) field, a user with this name must already exist on the KeySecure appliance. In the example above, “iDRAC” has been created as a user prior to the creation of the profile. This user need not be added to a group. 4. Click Registration Token New Registration Token. Create a new registration token 5. Enter the prefix name of the registration token.
Next Generation KeySecure (k170v) 6. Select Local CAs as the certification authority, and then click Select Profile. Select CA as the certification authority while creating a new registration token 7. Select the profile you created, and then click Create Token. Select a profile for creating a new registration token 8. Copy the registration token. Copy registration token 9. 10. 11. 12. 34 Click Admin Settings. Click System Interfaces Ellipses. Select the Auto Registration check box.
Next Generation KeySecure (k170v) 13. Click Update. Paste the token and configure KMIP Note—Ensure that you disable automatic generation from a Local CA on the Configure KMIP page. If this option is not disabled, the KeySecure k170v will replace the KMIP server certificate with a new certificate after rebooting. This option is available under Local CA for Automatic Server Certificate Generation in the Edit section. 14. Restart the KMIP services.
Next Generation KeySecure (k170v) 4.2.2 Configure KMIP Interface 1. Click CA Create CSR. The save csr and save private key buttons are enabled. Create CSR on Thales Note—By default, the Local Certificate Authority shown in the image is available. 2. Enter or select the settings in the Create CSR section.
Next Generation KeySecure (k170v) In the example above, we have included the IP address of the Next Generation KeySecure in the Common Name box. • • Algorithm—RSA Size—2048 3. Click both the buttons. Saving CSR and Private Key 4. Copy the contents of your CSR and get it signed by your Certificate Authority. In this example, we will use the certificate authority that is available by default. (CA Local Certificate Authority) Copy CSR content on Gemalto 5. Select the Certificate Authority (CA). 6.
Next Generation KeySecure (k170v) 8. Upload the externally generated CSR. Note—For Certificate Purpose, make sure you select server. Issue certificate on Gemalto After you click “Issue Certificate”, the certificate becomes available for download on the same page under “Subject”. 9. Click the ellipses (…) symbol, download the signed certificate, and then save it to your system.
Next Generation KeySecure (k170v) 10. Take the private key you downloaded in the earlier steps and append it to the signed certificate you just downloaded.
Next Generation KeySecure (k170v) 11. Save this file and upload it to the KMIP interface. 12. Upload signed certificate and private key to KMIP interface. a. Click Settings Interfaces Interface Configurations. Upload CSR and Private Key to KMIP by using Gemalto b. Click the ellipses symbol, and then click Edit. After you click Edit, the Configure KMIP screen is displayed.
Next Generation KeySecure (k170v) 13. Click Upload New Certificate. Note—A green check mark is displayed after uploading the new certificate. a. Click Update. b. Restart the KMIP service to apply the configuration changes. c. Click Services Restart KMIP. Restart the KMIP service on Gemalto 4.2.3 Create a user that represents the iDRAC on the Next Generation KeySecure 1. Click Users Create New User.
Next Generation KeySecure (k170v) 2. After you create this user, add this user to the Key Users group: a. Click Groups Key Users. b. Add your newly created user to the group. Add new user to the group on Gemalto c. After you select this group, a green color Add button is displayed. d. Click this button to add your user to the group.
Next Generation KeySecure (k170v) 4.3 Set up SEKM on iDRAC Licensing and firmware update SEKM is a licensed feature with the iDRAC Enterprise or Data Center license as a pre-requisite. To avoid an additional iDRAC firmware update, it is recommended that the SEKM license is installed first and then the iDRAC firmware updated to a version that supports SEKM.
Next Generation KeySecure (k170v) 3. Expand the SEKM Configuration menu and click Generate CSR. Generate CSR on iDRAC 4. In the Generate Certificate Signing Requests (CSR) dialog box, enter the certificate information. 5. Click Generate. The CSR file is generated. 6. Save it to your system. Specify CSR properties on iDRAC GUI 7. Get the full CSR file contents signed on the Next Generation KeySecure. 8. Download the signed image file, and then upload it to iDRAC.
Next Generation KeySecure (k170v) 4.5 Get the CSR file signed by Next Generation KeySecure CSR certificate signed by next generation KeySecure 1. Log in to Next Generation KeySecure. 2. Click CA Local Certificate Authority. Copy Local Certificate properties 3. Click Upload and Sign CSR.
Next Generation KeySecure (k170v) Note—After you issue the certificate, it will become available to download and save to your system. It will be the most recent certificate listed under “Subject”. Edit and upload the CSR certificate on Gemalto 4. To upload the file you just got signed by Gemalto, on the iDRAC GUI, on the SEKM Certificate page, click Upload Signed CSR. A message is displayed to indicate the successful upload.
Next Generation KeySecure (k170v) 4.5.1 Download the server CA from Next Generation KeySecure and upload to iDRAC 1. On the KeySecure UI, click CA. Download CA and upload to iDRAC 2. Click the ellipses symbol (…) in the right corner, download, and then save it to your system. 3. Upload it as the KMS CA Certificate on the iDRAC. A message is displayed to indicate that the upload was successful.
Next Generation KeySecure (k170v) 4.6 Configure the Key Management Server (KMS) settings on iDRAC 1. Enter or select data in the fields, and then click Apply. Configure KMS on iDRAC Note—The User ID and Password fields (if applicable) must match the user you’ve created on the Next Generation KeySecure in the steps above. 2. Go to the Job Queue page and ensure that the job ID is marked as successfully completed. 3.
Next Generation KeySecure (k170v) 4.7 Enable SEKM on the iDRAC PERC 1. 2. 3. 4. 5. On the iDRAC GUI, click Configuration → Storage Configuration. Select your storage controller. Expand Controller Configuration. From the Security (Encryption) down-down menu, select Secure Enterprise Key Manager. Click Add to Pending Operations. Enable SEKM on iDRAC PERC 6. Select At Next Reboot. A message is displayed indicating that the job ID is created 7.
Next Generation KeySecure (k170v) 8. Restart the server to run the configuration job. Start a job to Enable SEKM on iDRAC PERC 9. Go to the Job Queue to view the scheduled job 10. After restarting the server, the configuration job is run in the Automated Task Application to enable SEKM on the PERC. The server is automatically restarted. 11. After the POST or Collecting Inventory operation is completed, ensure that the job ID has been marked as Completed on the Job Queue page.
Next Generation KeySecure (k170v) 4.8 Ensure SEKM is enabled on iDRAC PERC 1. On the iDRAC GUI, click Storage Overview. 2. Expand your storage controller and ensure the following statuses: • • Security Status = Security Key Assigned Encryption Mode = Secure Enterprise Key Manager Ensure SEKM is enabled on iDRAC PERC 4.9 Viewing the iDRAC key ID on Next Generation KeySecure View iDRAC key ID on next generation KeySecure The SEKM setup operation is completed.
Troubleshoot issues while setting up SEKM on iDRAC 5 Troubleshoot issues while setting up SEKM on iDRAC This section addresses some of the common issues encountered when using SEKM. 5.1 I installed the SEKM license, but I cannot enable the SEKM on iDRAC? Make sure you update the iDRAC firmware after you install the SEKM license. This is required even if you had a SEKM supported iDRAC firmware version prior to installing the SEKM license. 5.
Troubleshoot issues while setting up SEKM on iDRAC 5.5 I checked the SEKM status on iDRAC and it shows “Unverified Changes Pending”. What does that mean? This means that changes were made to the SEKM settings on iDRAC, but these changes were never validated. Use the racadm command “racadm sekm enable” to enable SEKM to ensure that iDRAC can validate the changes made and set the SEKM status back to either Enabled or Failed. 5.
Troubleshoot issues while setting up SEKM on iDRAC 5.8 I moved a SEKM enabled PERC to another server and now my PERC encryption mode shows as SEKM Failed. How do I enable SEKM on the PERC? Follow the steps outlined in I moved a SED from one SEKM enabled PERC to another SEKM enabled PERC on another server and now my drive shows up as Locked and Foreign. How do I unlock the drive? and restart the host. 5.
Troubleshoot issues while setting up SEKM on iDRAC 5.13 I am unable to rollback iDRAC firmware – what could be the reason for rollback to be blocked? Make sure that there are no storage devices that are in SEKM mode. iDRAC will block a rollback to a version that does not support SEKM if there are any storage devices that are in the SEKM mode. This is to prevent data lockout since after rollback iDRAC will not be able to provide keys to the storage devices to be unlocked. 5.
Troubleshoot issues while setting up SEKM on iDRAC 5.19 I cannot switch PERC to SEKM mode when it is in eHBA personality mode This is an expected behavior. In eHBA personality mode, the SEKM encryption mode is not supported. 5.20 Where can I get more information about any type of failures when setting up SEKM or for key exchange failures, successful key exchanges or rekey operations? In all these cases, refer to the iDRAC Lifecycle logs for detailed log entries.
Troubleshoot issues while setting up SEKM on iDRAC A Technical support and resources Dell.com/support is focused on meeting customer needs with proven services and support.