Dell OptiPlex 5070 Micro Setup and Specifications Regulatory Model: D10U Regulatory Type: D10U003
Notes, cautions, and warnings NOTE: A NOTE indicates important information that helps you make better use of your product. CAUTION: A CAUTION indicates either potential damage to hardware or loss of data and tells you how to avoid the problem. WARNING: A WARNING indicates a potential for property damage, personal injury, or death. © 2019 Dell Inc. or its subsidiaries. All rights reserved. Dell, EMC, and other trademarks are trademarks of Dell Inc. or its subsidiaries.
Contents 1 Set up your computer.....................................................................................................................................5 2 Chassis.......................................................................................................................................................... 7 Front view..........................................................................................................................................................................
Updating the Dell BIOS in Linux and Ubuntu environments................................................................................. 30 Flashing the BIOS from the F12 One-Time boot menu......................................................................................... 30 System and setup password...........................................................................................................................................33 Assigning a system setup password..............................
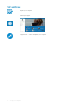
1 Set up your computer 1 Connect the keyboard and mouse. 2 Connect to your network using a cable, or connect to a wireless network. 3 Connect the display. NOTE: If you ordered your computer with a discrete graphics card, the HDMI and the display ports on the back panel of your computer are covered. Connect the display to the discrete graphics card. 4 Connect the power cable. 5 Press the power button. 6 Follow the instructions on the screen to finish Windows setup: 7 a Connect to a network.
Table 1.
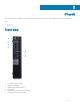
2 Chassis This chapter illustrates the multiple chassis views along with the ports and connectors and also explains the FN hot key combinations. Topics: • Front view • Back view Front view 1 Power button and power light 2 Hard drive activity light 3 Headset/Universal audio jack port 4 Line-out port 5 USB 3.1 Gen 2 Type-C port with PowerShare 6 USB 3.
Back view 8 Chassis
3 System specifications NOTE: Offerings may vary by region. The following specifications are only those required by law to ship with your computer. For more information about the configuration of your computer, go to Help and Support in your Windows operating system and select the option to view information about your computer.
Device Guard (DG) and Credential Guard (CG) are the new security features that are only available on Windows 10 Enterprise today. Device Guard is a combination of enterprise-related hardware and software security features that, when configured together, will lock a device down so that it can only run trusted applications. If it is not a trusted application, it cannot run.
Intel Core Processors 9th Gen Core CPUs Tower/ Micro Small Form Factor Intel® Core™ i5-9600 (6 Cores/9MB/6T/ x 3.1GHz to 4.6GHz/65W); supports Windows 10/ Linux Intel® Core™ i5-9600T (6 Cores/9MB/6T/ 2.3GHz to 3.9GHz/35W); supports Windows 10/ Linux x Intel® Core™ i7-9700 (8 Cores/12MB/8T/ x 3.0GHz to 4.8GHz/65W); supports Windows 10/ Linux Intel® Core™ i7-9700T (8 Cores/12MB/8T/ 2.0GHz to 4.3GHz/35W); supports Windows 10/ Linux x GSP DG/CG Ready x x x x x x x x Table 4.
Intel Core Processors 8th Gen Core CPUs Tower Small Form Factor Micro Intel Pentium Gold G5500T (2 Cores/4 MB/4T/3.2 GHz/35 W); supports Windows 10/Linux No No Yes Intel Pentium Gold G5400T (2 Cores/4 MB/4T/3.1 GHz/35 W); supports Windows 10/Linux No No Yes Intel Celeron G4900T (2 Cores/2 MB/2T/2.9 GHz/35 W); supports Windows 10/Linux No No Yes GSP DG/CG Ready Memory NOTE: Memory modules should be installed in pairs of matched memory size, speed, and technology.
Tower/Small form factor/Micro Interface type and Maximum speed PCIe Gen2 MTBF 1.6 M hours Logical Blocks 28,181,328 Power Source: Power Consumption (reference only) Idle 900 mW to 1.2 W, Active 3.5 W Environmental Operating Conditions (Non-Condensing): Temperature Range 0°C to 70°C Relative Humidity Range 10 to 90% Op Shock (@2 ms) 1,000G Environmental Non-Operating Conditions (Non-Condensing): Temperature Range -10°C to 70°C Relative Humidity Range 5 to 95% Storage Table 7.
Tower Small Form Factor Micro 2.5 inch 2 TB 5400 RPM SATA Hard Disk Drive Y Y Y 2.5 inch 256 GB SATA Class 20 Solid State Drive1 Y Y Y 2.5 inch 512 GB SATA Class 20 Solid State Drive1 Y Y Y 2.5 inch 1 TB SATA Class 20 Solid State Drive1 Y Y Y M.2 1 TB PCIe Class 40 Solid State Drive Y Y Y M.2 256 GB PCIe NVMe Class 40 Solid State Drive Y Y Y M.2 512 GB PCIe NVMe Class 40 Self Encrypting Opal 2.0 Solid State Drive Y Y Y M.
Table 9. External ports and connectors Tower Small Form Factor Micro USB 2.0 (SmartPower On) 2 Rear 2 Rear 0 USB 3.1 Gen 1 (Front/Rear/Internal) 1/4/0 1/4/0 0/3/0 USB 3.1 Gen 1 (SmartPower On) 0 0 1 Rear USB 3.1 Gen 1 PowerShare 0 0 1 Front USB 2.0 port 1 Front 1 Front 0 USB 2.0 PowerShare (2A max) 1 Front 1 Front 0 USB 3.
Communications—Wireless Table 11. Communications—Wireless Tower/Small Form Factor/Micro Qualcomm QCA9377 Dual-band 1x1 802.11ac Wireless with MUMIMO + Bluetooth 4.1 Yes Qualcomm QCA61x4A Dual-band 2x2 802.11ac Wireless with MUMIMO + Bluetooth 4.2 Yes Intel Wireless-AC 9560, Dual-band 2x2 802.11ac Wi-Fi with MUMIMO + Bluetooth 5 Yes Internal Wireless Antennas Yes External Wireless Connectors and Antenna Yes Support for 802.11n and 802.11ac wireless NIC Yes via M.
Accessories Table 13.
Table 15. Regulatory/Environmental Certifications Tower SFF Micro Energy Star 7.0/7.1 Compliant (Windows & Ubuntu) Yes Yes Yes EPEAT 2018 Bronze Rated Configurations Yes Yes Yes NFPA 99 Leakage Current Spec (Dell ENG0011750) Yes Yes Yes TCO 8.
4 System setup System setup enables you to manage your hardware and specify BIOS level options.
Keys Navigation Spacebar Expands or collapses a drop-down list, if applicable. Tab Moves to the next focus area. Esc Moves to the previous page until you view the main screen. Pressing Esc in the main screen displays a message that prompts you to save any unsaved changes and restarts the system. System setup options NOTE: Depending on the and its installed devices, the items listed in this section may or may not appear. General options Table 16.
System information Table 17. System Configuration Option Integrated NIC Description Allows you to control the on-board LAN controller. The option ‘Enable UEFI Network Stack’ is not selected by default. The options are: • • • Disabled Enabled Enabled w/PXE (default) NOTE: Depending on the computer and its installed devices, the items listed in this section may or may not appear. SATA Operation Allows you to configure the operating mode of the integrated hard drive controller.
Option Description • • • • • • • 15 days 30 days 60 days 90 days 120 days 150 days 180 days Video screen options Table 18. Video Option Description Primary Display Allows you to select the primary display when multiple controllers are available in the system. • • Auto (default) Intel HD Graphics NOTE: If you do not select Auto, the on-board graphics device will be present and enabled. Security Table 19.
Option Description • • • • • • • • TPM On (default) Clear PPI Bypass for Enable Commands PPI Bypass for Disable Commands PPI Bypass for Clear Commands Attestation Enable (default) Key Storage Enable (default) SHA-256 (default) Choose any one option: • • Absolute Disabled Enabled (default) This field lets you Enable, Disable or Permanently Disable the BIOS module interface of the optional Absolute Persistence Module service from Absolute Software.
Option Description • Expert key Management Audit Mode Allows you to manipulate the security key databases only if the system is in Custom Mode. The Enable Custom Mode option is disabled by default. The options are: • • • • PK (default) KEK db dbx If you enable the Custom Mode, the relevant options for PK, KEK, db, and dbx appear.
Performance Table 22. Performance Option Description Multi Core Support This field specifies whether the process has one or all cores enabled. The performance of some applications improves with the additional cores. • • • • All—Default 1 2 3 Allows you to enable or disable the Intel SpeedStep mode of processor. Intel SpeedStep • Enable Intel SpeedStep This option is set by default. Allows you to enable or disable the additional processor sleep states.
Option Description This option is set to Power Off by default. Enable Intel Speed Shift Technology Allows you to enable or disable Intel Speed Shift Technology support. The option Enable Intel Speed Shift Technology is set by default. Auto On Time Sets time to automatically turn on the computer. Time is kept in standard 12-hour format (hour:minutes:seconds). Change the startup time by typing the values in the time and AM/PM fields.
Option Description • • 5 seconds 10 seconds Full Screen Logo This option will display full screen logo if your image match screen resolution. The option Enable Full Screen Logo is not set by default. Warnings and Errors This option causes the boot process to only pause when warning or errors are detected. Choose any one of the option: • • • Prompt on Warnings and Errors (default) Continue on Warnings Continue on Warnings and Errors Manageability Table 25.
Wireless options Table 27. Wireless Option Description Wireless Device Enable Allows you to enable or disable the internal wireless devices. The options are: • • WLAN/WiGig Bluetooth All the options are enabled by default. Maintenance Table 28. Maintenance Option Description Service Tag Displays the service tag of your computer. Asset Tag Allows you to create a system asset tag if an asset tag is not already set. This option is not set by default.
Advanced configuration Table 30. Advanced configuration Option Description ASPM Allows you to set the ASPM level. • • • Auto (default) - There is handshaking between the device and PCI Express hub to determine the best ASPM mode supported by the device Disabled - ASPM power management is turned off at all time L1 Only - ASPM power management is set to use L1 Updating the BIOS in Windows It is recommended to update your BIOS (System Setup), when you replace the system board or if an update is available.
Updating your system BIOS using a USB flash drive If the system cannot load into Windows but there is still a need to update the BIOS, download the BIOS file using another system and save it to a bootable USB Flash Drive. NOTE: You will need to use a bootable USB Flash drive. Please refer to the following article for further details: https:// www.dell.com/support/article/us/en/19/sln143196/ 1 Download the BIOS update .EXE file to another system. 2 Copy the file e.g. O9010A12.
Most Dell systems built after 2012 have this capability and you can confirm by booting your system to the F12 One-Time Boot Menu to see if BIOS FLASH UPDATE is listed as a boot option for your system. If the option is listed, then the BIOS supports this BIOS update option. NOTE: Only systems with BIOS Flash Update option in the F12 One-Time Boot Menu can use this function.
4 Select external USB device 5 Once the file is selected, Double click the flash target file, then press submit .
6 Click the Update BIOS then system will reboot to flash the BIOS. 7 Once complete, the system will reboot and the BIOS update process is completed. System and setup password Table 31. System and setup password Password type Description System password Password that you must enter to log on to your system. Setup password Password that you must enter to access and make changes to the BIOS settings of your computer. You can create a system password and a setup password to secure your computer.
CAUTION: Anyone can access the data stored on your computer if it is not locked and left unattended. NOTE: System and setup password feature is disabled. Assigning a system setup password You can assign a new System or Admin Password only when the status is in Not Set. To enter the system setup, press F2 immediately after a power-on or re-boot. 1 In the System BIOS or System Setup screen, select Security and press Enter. The Security screen is displayed.
5 Software This chapter details the supported operating systems along with instructions on how to install the drivers. Downloading drivers 1 Turn on the . 2 Go to Dell.com/support. 3 Click Product Support, enter the Service Tag of your , and then click Submit. 4 Click Drivers and Downloads. 5 Select the operating system installed on your . 6 Scroll down the page and select the driver to install. 7 Click Download File to download the driver for your .
USB drivers Verify if the USB drivers are already installed in the computer. Network adapter drivers Verify if the Network adapter drivers are already installed in the system. Realtek Audio Verify if audio drivers are already installed in the computer. Storage controller Verify if the storage control drivers are already installed in the system.
6 Getting help Contacting Dell NOTE: If you do not have an active Internet connection, you can find contact information on your purchase invoice, packing slip, bill, or Dell product catalog. Dell provides several online and telephone-based support and service options. Availability varies by country and product, and some services may not be available in your area. To contact Dell for sales, technical support, or customer service issues: 1 Go to Dell.com/support. 2 Select your support category.