Dell™ U2211H /U2311H Monitor User's Guide About Your Monitor Setting Up the Monitor Operating the Monitor Troubleshooting Appendix Notes, Notices, and Cautions NOTE: A NOTE indicates important information that helps you make better use of your computer. CAUTION: A CAUTION indicates either potential damage to hardware or loss of data and tells you how to avoid the problem. WARNING: A WARNING indicates a potential for property damage, personal injury, or death.
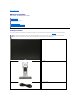
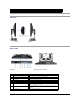
Back to Contents Page About Your Monitor Dell™ U2211H / U2311H Monitor User's Guide Package Contents Product Features Identifying Parts and Controls Monitor Specifications Plug and Play Capability Universal Serial Bus (USB) Interface LCD Monitor Quality and Pixel Policy Maintenance Guidelines Package Contents Your monitor ships with the components shown below. Ensure that you have received all the components and contact Dell if something is missing.
l VGA Cable (attached to the monitor) l DVI Cable l USB up stream cable (enables the USB ports on the monitor) l Drivers and Documentation media Quick Setup Guide Product and Safety Information Guide l l Product Features The U2211H / U2311H flat panel display has an active matrix, thin-film transistor (TFT), liquid crystal display (LCD). The monitor features include: ■ 546.1 mm (21.5-inch) viewable area display (Measured diagonally).
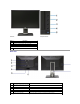
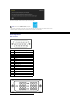
Front View Front panel controls Label Description 1 Preset Modes (default, but configurable) 2 Brightness & Contrast (default, but configurable) 3 Menu 4 Exit 5 Power (with power light indicator) Back View Back view Label Back view with monitor stand Description Use 1 VESA mounting holes (100 mm x 100 mm Wall mount monitor using VESA-compatible wall mount kit (100 mm x 100 mm) behind attached VESA Plate) 2 Regulatory label Lists the regulatory approvals.
7 USB downstream ports Connect your USB devices. 8 Cable management slot Use to organize cables by placing them through the slot. Side View Left view Right view Bottom View Bottom view Label Bottom view with monitor stand Description Use 1 AC power cord connector Connect the power cable 2 DC power connector for Dell Soundbar.
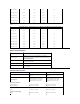
Monitor Specifications Flat Panel Specifications Model U2211H U2311H Screen type Active matrix - TFT LCD Active matrix - TFT LCD Panel type IPS IPS Screen dimensions 546.1 mm (21.5-inches viewable image size) 584.2 mm (23-inches viewable image size) Preset display area: 475.2 (H) X 267.3 (V) mm 509.2 (H) X 286.4 (V) mm Horizontal 475.2 mm (18.7 inches) 509.2 mm (20.05 inches) Vertical 267.3 mm (10.5 inches) 286.4 mm (11.28 inches) Pixel pitch 0.2475 mm 0.
VESA, 800 x 600 37.9 60.3 40.0 +/+ VESA, 800 x 600 46.9 75.0 49.5 +/+ VESA, 1024 x 768 48.4 60.0 65.0 -/- VESA, 1024 x 768 60.0 75.0 78.8 +/+ VESA, 1152 x 864 67.5 75.0 108.0 +/+ VESA, 1280 x 1024 64.0 60.0 108.0 +/+ VESA, 1280 x 1024 80.0 75.0 135.0 +/+ VESA, 1600 x 1200 75.0 60.0 162.0 +/+ VESA, 1920 x 1080 67.5 60.0 148.
Width 514.4 mm (20.25 inches) 547.97 mm (21.57 inches) Depth 65.00 mm (2.56 inches) 65.00 mm (2.56 inches) Height (extended) 363.60 mm (14.31 inches) 370.47 mm (14.59 inches) Height (compressed) 323.50 mm (12.74 inches) 331.32 mm (13.04 inches) Width 279.90 mm (11.02 inches) 279.90 mm (11.02 inches) Depth 184.10 mm (7.25 inches) 184.10 mm (7.25 inches) Weight with packaging 16.85 lbs (7.65 kg) 18.14 lbs (8.23 kg) Weight with stand assembly and cables 14.22 lbs (6.45 kg) 15.45 lbs (7.
Activate the computer and the monitor to gain access to the OSD. NOTE: This monitor is ENERGY STAR®-compliant. * Zero power consumption in OFF mode can only be achieved by disconnecting the main cable from the monitor. ** Maximum power consumption with max luminance, Dell Soundbar, and USB active. Pin Assignments VGA Connector Pin 15-pin Side of the Connected Signal Cable Number 1 Video-Red 2 Video-Green 3 Video-Blue 4 GND 5 Self-test 6 GND-R 7 GND-G 8 GND-B 9 Computer 5V/3.
Pin Number 24-pin Side of the Connected Signal Cable 1 TMDS RX2- 2 TMDS RX2+ 3 TMDS Ground 4 Floating 5 Floating 6 DDC Clock 7 DDC Data 8 Floating 9 TMDS RX1- 10 TMDS RX1+ 11 TMDS Ground 12 Floating 13 Floating 14 +5V/+3.
19 DP_PWR Return 20 +3.3V DP_PWR Plug and Play Capability You can install the monitor in any Plug and Play-compatible system. The monitor automatically provides the computer system with its Extended Display Identification Data (EDID) using Display Data Channel (DDC) protocols so the system can configure itself and optimize the monitor settings. Most monitor installations are automatic; you can select different settings if desired.
During the LCD Monitor manufacturing process, it is not uncommon for one or more pixels to become fixed in an unchanging state which are hard to see and do not affect the display quality or usability. For more information on Dell Monitor Quality and Pixel Policy, see Dell Support site at: support.dell.com. Maintenance Guidelines Cleaning Your Monitor WARNING: Read and follow the safety instructions before cleaning the monitor.
Back to Contents Page Appendix Dell™ U2211H / U2311H Monitor User's Guide Safety Instructions FCC Notice (U.S. Only) and Other Regulatory Information Contacting Dell WARNING: Safety Instructions WARNING: Use of controls, adjustments, or procedures other than those specified in this documentation may result in exposure to shock, electrical hazards, and/or mechanical hazards. For information on safety instructions, see the Product Information Guide. FCC Notices (U.S.
Back to Contents Page Setting Up Your Monitor Dell™ U2211H / U2311H Monitor If you have a Dell™ desktop or a Dell™ portable computer with internet access 1. Go to http://support.dell.com, enter your service tag, and download the latest driver for your graphics card. 2. After installing the drivers for your Graphics Adapter, attempt to set the resolution to 1920 x 1080 (for U2211H) or 1920 x 1080 (for U2311H) again.
Back to Contents Page Setting Up Your Monitor Dell™ U2211H / U2311H Monitor If you have a non Dell™ desktop, portable computer, or graphics card In Windows XP: 1. Right-click on the desktop and click Properties. 2. Select the Settings tab. 3. Select Advanced. 4. Identify your graphics controller supplier from the description at the top of the window (e.g. NVIDIA, ATI, Intel etc.). 5. Refer to the graphic card provider website for updated driver (for example, http://www.ATI.com OR http://www.NVIDIA.com ).
Back to Contents Page Operating the Monitor Dell™ U2211H / U2311H Monitor User's Guide Using the Front Panel Controls Using the On-Screen Display (OSD) Menu Setting the Maximum Resolution Using the Dell Soundbar (Optional) Using the Tilt, Swivel, and Vertical Extension Rotating the monitor Adjusting the Rotation Display Settings of Your System Using the Front Panel Use the control buttons on the front of the monitor to adjust the characteristics of the image being displayed.
5 Use the Power button to turn the monitor on and off. The Blue LED indicates the monitor is on and fully functional. An amber LED indicates DPMS power save mode. Power (with power light indicator) Using the On-Screen Display (OSD) Menu Accessing the Menu System NOTE: If you change the settings and then either proceed to another menu or exit the OSD menu, the monitor automatically saves those changes. The changes are also saved if you change the settings and then wait for the OSD menu to disappear. 1.
NOTE: Auto Adjust is only available when you use the analog (VGA) connector. 2. Push the and buttons to move between the setting options. As you move from one icon to another, the option name is highlighted. See the following table for a complete list of all the options available for the monitor. 3. Push the button once to activate the highlighted option. 4. Push and 5. Push to enter the slide bar and then use the 6. Select the Icon button to select the desired parameter.
NOTE: In most cases, Auto Adjust produces the best image for your configuration. NOTE: Auto Adjust option is only available when you are using the analog (VGA) connector. Input Source Use the Input Source menu to select between different video signals that may be connected to your monitor. Auto Select Push VGA Select VGA input when you are using the analog (VGA) connector. Push DVI-D Select DVI-D input when you are using the Digital (DVI) connector.
Mode Selection You can choose Graphics or Video according to the input signal. l l Preset Modes Graphics: Select this mode if your monitor is connected to your computer. Video: Select this mode if your monitor is connected to a DVD player. When you select Graphics, you can choose Standard, Multimedia, Game, Warm, Cool, or Custom (RGB); l l l l l l Standard: Loads the monitor's default color settings. This is the default preset mode. Multimedia: Loads color settings ideal for multimedia applications.
Press to increase the green shade of the video image. Press to increase the purple shade of the video image. NOTE: Hue adjustment is available only for video input. Saturation This feature can adjust the color saturation of the video image. Use Reset Color Setting s Display Settings Press to increase the monochrome appearance of the video image. Press to increase the colorful appearance of the video image. NOTE: Saturation adjustment is available only for video input.
Back to Contents Page Setting Up Your Monitor Dell™ U2211H / U2311H Monitor Setting the display resolution to 1920 x 1080 (for U2211H) or 1920 x 1080 (for U2311H) (maximum) For maximum display performance with Microsoft® Windows® operating systems, set the display resolution to 1920 x 1080 (for U2211H) or 1920 x 1080 (for U2311H) pixels by performing the following steps: In Windows XP: 1. Right-click on the desktop and click Properties. 2. Select the Settings tab. 3.
Dell™ U2211H / U2311H Monitor User Guide Setting the display resolution to 1920 x 1080 (for U2211H) or 1920 x 1080 (for U2311H) (maximum) Information in this document is subject to change without notice. © 2010 Dell Inc. All rights reserved. Reproduction of these materials in any manner whatsoever without the written permission of Dell Inc. is strictly forbidden.
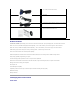
Back to Contents Page Setting Up the Monitor Dell™ U2211H / U2311H Monitor User's Guide Attaching the Stand Connecting the Monitor Organizing Your Cables Attaching the Soundbar (optional) Removing the Stand Wall Mounting (Optional) Attaching the Stand NOTE: The stand is detached when the monitor is shipped from the factory. NOTE: This is applicable for a monitor with a stand. When other stand is bought, please refer to the respective stand setup guide for set up instructions.
NOTE: Do not connect the blue VGA, the white DVI, or the black DisplayPort cables to the computer at the same time. All monitors ship with the VGA (blue) cable attached by default. 2. Connect the white (digital DVI-D) or the blue (analog VGA) or the black (DisplayPort) display connector cable to the corresponding video port on the back of your computer. Do not use the three cables on the same computer.
CAUTION: The Graphics are used for the purpose of illustration only. Appearance of the computer may vary. Connecting the USB cable After you have completed connecting the DVI/VGA/DP cable, follow the procedure below to connect the USB cable to the computer and complete your monitor setup: 1. 2. 3. 4. 5. Connect the upstream USB port (cable supplied) to an appropriate USB port on your computer. (See bottom view for details.
CAUTION: Do not use with any device other than the Dell Soundbar. NOTE: The Soundbar power connector (+12 V DC output) is for the optional Dell Soundbar only. To attach the Soundbar: 1. Working from the back of the monitor, attach the Soundbar by aligning the two slots with the two tabs along the bottom of the monitor. 2. Slide the Soundbar to the left until it snaps into place. 3. Connect the Soundbar with the DC power connector. 4.
(Screw dimension: M4 x 10 mm). Refer to the instructions that come with the VESA-compatible base mounting kit. 1. 2. 3. 4. 5. Place the monitor panel on a soft cloth or cushion on a stable flat table. Remove the stand. Use a screwdriver to remove the four screws securing the plastic cover. Attach the mounting bracket from the wall mounting kit to the LCD. Mount the LCD on the wall by following the instructions that came with the base mounting kit.
Back to Contents Page Troubleshooting Dell™ U2211H / U2311H Monitor User's Guide Self-Test Built-in Diagnostics Common Problems Product Specific Problems Universal Serial Bus Specific Problems Dell Soundbar Problems WARNING: Before you begin any of the procedures in this section, follow the Safety Instructions. Self-Test Your monitor provides a self-test feature that allows you to check whether your monitor is functioning properly.
To run the built-in diagnostics: 1. 2. 3. 4. 5. 6. 7. Ensure that the screen is clean (no dust particles on the surface of the screen). Unplug the video cable(s) from the back of the computer or monitor. The monitor then goes into the self-test mode. Press and hold the Button 1 and Button 4 on the front panel simultaneously for 2 seconds. A gray screen appears. Carefully inspect the screen for abnormalities. Press the Button 4 on the front panel again. The color of the screen changes to red.
Missing Color Picture missing color l l l Wrong Color Picture color not good l l l l Image retention from a static Faint shadow from the static image left on the monitor for a image displayed appears on long period of time the screen l l Perform monitor self-test feature check. Ensure that the video cable connecting the monitor to the computer is connected properly and is secure. Check for bent or broken pins in the video cable connector.
Distorted Sound Other audio source is used l l l l l Unbalanced Sound Output Sound from only one side of Soundbar l l l l l l Low Volume Volume is too low l l l l l Back to Contents Page Clear any obstructions between the Soundbar and the user. Confirm that the audio line-in plug is completely inserted into the jack of the audio source. Decrease the volume of the audio source. Turn the Power/Volume knob on the Soundbar counter-clockwise to a lower volume setting.