Dellt Online Rack External Battery Module for use with 3750W and 4200W UPS models Getting Started With Your System Démarrer avec Votre Système Erste Schritte mit Ihrem System Начало работы с системой Introducción de su Sistema 系统使用 入门指南 系統使用 入門指南 사용자 시스템 시작하기 はじめに システムについて K804N, H952N, J730N, K805N J739N www.dell.com | support.dell.
Dellt Online Rack External Battery Module for use with 3750W and 4200W UPS models Getting Started With Your System K804N, H952N, J730N, K805N J739N www.dell.com | support.dell.
Notes and Warnings NOTE: A NOTE indicates important information that helps you make better use of your software. DANGER: A DANGER indicates an imminently hazardous situation which, if not avoided, will result in death or serious injury. WARNING: A WARNING indicates a potentially hazardous situation which, if not avoided, could result in death or injury.
Finding Information CAUTION: The Safety, Environmental, and Regulatory Information document provides important safety and regulatory information. What are You Looking For? S The user's guide for my UPS Find It Here Dell UPS Disc S The user's guide for the Dell Network Management Card S Dell UPS Management Software NOTE: Documentation and software updates can be found at support.dell.com.
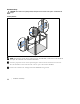
Installation and Startup CAUTION: Before performing the procedures in this document, read and follow the safety instructions and important regulatory information in your Safety, Environmental, and Regulatory Information document. Unpacking the External Battery Module 1 Open the outer carton and remove the accessories packaged with the cabinet.
Lifting the Cabinet CAUTION: The cabinet is heavy (53 kg/116.8 lb). Lifting the cabinets into the rack requires a minimum of two people. 1 With one person on each side, carefully lift the cabinet out of the outer carton using the handles on the cardboard and set it on a flat, stable surface. 2 Discard or recycle the packaging in a responsible manner, or store it for future use.
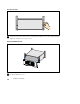
Rackmount Setup CAUTION: The cabinet is heavy (53 kg/116.8 lb). Lifting the cabinets into the rack requires a minimum of two people. Installing the Rails NOTE: The instructions are the same for square-hole racks and unthreaded, round-hole racks. The rails fit both rack styles. The round-hole rack is shown in the illustrations. 1 Select the proper holes in the rail for positioning the cabinet in the desired location in the rack.
3 Attach the rails to the rack: Engage the back end of the rail until it fully seats on the vertical rack flange and the hook latch locks in place. Pull the rail toward the front. Push the front end of the rail until it fully seats on the vertical rack flange and the hook latch locks in place. Installing the Cabinet NOTE: Install the EBM directly below the UPS. 4 Slide the cabinet into the rack.
Securing the Cabinet 5 Secure the front of the cabinet to the rack using the thumbscrews on the mounting brackets. Tighten by hand; do not use power tools. Installing the EBM Front Cover 6 Install the EBM front cover.
Connecting the EBM NOTE: A small amount of arcing may occur when connecting an EBM to the UPS. This is normal and will not harm personnel. Insert the EBM cable into the UPS battery connector quickly and firmly. Installing the EBM Cable 7 Plug the EBM cable into the UPS battery connector. CAUTION: Follow the instructions in the UPS Getting Started document or the Dell Online Rack UPS 3750W and 4200W User's Guide for instructions on installing the UPS.
10 | Installation and Startup
Baie En Ligne Dellt Module de Batterie Externe pour une utilisation avec Modèles de l'onduleur 3750W et 4200W Démarrer avec Votre Système K804N, H952N, J730N, K805N J739N www.dell.com | support.dell.
Remarques et Avertissements REMARQUE : Une REMARQUE indique des informations importantes qui vous aident à mieux utiliser votre logiciel. DANGER : Un DANGER indique une situation dangereuse imminente qui, si elle n'est pas évitée, provoquera la mort ou une blessure grave. AVERTISSEMENT : Un AVERTISSEMENT indique une situation dangereuse potentielle qui, si elle n'est pas évitée, pourrait provoquer la mort ou une blessure.
Trouver des informations ATTENTION : Le document Informations sur la sécurité, l'environnement et la réglementation fournit des informations importantes sur la sécurité et la réglementation. Que recherchez-vous ? S Le guide d'utilisation de mon onduleur Trouvez-le ici Disque de l'onduleur Dell S Le guide d'utilisation pour la Carte de gestion de réseau Dell S Logiciel de gestion d'onduleur Dell REMARQUE : Les mises à jour des documents et des logiciels se trouvent sur support.dell.com.
Installation et démarrage ATTENTION : Avant de réaliser les procédures de ce document, lisez et suivez les instructions de sécurité et les informations importantes sur la réglementation qui figurent dans votre document Informations sur la sécurité, l'environnement et la réglementation. Déballage du Module de Batterie Externe 1 Ouvrez le carton extérieur et retirez les accessoires emballés avec le module.
Levage du Module ATTENTION : Le module est lourd (53 kg/116,8 lb). Le levage des modules dans la baie exige deux personnes au minimum. 1 Avec une personne de chaque côté, levez soigneusement le module hors du carton extérieur en utilisant les poignées du carton et posez-le sur une surface plane et stable. 2 Jetez ou recyclez l'emballage d'une façon responsable, ou conservez-le pour une utilisation ultérieure.
Configuration en baie ATTENTION : Le module est lourd (53 kg/116,8 lb). Le levage des modules dans la baie exige deux personnes au minimum. Installation des Rails REMARQUE : Les instructions sont les mêmes pour des baies à trous carrés et les baies à trous ronds non filetés. Les rails s'adaptent aux deux styles de baies. La baie à trous ronds est représentée sur les illustrations. 1 Sélectionnez les bons trous dans le rail pour positionner le module à l'emplacement souhaité dans la baie.
3 Fixez les rails à la baie : Emboîtez l'extrémité arrière du rail jusqu'à ce qu'il soit totalement en place sur le bord vertical de la baie et que le loquet du crochet soit en place. Tirez le rail vers l'avant. Poussez l'extrémité avant du rail jusqu'à ce qu'il soit totalement en place sur le bord vertical de la baie et le loquet du crochet soit en place. Installation du Module REMARQUE : Installez l'EBM directement sous l'onduleur. 4 Glissez le module dans la baie.
Fixation du Module 5 Fixez l'avant du module sur la baie en utilisant les vis à oreilles sur les supports de montage. Serrez à la main; n'utilisez pas d'outils mécaniques. Installation du couvercle avant de l'EBM 6 Installez le couvercle avant de l'EBM.
Connexion du EBM REMARQUE : Un petit arc électrique peut survenir lors du branchement des batteries internes. Ceci est normal et ne nuira pas au personnel. Insérez le câble dans le connecteur de batterie de l'onduleur rapidement et fermement. Installation du Câble EBM 7 Branchez le câble de l'EBM au connecteur de la batterie de l'onduleur.
20 | Installation et démarrage
Dellt Online Rack Externes Batteriemodul zur Verwendung mit USV-Gerätetypen 3750W und 4200W Erste Schritte mit Ihrem System K804N, H952N, J730N, K805N J739N www.dell.com | support.dell.
Hinweise und Warnungen HINWEIS: Ein HINWEIS macht auf eine wichtige Information aufmerksam, mit deren Hilfe Sie Ihre Software optimal nutzen können. GEFAHR: GEFAHR macht auf eine unmittelbar gefährliche Situation aufmerksam, die zum Tod oder schweren Verletzungen führt, wenn sie nicht vermieden wird. WARNUNG: WARNUNG macht auf eine potenziell gefährliche Situation aufmerksam, die zum Tod oder zu Verletzungen führt, wenn sie nicht vermieden wird.
Finden von Informationen ACHTUNG: Im Dokument Informationen zu Sicherheit, Umweltschutz und Ordnungsvorschriften finden Sie wichtige Sicherheitshinweise und Informationen zu gesetzlichen Bestimmungen. Was suchen Sie? S Die Benutzeranleitung für meine USV Hier finden Sie es Die Disk für die Dell USV S Die Benutzeranleitung für die Dell Netzwerkmanagementkarte S Dell USV Management Software HINWEIS: Dokumentation und Softwareaktualisierungen finden Sie unter support.dell.com.
Installation und Inbetriebnahme ACHTUNG: Vor der Ausführung der Verfahren in diesem Dokument lesen und befolgen Sie bitte die Sicherheitshinweise und wichtigen Informationen zu gesetzlichen Bestimmungen in Ihrem Dokument über Informationen zu Sicherheit, Umweltschutz und Ordnungsvorschriften. Auspacken des Externes Batteriemoduls 1 Öffnen Sie den äußeren Karton und nehmen Sie die mit dem Gehäuse zusammen verpackten Zubehörteile heraus.
Gehäuse heben ACHTUNG: Das Gehäuse ist schwer (53 kg). Zum Heben des Gehäuses in das Gestell sind mindestens zwei Personen erforderlich. 1 Heben Sie das Gehäuse mit einer Person auf jeder Seite mit den Griffen vorsichtig aus dem äußeren Karton heraus und setzen Sie es auf einer flachen, stabilen Unterlage ab. 2 Entsorgen oder recyceln Sie die Verpackung in umweltbewusster Weise, oder bewahren Sie sie für den späteren Gebrauch auf.
Rackmontage ACHTUNG: Das Gehäuse ist schwer (53 kg). Zum Heben des Gehäuses in das Gestell sind mindestens zwei Personen erforderlich. Montage der Schienen HINWEIS: Für Racks mit quadratischen Öffnungen und Racks mit runden Öffnungen ohne Gewinde gelten die gleichen Anweisungen. Die Schienen passen zu beiden Rack-Typen. Auf den Abbildungen ist das Rack mit den runden Öffnungen zu sehen. 1 Wählen Sie die korrekten Öffnungen in der Schiene aus, um das Gehäuse wie gewünscht im Rack zu positionieren.
3 Bringen Sie die Schienen am Rack an: Schieben Sie das hintere Ende der Schiene hinein, bis es vollständig auf dem vertikalen Gestellflansch sitzt und der Haken einrastet. Ziehen Sie die Schiene nach vorne. Schieben Sie das vordere Ende der Schiene hinein, bis es vollständig auf dem vertikalen Gestellflansch sitzt und der Haken einrastet. Installation des Gehäuses HINWEIS: Bringen Sie das EBM direkt unterhalb der USV an. 4 Schieben Sie das Gehäuse in das Rack.
Befestigung des Gehäuses 5 Befestigen Sie die Vorderseite des Gehäuses mit den Rändelschrauben auf den Halterungen an dem Rack. Ziehen Sie die Schrauben von Hand fest. Verwenden Sie keine Elektrowerkzeuge. Installation der vorderen EBM-Abdeckung 6 Installieren Sie die vordere EBM-Abdeckung.
Anschluss EBM HINWEIS: Beim Anschließen eines EBM an die USV kann es zu einem kleinen Lichtbogen kommen. Dies ist normal und für Personen unschädlich. Verbinden Sie das EBM-Kabel rasch und fest mit dem Batterieanschluss der USV. Installation des EBM-Kabels 7 Stecken Sie das EBM-Kabel in den USV-Batterieanschluss ein. ACHTUNG: Folgen Sie den Anweisungen aus Erste Schritte USV oder der Benutzeranleitung für das Dell Online Rack-USV 3750W und 4200W für Anleitungen zur USV-Installation.
30 | Installation und Inbetriebnahme
Он-лайн блок Dellt Модуль внешней батареи для применения в моделях ИБП 3750 Вт и 4200 Вт Начало работы с системой K804N, H952N, J730N, K805N J739N www.dell.com | support.dell.
Примечания и предупреждения ПРИМЕЧАНИЕ: Заметка ПРИМЕЧАНИЕ указывает на важную информацию, которая помогает более эффективно использовать программное обеспечение. ОПАСНО: Заметка ОПАСНОСТЬ указывает на ситуации с существующей непосредственной угрозой, возникновение которой может привести к серьезной травме или летальному исходу. ПРЕДУПРЕЖДЕНИЕ: Заметка ПРЕДУПРЕЖДЕНИЕ указывает на потенциально опасную ситуацию, возникновение которой может привести к серьезной травме или летальному исходу.
Поиск информации ВНИМАНИЕ: Документ Информация о технике безопасности, охране окружающей среды и нормативных документах содержит важную информацию о технике безопасности и нормативных документах. Что вы ищите? S Руководство пользователя для ИБП Вы найдете это здесь Диск ИБП Dell S Руководство пользователя для карты Сетевая карта управления Dell S Программное обеспечение управлением ИБП Dell ПРИМЕЧАНИЕ: Документацию и обновленные версии ПО можно найти на сайте support.dell.com.
Установка и запуск ВНИМАНИЕ: Перед выполнением процедуры, описанной в данной документации, прочтите и выполните инструкции по технике безопасности и ознакомьтесь с важным нормативным документом Информация о технике безопасности, охране окружающей среды и нормативных документах. Распаковка Модуль внешней батареи 1 Откройте внешнюю картонную коробку и достаньте из нее принадлежности, упакованные вместе с корпусом.
Подъем корпуса ВНИМАНИЕ: Корпус тяжелый (53кг/116,8ф). Для подъема корпуса на стойку требуется не менее двух человек. 1 Два человека (по одному человеку с каждой стороны) осторожно вынимают корпус из картонной упаковки за ручки на картоне и устанавливают его на ровной устойчивой поверхности. 2 Выбросьте или утилизируйте упаковку согласно правилам или сохраните ее для будущего использования.
Вариант установки в стойке ВНИМАНИЕ: Корпус тяжелый (53кг./116,8ф). Для подъема корпуса на стойку требуется не менее двух человек. Установка направляющих Примечание: Инструкции по работе со стойками с квадратными отверстиями и стойками с круглыми безрезьбовыми отверстиями явлются одинаковыми. Направляющие подходят для обоих видов стоек. Круглый блок показан на рисунке. 1 Выберите соответствующее отверстие на рейке для установки корпуса в блоке.
3 Прикрепите направляющие к стойке: Зацепите задний конец направляющей таким образом, чтобы он полностью сел на фланец вертикальной стойки, а защелка закрылась. Потяните направляющую вперед. Подтолкните передний конец направляющей таким образом, чтобы он полностью сел на фланец вертикальной стойки, а защелка закрылась. Установка корпуса Примечание: Установите EBM под ИБП. 4 Задвиньте корпус в стойку.
Крепеж корпуса 5 Закрепите переднюю сторону корпуса на стойке при помощи винтов-барашков на монтажных кронштейнах. Затяните вручную, без использования силового инструмента.
Монтаж EBM Примечание: При подключении к ИБП возможно возникновение незначительного искрения.EBM Это нормально и не опасно для персонала. Вставляйте кабель EBM в разъем батарей ИБП быстро и крепко. Установка кабеля модуля EBM 7 Подключите кабель EBM к разъему батарей ИБП. ВНИМАНИЕ: Следуйте инструкциям по установке ИБП, приведенным в документе Начало работы с ИБП или Руководство пользователя он-лайн блока Dell ИБП 3750W и 4200W.
40 | Установка и запуск
Bastidor en línea de Dellt Módulo de batería externa para uso con Modelos de UPS 3750W y 4200W Introducción de su Sistema K804N, H952N, J730N, K805N J739N www.dell.com | support.dell.
Notas y advertencias NOTA: Una NOTA indica información importante que lo ayuda a utilizar mejor el software. PELIGRO: Un PELIGRO indica una situación inminentemente peligrosa que, si no se evita, dará como resultado la muerte o una lesión grave. ADVERTENCIA: Una ADVERTENCIA indica una situación potencialmente peligrosa que, sino se evita, podría dar como resultado la muerte o una lesión.
Búsqueda de información PRECAUCIÓN: El documento Información Ambiental, Regulatoria y de Seguridad brinda importante información regulatoria y de seguridad. ¿Qué está buscando? S La guía del usuario para la UPS Encuéntrelo aquí Disco de la UPS Dell S La guía del usuario para la Tarjeta de Gestión de Red de Dell S Software de Gestión de UPS de Dell NOTA: La documentación y la actualización de software se pueden encontrar en support.dell.com.
Instalación y arranque PRECAUCIÓN: Antes de realizar los procedimientos que se describen en este documento, lea y siga las instrucciones de seguridad y la información regulatoria importante en su documento Información Ambiental, Regulatoria y de Seguridad. Cómo desembalar el Módulo de batería externa 1 Abra la caja de cartón exterior y extraiga los accesorios embalados con el gabinete.
Cómo levantar el gabinete PRECAUCIÓN: El gabinete es pesado (53 kg/52,98 kg). Para levantar los gabinetes al bastidor se necesitan al menos dos personas. 1 Con una persona de cada lado, levante cuidadosamente el gabinete de la caja de cartón externa usando las manijas de la caja de cartón y colóquelo sobre una superficie plana y estable. 2 Deseche o recicle el embalaje de manera responsable o guárdelo para un uso futuro.
Configuración del montaje en bastidor PRECAUCIÓN: El gabinete es pesado (53 kg/52,98 kg). Para levantar los gabinetes al bastidor se necesitan al menos dos personas. Cómo instalar los rieles NOTA: Las instrucciones son las mismas que para los bastidores de orificios cuadrados y los bastidores de orificios redondos y sin rosca. Los rieles sirven para ambos estilos de bastidores. En las ilustraciones se muestra el bastidor con orificios redondos.
3 Fije los carriles al bastidor: Acople el extremo posterior del riel hasta que se asiente completamente sobre la brida del bastidor vertical y el pestillo del gancho se cierre en el lugar. Tire del riel hacia la parte delantera. Empuje el extremo delantero del riel hasta que se asiente completamente sobre la brida del bastidor vertical y el pestillo del gancho se cierre en el lugar. Instalación del gabinete NOTA: Instale el EBM directamente debajo de la UPS. 4 Deslice el gabinete por el bastidor.
Cómo asegurar el gabinete 5 Asegure la parte delantera del gabinete al bastidor mediante tornillos de apriete manual en los soportes de montaje. Ajuste manualmente; no utilice herramientas mecánicas. Cómo instalar la cubierta trontal del EBM 6 Instale la cubierta frontal del EBM.
Cómo conectar el EBM NOTA: Puede haber un pequeño arco al momento de conectar un EBM a la UPS. Esto es normal y no ocasionará daños personales. Inserte el cable del EBM en el conector de la batería de la UPS rápida y firmemente. Cómo instalar el cable de EBM 7 Enchufe el cable del EBM en el conector de la batería de la UPS. PRECAUCIÓN: Siga las instrucciones del documento UPS - Introducción o la Guía del usuario de la UPS con bastidor en línea de Dell para obtener indicaciones sobre cómo instalar el UPS.
50 | Instalación y arranque
Dellt在线机架式 外部电池模块 用于 UPS 型号 3750W 和 4200W 系统使用 入门指南 K804N, H952N, J730N, K805N J739N www.dell.com | support.dell.
注意和警告 注意: “注意”表示可帮助您更好使用本软件的重要信息。 危险: “危险”表示紧急危险情况,如果不加以避免,将导致死亡或严重的伤害。 警告: “警告”表示潜在危险情况,如果不加以避免,可能会导致死亡或伤害。 小心: “小心”表示潜在危险情况,如果不加以避免,可能导致轻度或中度伤害,或财产损失事故。 危险: 遵守下列须知有助于防止紧急危险情况,其若不加以避免,将导致死亡或严重的伤害: S 本 UPS 包含危险致命的电压 所有维修和服务都只能由经过授权的维修人员进行。 UPS 中没有用户可自行维修的部件。 本文档所含信息如有更改,恕不另行通知。 E 2009 Dell Inc. 保留所有权利。 未经 Dell Inc. 书面允许,严禁以任何形式进行复制。 本文中使用的商标:Dell 和 DELL 徽标是 Dell Inc. 的商标。 本文件中可能会使用其它商标或商业名称来指称拥有该商标或名称权利的实体或其产品。Dell Inc.
查找信息 小心:安全、环保和法规信息文件提供了重要的安全性和法规信息。 您正在寻找什么? S 我的 UPS 的用户指南 在此查找 Dell UPS 光盘 S Dell 网络管理卡 用户指南 S Dell UPS 管理软件 注意:文件和软件更新可在 support.dell.com 找到。 S 规格 Dell UPS 用户指南 S 如何配置 UPS 设置 用户指南可从 Dell UPS 光盘和 support.dell.com 上找到。 S 如何诊断故障和解决问题 S 如何安装 REPO 控制 S 安全操作说明 安全、环保和法规信息 S 行政法规信息 S 回收信息 S 保修信息 Dell 保修和支持信息 S 条款和条件(仅限美国) S 最终用户许可协议 S 支持信息 Dell 支持网站 – support.dell.
安装和启动 小心:在进行本文件中的步骤之前,请先阅读和遵循 安全、环保和法规信息 文件中的安全操作说明和重要法规信息。 拆开外部电池模块包装 1 打开外部包装箱,取下与机箱包装在一起的配件。 54 | 安装和启动
举起机箱 小心: 机箱很重(53 kg/116.
机架安装 小心: 机箱很重(53 kg/116.
3 将导轨连接到机架上: 啮合导轨的后端,直到其完全卡在纵向齿条凸缘上,并且钩锁锁定在其位置上。 朝前拉动导轨。 推动导轨的前端,直到其完全卡在纵向齿条凸缘上,并且钩锁锁定在其位置上。 安装机箱 注意: 将 EBM 直接安装在 UPS 下方。 4 将机箱滑入机架中。 安装和启动 | 57
固定机箱 5 用固定架上的翼形螺钉将机箱前端固定到机架上。 用手拧紧;不要使用电动工具。 安装 EBM 前盖 6 安装 EBM 前盖。 58 | 安装和启动
连接 EBM 注意: 连接 EBM 和 UPS 时可能会出现少量火花。 这是正常现象,不会对人员产生伤害。 将 EBM 线缆迅速稳固地插入 UPS 电池连接器中。 安装 EBM 电缆 7 将EBM电缆插入 UPS 电池连接器。 小心:按照 UPS 入门指南文件中的说明或 Dell 在线机架式 UPS 3750W 和 4200W 用户指南 中有关安装 UPS 的说明。 安装和启动 | 59
60 | 安装和启动
Dellt 在線機架式 外部電池模組 用於 3750W 和 4200W UPS 型號 系統使用 入門指南 K804N, H952N, J730N, K805N J739N www.dell.com | support.dell.
注意和警告 注意: 「注意」表示可協助您更妥善地使用本軟體的重要資訊。 危險: 「危險」表示緊急危險情況,如果不加以避免,將導致死亡或嚴重的傷害。 警告: 「警告」表示潛在危險情況,如果不加以避免,將會導致死亡或嚴重的傷害。 注意: 「小心」表示潛在危險情況,如果不加以避免,可能導致輕度或中度傷害,或財產損失事故。 危險: 遵守以下須知有助於防止緊急危險情況,其若不加以避免,將導致死亡或嚴重的傷害: S 本 UPS 包含危險致命的電壓。所有維修和服務都只能由經過授權的維修人 員進行。 UPS 中沒有可由使用者自行維修的零件。 本文件所含資訊如有變更,恕不另行通知。 E 2009 Dell Inc. 保留所有權利。 未經 Dell Inc. 書面允許,嚴格禁止以任何形式進行複製。 本文中使用的商標: Dell 和 DELL 標誌是 Dell Inc. 的商標。 本文件中可能會使用其他商標或商業名稱來指稱擁有該商標或名稱權利的實體或其產品。 Dell Inc.
尋找資訊 小心: 安全、環保和法規資訊文件提供了重要的安全和法規資訊。 您要尋找什麼? S UPS 使用者指南 在此尋找 Dell UPS 光碟 S Dell網路管理卡 使用者指南 S Dell UPS Management Software 注意: 檔和軟體更新可在 support.dell.com 取得。 S 規格 Dell UPS 使用者指南 S 如何進行 UPS 設定 使用者指南可從 Dell UPS 光碟和 support.dell.com 上取得。 S 如何診斷故障和解決問題 S 如何安裝 REPO 控制 S 安全操作說明 安全、環保和法規資訊 S 法規資訊 S 回收資訊 S 保固資訊 Dell 保固和支援資訊 S 條款和條件(僅限美國) S 一般使用者授權協議 S 支援資訊 Dell 支援網站 — support.dell.
安裝和啟動 小心: 在進行本檔中的步驟之前,請先閱讀並遵循 安全、環保和法規資訊 文件中的安全操作說明和重要法規資訊。 拆開 外部電池模組 包裝 1 打開外部包裝箱,取出與機箱包裝在一起的配件。 64 |
抬起機箱 小心: 機箱很重 (53 kg/116.
機架安裝 小心: 機箱很重 (53 kg/116.
3 將導軌連接到機架上: 嚙合導軌的後端,直到其完全卡在縱向機架法蘭上,並且用鉤鎖鎖定。 向前拉動導軌。 推動導軌的前端,直到其完全卡在縱向機架法蘭上,並且用鉤鎖鎖定。 安裝機箱 注意: 將 EBM 直接安裝在 UPS 下方。 4 將機箱滑入機架中。 | 67
固定機箱 5 用固定架上的翼形螺釘將機箱前端固定到機架上。 用手擰緊;不要使用電動工具。 安裝 EBM 前蓋 6 安裝 EBM 前蓋。 68 |
連接 EBM 注意: 將 EBM 連接到 UPS 時可能會出現少量電弧。 這是正常現象,不會對人員產生傷害。 將 EBM 纜線迅速穩固地插入 UPS 電池接頭中。 安裝 EBM 電線 7 將 EBM 電纜插入 UPS 電池接頭。 小心: 請遵循 UPS 入門指南 檔中的說明或 Dell 在線機架式 UPS 3750W 和 4200W 使用者指南 中的 UPS 安裝說明。 | 69
70 |
Dellt 온라인 랙 외장 배터리 모듈을 UPS 모델 3750W 및 4200W와 함께 사용 사용자 시스템 시작하기 K804N, H952N, J730N, K805N J739N www.dell.com | support.dell.
참고 및 경고 참고: "참고"는 소프트웨어를 더 잘 활용하는 데 도움이 되는 중요한 정보를 나타냅니다. 위험: "위험"은 피하지 않을 경우 급박한 위험 상황이 사망이나 중상의 결과를 야기할 수 있음을 나타냅니다. 경고: "경고"는 피하지 않을 경우 죽음이나 상해를 야기할 수 있는 잠재적 위험 상황을 표시합니다. 주의: "주의"는 피하지 않을 경우 경미하거나 보통의 상해 또는 재산 손실 사고를 야기할 수 있는 잠재적 위험 상황을 표시합니다. 위험: 아래의 지시사항을 준수하여, 피하지 않을 경우 사망이나 중상의 결과를 야기할 수 있는 급박한 위험 상황을 방지하십시오. S UPS는 사망에 이를 수 있는 전압을 갖고 있습니다. 모든 수리와 정비는 자격있는 서비스 요원만이 수행해야 합니다. UPS 내부에는 사용자가 정비할 수 없는 부품이 있습니다. 이 문서에 포함된 정보는 고지없이 변경될 수 있습니다. E 2009 Dell Inc. All rights reserved. Dell Inc.
정보 찾아보기 주의: 안전, 환경 및 규제 관련 정보 문서는 중요한 안전 및 규제 정보를 제공합니다. 찾는 정보 항목 S UPS용 사용자 설명서 정보의 소재 Dell UPS 디스크 S Dell 네트워크 관리카드용 사용자 설명서 S Dell UPS Management Software 참고: 문서 및 소프트웨어 업데이트는 support.dell.com 에서 조회할 수 있습니다. S 사양 Dell UPS 사용자 설명서 S UPS 설정 구성 방법 사용자 설명서는 Dell UPS 디스크 및 support.dell.com에서 조회할 수 있습니다. S 장애 처리 및 문제점 해결 방법 S REPO 제어 설치 방법 S 안전 지침 안전, 환경 및 규제 관련 정보 S 규제 정보 S 재활용 정보 S 보증 정보 Dell 보증 및 지원 정보 S 약관(미국만 해당) S 최종 사용자 라이센스 계약 S 지원 정보 Dell 지원 웹사이트 — support.dell.
설치 및 시동 주의: 본 문서의 절차를 수행하기 전에 안전, 환경 및 규제 관련 정보 문서에 있는 안전 지침 및 중요한 규제정보를 읽고 준수하십시오. 외장 배터리 모듈 포장풀기 1 포장상자를 열고 캐비닛과 함께 포장된 부속품을 꺼내십시오.
캐비닛 들어올리기 주의: 캐비닛은 무겁습니다(53 kg/52.98 kg). 캐비닛을 랙 안으로 들어 올려 넣으려면 최소한 2인이 필요합니다. 1 양편에 각 한 사람이 자리한 후, 판지의 손잡이를 이용하여 포장상자에서 캐비닛을 조심스럽게 들어 올려 평평하고 안정된 지면에 내려 놓으십시오. 2 포장은 적법한 처리방식에 따라 폐기 또는 재활용하거나, 추후 사용을 위해 보관하십시오.
랙마운트 설치 주의: 캐비닛은 무겁습니다(53 kg/52.98 kg). 캐비닛을 랙 안으로 들어 올려 넣으려면 최소한 2인이 필요합니다. 레일 설치하기 참고: 사각 구멍 랙과 나사산 없는 원형 구멍 랙에 대해 설치 지침은 동일합니다. 레일은 두 종류의 랙에 모두 맞습니다. 원형 구멍 랙은 그림에서 볼 수 있습니다. 1 캐비닛을 랙의 원하는 위치에 설치할 적당한 구멍을 레일에서 선택합니다. 레일은 EBM에 할당된 3U 공간 하단에 위치해야 합니다. 2 "FRONT"라고 표시된 레일의 좌우단이 안쪽을 향하도록 합니다.
3 다음과 같이 레일을 랙에 부착하십시오. 레일 후단이 수직 랙 플랜지(rack flange)에 완전히 안착되고 고리 걸쇠(hook latch)가 제자리에 잠겨지도록 맞춥니다. 레일을 앞으로 당깁니다. 레일 전단이 수직 랙 플랜지에 완전히 자리잡고 고리 걸쇠가 제자리에 잠겨지도록 밉니다. 캐비닛 설치하기 참고: UPS 바로 아래에 EBM을 설치합니다. 4 캐비닛을 랙으로 밀어 넣습니다.
캐비닛 고정시키기 5 장착 브래킷에 있는 손나사를 이용하여 캐비닛 앞면을 랙에 고정시킵니다. 손으로 조이고, 전기 공구는 사용하지 마십시오. EBM 앞면 커버 설치 6 EBM 앞면 커버 를 설치합니다.
연결 EBM 참고: EBM을 UPS에 연결할 때 소량의 아크(arc)가 발생할 수 있습니다. 이것은 정상적인 것이며 인체에 해를 주지 않습니다. EBM 케이블을 UPS 배터리 커넥터에 신속하고 단단히 삽입합니다. EBM 케이블 설치 7 EBM 케이블을 UPS 배터리 커넥터에 꽂으십시오. 주의: UPS 시작 문서 또는 Dell 온라인 랙 UPS 3750W 및 4200W 사용자 가이드에 있는 설명서를 따르십시오.
80 | 설치 및 시동
Dellt オンライン式ラック型 外付けバッテリーモジュール 3750W および 4200W形UPS はじめに システムについて K804N, H952N, J730N, K805N J739N www.dell.com | support.dell.
注記および警告 注記: 「注記」は、ソフトウェアを有効に利用するための重要な情報を示しています。 危険: 「危険」は、回避しないとほぼ確実に死亡、または重傷を招く危険な状況を示しています。 警告: 「警告」は、回避しないと死亡、または重傷を招く潜在的に危険な状況を示しています。 注意: 「注意」は、回避しないと軽傷、または中程度の傷害を招く恐れがある潜在的に 危険な状況を示しています。 危険: 回避しないとほぼ確実に死亡、または重傷を招く危険な状況を防ぐため、 以下の説明をよくお読みください: S このUPSの中には 致死的な電圧 が掛かっています。すべての修理や点検は、 公認のサービススタッフのみ が行わなければいけません。UPS内には ユーザーが修理可能な部品 はありません。 当資料の情報は、予告なく変更されることがあります。 E 2009 Dell Inc. 無断複写・転載を禁じます。 Dell Inc.の書面による許可のない複写は、いかなる形態においても厳重に禁じられています。 当テキストに使用されている登録商標: Dell および DELL のロゴは、Dell Inc.
情報一覧 注意: 安全、環境、規則に関する情報 資料には、安全および規定に関する重要情報が含まれています。 どんな情報をお探しですか? S UPSユーザーガイド こちらでご覧いただけます Dell UPS ディスク S Dell ネットワークマネージメントカード用のユ ーザーガイド S Dell UPS 制御ソフトウェア 注記:説明書およびソフトウェアの更新情報 は、support.dell.comでご確認いただけます。 S 仕様 Dell UPS ユーザーガイド S UPSの設定方法 ユーザーガイドはDell UPS ディスクおよびsupport.dell.comで入手することがで きます。 S トラブルシューティングおよび問題の解決方法 S REPO制御のインストール方法 S 安全に関する説明書 安全、環境、規則に関する情報 S 規則に関する情報 S リサイクルに関する情報 S 保証情報 Dell 保証およびサポート情報 S 使用上の条件(アメリカのみ) S エンドユーザー使用許諾契約 S サポート情報 Dellサポートウェブサイト - support.dell.
インストールおよび起動 注意: 当資料の手順を実施する前に、安全、環境、規則に関する情報資料に記載されてい る安全に関する説明書および重要な規制情報をご覧いただき、これらの情報に従ってください。 外付けバッテリーモジュールの開梱方法 1 段ボール箱を開き、キャビネットと同梱の付属品を取り外します。 84 | インストールおよび起動
キャビネットの持ち上げ方 注意: キャビネットにはかなりの重量があります (53 kg/52.
ラックマウント式設置方法 注意: キャビネットにはかなりの重量があります (53 kg/52.
3 レールをラックに取り付ける方法: 垂直のラックフランジに完全にはまり、フックラッチが所定位置に固定するまでレールの 後端部をはめ込みます。 レールを手前に引きます。 垂直のラックフランジに完全にはまり、フックラッチが所定位置に固定するまで、レール の前端部をはめ込みます。 キャビネットの設置方法 注記: UPSの直接下に外付けバッテリーモジュールを設置します。 4 キャビネットをラックにスライドさせます。 インストールおよび起動 | 87
キャビネットの固定方法 5 蝶ネジを使って、キャビネットの前方をマウンティング・ブラケットに固定します。 手で強く締めてください。電動工具は使用しないでください。 外付けバッテリーモジュールのフロントカバーの取り付け方法 6 外付けバッテリーモジュールのフロントカバーを取り付けます。 88 | インストールおよび起動
接続方法 外付けバッテリーモジュール 注記: 外付けバッテリーモジュールをUPSに接続する際、少量のアーク放電が起こることがあり ます。 これは正常であり、人に損傷を与えることはありません。即座にしっかりと、 外付けバッテリーモジュールケーブルをUPSバッテリーコネクタへ挿入します。 外付けバッテリーモジュールケーブルの取り付け方法 7 外付けバッテリーモジュールケーブルをUPSバッテリーコネクタへ接続します。 注意: UPSの取り付けに関する説明書に関しましては、UPS はじめにの資料、またはDell オンライン式ラック型UPS 3750W および4200W ユーザーガイドで記載されている指示に 従ってください。 インストールおよび起動 | 89
90 | インストールおよび起動
*1642018161* 164201816 1