Dell Latitude 7300 Setup and Specifications Regulatory Model: P99G Regulatory Type: P99G001
Notes, cautions, and warnings NOTE: A NOTE indicates important information that helps you make better use of your product. CAUTION: A CAUTION indicates either potential damage to hardware or loss of data and tells you how to avoid the problem. WARNING: A WARNING indicates a potential for property damage, personal injury, or death. © 2019 Dell Inc. or its subsidiaries. All rights reserved. Dell, EMC, and other trademarks are trademarks of Dell Inc. or its subsidiaries.
Contents 1 Set up your computer.....................................................................................................................................5 2 Chassis.......................................................................................................................................................... 7 Front view..........................................................................................................................................................................
Secure boot................................................................................................................................................................ 28 Intel Software Guard Extensions options................................................................................................................29 Performance...............................................................................................................................................................
1 Set up your computer 1 Connect the power adapter and press the power button. NOTE: To conserve battery power, the battery might enter power saving mode. 2 Finish the Windows system setup. 3 Follow the on-screen instructions to complete the setup. When setting up, Dell recommends that you: • Connect to a network for Windows updates. NOTE: If connecting to a secured wireless network, enter the password for the wireless network access when prompted.
Dell apps Details SupportAssist Proactively checks the health of your computer’s hardware and software. NOTE: Renew or upgrade your warranty by clicking the warranty expiry date in SupportAssist. Dell Update Updates your computer with critical fixes and important device drivers as they become available. Dell Digital Delivery Download software applications including software that is purchased but not pre-installed on your computer. 5 Create recovery drive for Windows.
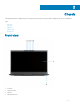
2 Chassis This chapter illustrates the multiple chassis views along with the ports and connectors and also explains the FN hot key combinations.
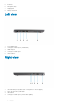
5 IR emitter 6 Microphone array 7 Display panel 8 Battery status LED Left view 1 Power adapter port 2 USB Type-C 3.1 Gen 2 port (Thunderbolt) 3 HDMI 1.4a port 4 USB Type-A 3.1 Gen 1 port 5 Smart card slot Right view 1 Universal audio port (Headset Jack + microphone-in + line-in support) 2 micro-SD 4.0 memory card reader 3 SIM card slot 4 USB Type-A 3.
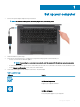
5 Noble wedge lock slot Palmrest view 1 Power button (with optional finger print reader - no LED) 2 Keyboard 3 Touchpad Chassis 9
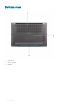
Bottom view 1 Thermal vent 2 Service tag label 3 Speakers 10 Chassis
3 Keyboard shortcuts NOTE: Keyboard characters may differ depending on the keyboard language configuration. Keys used for shortcuts remain the same across all language configurations. Table 2. List of keyboard shortcuts Keys Description Fn + Esc Toggle Fn-key lock Fn + F1 Mute audio Fn + F2 Decrease volume Fn + F3 Increase volume Fn + F4 Mute microphone Fn + F5 Keyboard backlight NOTE: Not applicable for nonbacklight keyboard.
4 Technical specifications NOTE: Offerings may vary by region. The following specifications are only those required by law to ship with your computer. For more information about the configuration of your computer, go to Help and Support in your Windows operating system and select the option to view information about your computer. System information Table 3.
Feature Specifications Memory options • • • • • • 4 GB - 1 x 4 GB 8 GB - 1 x 8 GB 8 GB - 2 x 4 GB 16 GB - 1 x16 GB 16 GB - 2 x 8 GB 32 GB - 2 x 16 GB Type DDR4 Speed 2400 MHz Storage Table 6. Storage specifications Type Form factor Interface Capacity Solid-state drive M.2 2280 PCIe / SATA Up to 1 TB Solid-state drive M.2 2230 (With bracket) PCIe 128 GB Self Encrypting Drive (SED) / Opal SED M.2 2280 PCIe NVMe 256 GB Media card-reader Table 7.
Video card Table 9. Video card specifications Controller Type Intel UHD Graphics 620 UMA CPU Dependency • 8th Gen Intel Core i5 processor 8th Gen Intel Core i7 processor • Graphics memory type Capacity External display support Maximum resolution Integrated Shared system memory HDMI 1.4a 4096 x 2304 Camera Table 10. Camera specifications Feature Specifications Resolution Diagonal viewing angle Camera Options • • Still image: 0.
Features Specifications Docking port Dell USB 3.0 Dock (UNO) Audio Universal audio jack (Headset Jack + microphone-in + line-in support) Video HDMI 1.4a Wireless Wireless LAN card specifications Table 12. Wireless LAN card specifications Wireless card options Qualcomm QCA61x4A 802.11ac Dual Band (2x2) Wireless Adapter + Bluetooth 4.2 (non vPro) Intel Dual-Band Wireless-AC 9560 Wi-Fi + Bluetooth 5.0 Wireless Card (2x2)(vPro)(Bluetooth Optional) Intel Wi-Fi 6 AX200 2x2 .11ax 160MHz + Bluetooth 5.
Feature Specifications Refresh rate 60 Hz Keyboard Table 15. Keyboard specifications Feature Specifications Number of keys Size • • • • 81 (U.S) 82 (UK) 82 (Brazil) 85 (Japan) Full sized • • X= 18.05 mm key pitch Y= 18.05 mm key pitch Backlit keyboard Optional Layout QWERTY / AZERTY / Kanji Touchpad Table 16. Touchpad specifications Feature Specifications Resolution 1048 x 984 Dimensions Multi-touch • • Width: 3.91 inch (99.5 mm) Height: 2.
Battery Table 18. Battery specifications Type Dimension • • • Polymer 3-cell 42 WHr Polymer 4-cell 60 WHr Polymer 4-cell 60 WHr (LCL) Polymer 3-cell 42 WHr • Width: 95.9 mm (3.78 in) • Length: 200.5 mm (7.89 in) • Height: 5.7 mm (0.22 in) Polymer 4-cell 60 WHr and LCL Weight (maximum) Voltage Life span • Width: 95.9 mm (3.78 in) • Length: 238 mm (9.37 in) • Height: 5.7 mm (0.22 in) • Polymer 3-cell 42 WHr: 192.5 g (0.42 lb) • Polymer 4-cell and LCL: 270 g (0.60 lb) 11.
Power adapter Table 19. Power adapter specifications Feature Specifications Type • • • • • • Input Voltage E5 65 W 7.4 mm Barrel Adapter E5 65 W BFR/PVC Halogen Free adapter, 7.4 mm barrel E5 65 W Rugged Adapter 7.4 mm barrel (India only) E5 90 W 7.4 mm Barrel Adapter 65 W adapter, Type-C 90 W adapter, Type-C 100 VAC - 240 VAC Input current (maximum) • • Input frequency 1.7 A for 65 W 2.5 A for 90 W 50 Hz to 60 Hz Output current • • 3.34 A for 65 W 4.62 A for 90 W Rated output voltage 19.
Table 21. Computer environment Operating Storage Temperature range 0°C to 40°C (32°F to 104°F) -40°C to 65°C (-40°F to 149°F) Relative humidity (maximum) 10% to 90% (non-condensing) 0% to 95% (non-condensing) NOTE: Maximum dew point temperature = 26°C NOTE: Maximum dew point temperature = 33°C Vibration (maximum) 0.66 GRMS 1.
5 System setup CAUTION: Unless you are an expert computer user, do not change the settings in the BIOS Setup program. Certain changes can make your computer work incorrectly. NOTE: Before you change BIOS Setup program, it is recommended that you write down the BIOS Setup program screen information for future reference. Use the BIOS Setup program for the following purposes: • Get information about the hardware installed in your computer, such as the amount of RAM and the size of the hard drive.
Keys Navigation Down arrow Moves to the next field. Enter Selects a value in the selected field (if applicable) or follow the link in the field. Spacebar Expands or collapses a drop-down list, if applicable. Tab Moves to the next focus area. Esc Moves to the previous page until you view the main screen. Pressing Esc in the main screen displays a message that prompts you to save any unsaved changes and restarts the system.
Option Description – – – – – – – • • Memory Installed Memory Available Memory Speed Memory Channel Mode Memory Technology DIMM A Size DIMM B Size NOTE: Due to an amount of memory being assigned for system use, "Memory Available" is less than "Memory Installed". Note that certain operating systems may not be able to use all the available memory.
Option Description Advanced Boot Options Allows you to Enable Legacy Option ROMs. • UEFI Boot Path Security Enable UEFI Network Stack—Default Allows you to control whether the system prompts the user to enter the Admin password when booting to a UEFI boot path. Click one of the following options: • • • • Date/Time Always, Except Internal HDD—Default Always, Except Internal HDD & PXE Always Never Allows you to set the date and time. The change to the system date and time takes effect immediately.
Option Description NOTE: USB keyboard and mouse always work in the BIOS setup irrespective of these settings. Dell Type-C Dock Configuration Allows you to connect to Dell WD and TB family of docks(Type-C Docks) independent of USB and thunderbolt adapter configuration. This option is enabled by default.
Option Description Keyboard Backlight Timeout on AC This feature defines the timeout value for the keyboard backlight when an AC adapter is plugged into the system. Options are: • • • • • • • • 5 seconds 10 seconds(Default) 15 seconds 30 seconds 1 minute 5 minute 15 minute Never NOTE: Option present on system opted with backlit keyboard. Keyboard Backlight Timeout on Battery This feature defines the timeout value for the keyboard backlight when the system is running only on battery power.
Video screen options Table 24. Video Option Description LCD Brightness Allows you to set the display brightness depending upon the power source. On Battery(100% is default) and On AC (100 % is default). Privacy Screen This option Enables or Disables the Privacy Screen if the Panel supports this feature. The options are: • • • Disabled: When Disabled the privacy screen is not applied to the embedded display panel.
Option Description Strong Password Allows you to enforce the option to always set strong password. • Enable Strong Password This option is not set by default. Password Configuration You can define the length of your password. Min = 4, Max = 32 Password Bypass Allows you to bypass the System password and the Internal HDD password, when it is set, during a system restart.
Option Description OROM Keyboard Access This option determines whether users are able to enter Option ROM Configuration screens via hotkey during boot. Specifically this settings is capable of preventing access to Intel® RAID(Ctrl+I) or Intel® Management Engine BIOS Extension (Ctrl+P/F12). Options are: • • • Admin Setup Lockout Enable— Default One Time Enable Disable Allows you to prevent users from entering Setup when an administrator password is set.
Option Description • dbx Intel Software Guard Extensions options Table 27. Intel Software Guard Extensions Option Description Intel SGX Enable This field specifies you to provide a secured environment for running code/storing sensitive information in the context of the main OS.
Option Description Intel® TurboBoost™ This option enables or disables the Intel® TurboBoost™ mode of the processor Hyper-Thread Control Allows you to enable or disable the HyperThreading in the processor. • • Disabled Enabled—Default Power management Table 29. Power Management Option Description AC Behavior Allows you to enable or disable the computer from turning on automatically when an AC adapter is connected. • Wake on AC This option is not set by default.
Option Description Peak Shift Start and End Time can be configured for all weekdays This option set the battery threshold value (15 % to 100 %) Advanced Battery Charge Configuration This option enables you to maximize the battery health. By enabling this option, your system uses the standard charging algorithm and other techniques, during the non-work hours to improve the battery health.
Option Description Click one of the following options: • • • Extended BIOS POST Time Minimal—Default Thorough Auto Allows you to create an additional preboot delay. Click one of the following options: • • • Full Screen Logo 0 seconds—Default 5 seconds 10 seconds Allows you to display full screen logo, if your image matches screen resolution. • Enable Full Screen Logo This option is not set by default.
Virtualization support Table 32. Virtualization Support Option Description Virtualization This option specifies whether a Virtual Machine Monitor (VMM) can utilize the additional hardware capabilities provided by the Intel Virtualization technology. • Enable Intel Virtualization Technology This option is set by default.
Option Description BIOS Downgrade Allows you to flash previous revisions of the system firmware. • Allow BIOS Downgrade This option is set by default. Allows you to securely erase data from all internal storage devices. Data Wipe • Wipe on Next Boot This option is not set by default. Bios Recovery BIOS Recovery from Hard Drive—This option is set by default. Allows you to recover the corrupted BIOS from a recovery file on the HDD or an external USB key.
10 Select your preferred download method in the Please select your download method below window, click Download File. The File Download window appears. 11 Click Save to save the file on your computer. 12 Click Run to install the updated BIOS settings on your computer. Follow the instructions on the screen. Updating BIOS on systems with BitLocker enabled CAUTION: If BitLocker is not suspended before updating the BIOS, the next time you reboot the system it will not recognize the BitLocker key.
System and setup password Table 36. System and setup password Password type Description System password Password that you must enter to log on to your system. Setup password Password that you must enter to access and make changes to the BIOS settings of your computer. You can create a system password and a setup password to secure your computer. CAUTION: The password features provide a basic level of security for the data on your computer.
5 Press Esc and a message prompts you to save the changes. 6 Press Y to save the changes and exit from System Setup. The computer reboot.
6 Software This chapter details the supported operating systems along with instructions on how to install the drivers. Downloading drivers 1 Turn on the notebook. 2 Go to Dell.com/support. 3 Click Product Support, enter the Service Tag of your notebook, and then click Submit. NOTE: If you do not have the Service Tag, use the auto detect feature or manually browse for your notebook model. 4 Click Drivers and Downloads. 5 Select the operating system installed on your notebook.
7 Getting help Contacting Dell NOTE: If you do not have an active Internet connection, you can find contact information on your purchase invoice, packing slip, bill, or Dell product catalog. Dell provides several online and telephone-based support and service options. Availability varies by country and product, and some services may not be available in your area. To contact Dell for sales, technical support, or customer service issues: 1 Go to Dell.com/support. 2 Select your support category.