
Users Guide
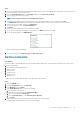

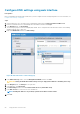

6. The mapping screen for the virtual media is displayed on the Virtual Media menu.
7. In the Map CD/DVD section, click Choose File.
8. Browse and select the required Dell EMC customized ESXi image (ISO image) file.
9. Click Map Device and then click Close.
10. From the Virtual Console menu, click Boot, and then click Virtual CD/DVD/ISO.
11. Click Yes.
12. From the Power menu, click Power on System.
13. If the system is not turned on, click Power on System. If the system is ON, click Power Cycle System (cold boot).
Results
The server is connected to the iDRAC devices and boots into the ESXi installer.
Install VMware ESXi
Prerequisites
Before installing VMware ESXi, you must connect to the iDRAC devices and boot into the ESXi installer. For more information, see
Connect to iDRAC and boot installation media.
Steps
1. In the Welcome to ESXi Installation window, press Enter.
2. Review the End User License Agreement (EULA), and then press F11 to accept and continue.
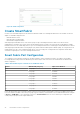
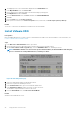
3. On the Select a Disk to Install or Upgrade page, select the DELLBOSS VD device, and then press Enter.
NOTE:
If DELLBOSS VD device has been used for previous ESXi installation, in the ESXi/VMFS Found dialog box,
choose to overwrite the existing VMFS datastore, and then press Enter.
Figure 28. ESXi disk partition page
4. Select the required keyboard layout, and then press Enter.
5. Enter the root password, and then press Enter.
6. In the Confirm Install window, press F11 to install the VMware ESXi.
7. In the Installation Complete window, press Enter to reboot the server.
The installation completes and the server boots into ESXi.
8. From the Virtual Media menu, click Disconnect Virtual Media.
Results
VMware ESXi is installed in the server.
48
Deploy ESXi to cluster nodes