
Users Guide


Configure ESXi settings using web interface
Prerequisites
Before configuring ESXi settings using web interface, you must configure the ESXi settings using DCUI. For more information, see
Configure ESXi settings—using DCUI.
Steps
1. Using a web browser, go to the ESXi host-level management web interface at https://<ESXi Host Address>/ui.
2. Enter the credentials that were created during the ESXi installation, and then click Log in.
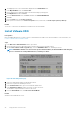
3. In the Navigator pane, click Networking.
The current port groups on the host are displayed by default. One is configured with VLAN information that is entered during
installation and the other is still at zero.
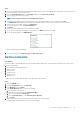
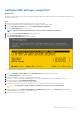
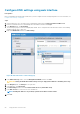
4. Right-click VM Network and then click Edit settings.
Figure 30. ESXi web interface—Edit settings page
5. In the Edit Port Group window, enter the Management VLAN ID, and then click Save.
CAUTION: Leaving the VLAN ID at default setting causes pre-deployment validation to fail during a later step.
6. In the Navigator pane, click Manage to set up the NTP.
7. In the right pane, click Time & Date.
8. Click Edit Settings and then select Use Network Time Protocol (enable NTP client).
9. In the NTP Servers box, enter the NTP server IP addresses.
NOTE: If multiple IP addresses are provided, separate the IP addresses with commas.
10. Click Save.
50
Deploy ESXi to cluster nodes