
White Papers


Introduction
6 Booting VMware ESXi from FCoE
• Dell S5000 Ethernet switch
• Dell Compellent SC8000 Storage Center Controller
For more information about the FCoE boot from SAN, BIOS, and UEFI perspective, see VMware Knowledge
Base Article 2148531. In this example testbed, we use Qlogic BCM 57xxx series adapter which is an FCoE
hardware offload capable CNA and it uses qfle3f driver module for storage adapter and qfle3 driver
module for network processing FCoE frames. For more information about the CNA adapter, see VMware
Compatibility Guide.
1.3 Storage configuration
To proceed with storage configuration, complete the following steps:
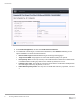
1. On the Storage Center Login page, enter your username and password, and then click Login.
2. Read the license agreement and on accepting, click Accept.
3. On the Load license page, browse and select the license file and then click Load License.
Note:
The serial number of the license file must match with the serial number of the controller.
The license submission must be completed successfully complete.
4. Click Continue.
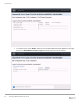
The Create Disk Folder page appears.
Note: Use this to assign disks to a folder and to create a single pool of storage for volumes.
5. On the Create Disk Folder page, select the required disk folder, and then click Continue.
Note: By default, all the disks are selected.
6. If required, rename the default folder name.
7. To configure Disk Folder, click Advanced.
a. Configure Tier Redundancy for each Tier, by selecting Single Redundant or Dual
Redundant from the drop-down menu.
b. From the Datapage Size drop‐down menu, select the required Datapage size.
c. Select Prepare Disk Folder for redundant storage, and then click Continue.
8. Click Create Now, and then click OK.
9. On the Add Controller page, for Single-controller storage center, click Continue Setup.
a. For Dual- controller storage center, click Add Controller to add the second controller.
b. In Controller ID, enter the HSN value.
Note: If the HSN for Controller 2 is included in the license file, then the value in Controller ID is
auto-populated, and the value cannot be changed. If the HSN for Controller 2 is not included in
the license file, you must enter the HSN value.
c. Under the Ether 0 interface, enter the values in IP Address, Net Mask, and Gateway.
d. Under the Ether 1 interface, enter the values in IP Address, Net Mask, and Gateway.
e. In Primary DNS Server, enter the IP Address of the primary DNS server.
f. If there is a secondary DNS server, then you must enter the IP address in Secondary DNS
server.
10. Click Continue.
11. Click Join Now.
12. On the Time Settings page, set the system time for the Storage Center, and then click Continue.