
White Papers


Introduction
7 Booting VMware ESXi from FCoE
13. On the System Setup page, enter the system name and management IP address for the Storage
Center, and then click Continue.
The wizard prompts you to enable or disable the read and write cache.
14. Select Enable Read Cache and Enable Write Cache, and then Click Continue.
15. Configure SMTP page, to enable alert message emails to be sent to users who have specified a
recipient address in their contact properties. Click Continue.
16. Use the Update setup page to configure how Storage Center handles software updates. Click
Continue.
17. On the User Setup page, specify session timeout and email addresses for the Admin account. Click
Continue.
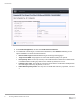
18. On the Configure SMTP page, enter the IP address or a domain name of the SMTP email server.
Note: To configure SMTP later, click Skip SMTP Configuration. SMTP settings can be configured
later in the System Manager.
19. In the Sender E‐mail Address field, enter the email address of the sender.
20. On the Update Setup page, select an update option from the drop-down menu, and then click
Continue.
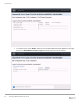
21. On the User Setup page, for Session Timeout, select the time from the drop-down menu.
22. In the Email, Email 2, and Email 3 fields, enter email addresses to which the Storage Center has to
send system alerts.
23. Click Continue.
24. On the Configure IO Cards page, enter the values in the IP Address, Subnet Mask, and
Gateway fields.
25. Click Continue.
26. On the Configure Ports page, click Configure Local Ports.
The wizard lists the IO cards installed in the storage center (FC, iSCSi and SAS) along with the status
of the port(s).
27. Configure Purpose, Fault Domain and User Alias (optional) based on your requirement.
a. For Single Controller Storage Center, by default, fault domain is created for each FC port.
b. For Dual-Controller Storage Center, create a fault domain for each pair of redundant FC ports.
28. Click Continue.
29. On the Generate SSL Certificate page, click Import.
30. Browse to the location of the public key (*.pem) file, and then select the file.
Note: If you do not have a certificate containing the Storage Center host name or IP address,
generate a certificate by clicking Generate Now.
31. Click Next.
32. To import the certificate, click Save.
1.4 Enabling FCoE in PowerEdge servers
To enable FCoE, complete the following steps:
1. On a supported Dell EMC PowerEdge server, navigate to Device Settings in the BIOS setup, and
then select the CNA adapter port that you want to boot.
2. To enable logical interfaces partitioned from a single interface, select enable.