
Setup Guide


Dell PowerConnect W-Series | ArubaOS 6.1 Quick Start Guide 3
If you plan on adding controller licenses or configuring additional VLANs, WLANs, or port settings on our
controller, make a note of the desired licenses or settings before you launch the Setup wizard.
Initial Setup on a Serial Port Connection
The serial port is located on the front panel of the controller. You can start the Initial Setup dialog when you
connect a terminal, PC or workstation running a terminal emulation program to the serial port on the controller.
The serial port connection only allows you to configure the basic configuration required to connect the controller
to the network. The recommended browser-based Setup Wizard allows you to also install software licenses and
configure internal and guest WLANs (see “Initial Setup Using the WebUI Setup Wizard” on page1). If you use
the Initial Setup dialog to configure the controller, the browser-based Setup Wizard will not be available unless
you reset the controller to its factory default configuration.
To run the Initial Setup dialog from a serial connection:
1. Configure your terminal or terminal emulation program to use the following communication settings:
2. Connect your terminal or PC/workstation to the serial port on the controller using an RS-232 serial cable. All
accessory kits shipped with Dell controllers contain an RJ-45 cable and DB-9 to RJ-45 adapter. You may need
to provide a USB adapter to connect the serial cable to your PC.
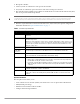
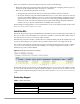
3. Boot up the Dell controller. After the controller has booted up, you should see a screen similar to the
following:
Figure 1 Initial Setup for Serial Port Connection
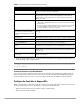
4. The Serial Port Configuration Dialog displays the configuration prompts described in Table 3. Enter the
required information at each prompt, then press Enter to continue to the next question.
NOTE: These optional configuration settings cannot be configured when running initial setup on a serial port connection.
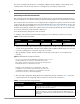
Table 2 Terminal Connection Settings
Baud Rate Data Bits Parity Stop Bits Flow Control
9600 8 None 1 None
Table 3 Console Configuration Setup Information
Console Prompt Description
Enter System Name Enter a name for the controller, or press Enter to use the default system name. You
can specify a name of up to 63 characters.
Enter VLAN 1 interface IP address The controller takes its IP address from VLAN 1 and uses this IP address to
communicate with other controllers and with APs. Enter the VLAN 1 interface IP
address, or press Enter without specifying an IP address to use the default address
172.16.0.254.
***************** Welcome to the Dell W-651 setup dialog *****************
This dialog will help you to set the basic configuration for the switch.
These settings, except for the Country Code, can later be changed from the
Command Line Interface or Graphical User Interface.
Commands: <Enter> Submit input or use [default value], <ctrl-I> Help
<ctrl-B> Back, <ctrl-F> Forward, <ctrl-A> Line begin, <ctrl-E> Line end
<ctrl-D> Delete, <BackSpace> Delete back, <ctrl-K> Delete to end of line
<ctrl-P> Previous question <ctrl-X> Restart beginning