
Setup Guide


4 Dell PowerConnect W-Series | ArubaOS 6.1 Quick Start Guide
5. At the end of the Initial Setup, you are asked to review and confirm your configuration changes. Enter y to
accept the changes. The controller reboots.
Connect the Controller to the Wired Network
Once controller setup is complete, connect a port on the controller to the appropriately-configured port on a
Layer-2 switch or router. Make sure that you have the correct cables and that the port LEDs indicate proper
connections. Refer to the Installation Guide for your Dell controller for port LED and cable descriptions.
Configure the Controller to Support APs
Before you install APs in a network environment, you must ensure that the APs will be able to locate and connect
to the controller when powered on. Specifically, you need to ensure the following:
When connected to the network, each AP is assigned a valid IP address
APs are able to locate the controller
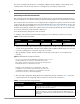
Enter VLAN 1 interface subnet mask Enter the VLAN 1 interface IP subnet mask, or press Enter without specifying an IP
address to use the default address 255.255.255.0.
Enter IP Default gateway This is usually the IP address of the interface on the upstream switch or router to
which you will connect the controller. The default gateway and the VLAN 1 IP
address need to be in the same network. To continue without specifying an IP
gateway, press Enter.
Enter Switch Role, (master|local) Enter one of the following switch roles:
Master: This controller will manage other controllers on the network. This is the
default setting.
Local: This controller will be managed by a master controller. You are prompted
for a key that will be used by all controllers on the network. (You need to
provide the IP address of the master controller.)
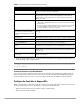
(For US controllers only)
This controller is restricted to Country
code US for United States, please confirm
(yes|no)
If your controller has a country code that restricts its usage, enter yes to confirm
this code.
Enter Time Zone Enter the time zone for the controller, or press Enter to select the default time zone.
Enter Time in UTC Enter the current time in UTC format, or press Enter to select the default time.
Enter Date (MM/DD/YYYY) Enter the current date, or press Enter to select the default date.
Enter Password for admin login (up to 32
chars)
Enter a password to allow the admin user to login to the controller WebUI, CLI and
console interfaces. This password can be up to 32 alphanumeric characters long.
Enter Password for enable mode (up to 15
chars
Enter a password for the admin user to access Enable mode in the controller
WebUI, CLI and console interfaces. This password can be up to 15 alphanumeric
characters long.
Do you wish to shutdown all the ports
(yes|no)? [no]
Enter yes to shut down all ethernet ports on the controller, or press Enter to allow
all ports to remain active.
Table 3 Console Configuration Setup Information (Continued)
Console Prompt Description
NOTE: If you want to complete optional configuration options (e.g. disabling spanning tree or installing software licenses) before
connecting the controller to the network, refer to the Dell PowerConnect W-Series ArubaOS User Guide for additional information
on controller configuration.