
Setup Guide

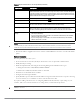

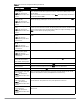


Table Of Contents

2 Dell Networking W-Series ArubaOS 6.4.x | Quick Start Guide
Initial Setup Using the WebUI Setup Wizard
The following browsers are officially supported for use with the Dell Networking W-Series ArubaOS 6.4.x Setup
wizard and WebUI:
You can launch the setup wizard using any PC or workstation that can run a supported Web browser. The PC or
workstation must either be configured to obtain its IP address using DHCP, or configured to have a static IP
address on the 172.16.0.0/24 subnetwork. The default IP address of the controller is 172.16.0.254. Connect a PC
or workstation to any line port on the controller, then enter this IP address into a supported Web browser to
launch the Setup Wizard.
To run the Setup Wizard:
1. Connect your PC or workstation to a line port on the controller.
2. Make sure that the controller is not connected to any device on your network.
3. Boot up the controller.
4. On your PC or workstation, open a Web browser and connect to https://172.16.0.254.
5. The controller contains a default server certificate to validate the device on the network. At the Security Alert,
click Yes to proceed with the Setup Wizard.
6. The initial window of the Mobility Controller Setup Wizard asks you to select one of the following
deployment modes. Select Standalone, Master, Local, or Branch then click Continue.
Standalone: This is the only controller on the network.
Master: This controller will manage other controllers on the network.
Local: This controller will be managed by a master controller.
Branch: This controller will be a branch controller on the network. That is, all settings for this controller
are managed by a master controller.
7. If you selected Standalone or Master in step6, you will be prompted to select the Campus WLAN
deployment mode. The Remote Access Points deployment mode allows you to configure additional settings
specific to remote APs. Go to step8.
If you selected Branch in step6, you will be prompted to enter the IP address or FQDN of the master
controller for this branch. Go to step9.
8. Enter the information described in Table 2, and, if desired, the optional configuration information described
in “Optional Information” on page3.
Table 1 Supported Browsers for Controller WebUI
Operating System Supported Browser
MacOS Apple Safari and Mozilla Firefox
Windows XP, Windows 7, Windows 8 Microsoft Internet Explorer 10 and 11, and Mozilla Firefox
NOTE: By default, the last 1000BASE-X port of the branch controller is selected as the uplink port.
Table 2 Required Information for the Setup Wizard
Requirement Description
System Name A user-defined name by which the controller will be referenced. You can specify a name of up to
63 characters.