
Users Guide


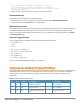


Figure 6:Creating a Filtered View
3. (Optional) AirWave administrators can select the Is Global check box to give all users access to the filtered
view. Administrators are able to edit any global view they can see in the filtered view drop-down list.
4. Click to add a new filter. A new list of parameters is added to the Filter field.
5. Scroll the list of filter parameters and select a Device or Radio parameter. If required, enter search
parameters such as "=" to refine the filter parameters.
6. (Optional) To create a filtered view with multiple filter parameters, click again and define any additional filter
parameters.
For example, to create a view that displays APs with more than zero clients but less than five clients, you
would need to create one filter with the parameters Clients > 0, and a second filter with the parameters
Clients < 5.
7. Drag and drop data columns from the Available Columns list to the Current Columns list to select which
columns display in the view. You can reorder the columns in the Current Columns list by dragging and
dropping the data column to a different place in the list.
8. Click OK to save the view.
You can edit a custom filter view at any time, by selecting clicking the down arrow in the table titlebar, selecting
Edit View, and modifying filter parameters and column displays.
Getting Started with AirWave
Use your browser to navigate to the hostname or static IP address assigned to the AirWave internal page, as
shown in Figure 7. Enter the User Name and Password as admin/admin for your initial login, and then select
Log In.
Dell Networking W-AirWave 8.2.4 | Installation Guide 13