Dell PowerConnect W-AirWave 7.6 Installation Guide Overview This document is designed as a reference for installing Dell PowerConnect W-AirWave using the CentOS software bundled with the .iso disc image. NOTE: Dell PowerConnect W-Series AirWave Wireless Management Suite (AWMS), AirWave, and AirWave Management Platform (AMP) refer to the same product set and are used interchangeably.
Figure 2: Add a Legacy Network Adapter Installing on a Red Hat Enterprise Linux Server If you are installing AirWave on a Red Hat Enterprise Linux server, contact Dell support at dell.com/support. NOTE: AirWave does not support downgrading to older versions. Significant data could be lost or compromised in such a downgrade.
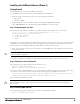
Checklist Check If upgrading, ensure that your current version is not more than two versions behind. For example, when upgrading to AirWave 7.6, you must already be using AirWave 7.3 or newer. Contact technical support for assistance with upgrading if you are upgrading from greater than two versions. Supported Browsers Windows (XP, Vista, Windows 7) l Internet Explorer 8/9 l Firefox 3.x l Google Chrome 9.x (stable) Mac OS X (10.5, 10.6, 10.7) l Safari 5.x and higher l Firefox 3.
5. When the burnatonce program opens, click the Write button. If burnatonce has not automatically associated to the .iso disc image, run burnatonce manually and select the AirWave install image from the Load menu. For help with CD burning software other than burnatonce, please refer to the user guide for that product and reference the option to create a CD from .iso disc image. With Nero, for instance, this option may be found under File -> Burn Image or Recorder -> Burn Image.
Installing the AirWave Software (Phase 2) Getting Started Perform the following steps when the GRUB screen appears. 1. Press Enter or wait six seconds. The system automatically loads the kernel. 2. When the kernel is loaded, log into the server using the following credentials: l login = root l password = admin 3. Start the AirWave software installation script by executing the ./amp-install command. Type./amp-install at the command prompt and press Enter to execute the script.
This will take a few minutes. Press Alt-F9 to see detailed messages. Press Alt-F1 return to this screen. This step requires no user input, but you can follow the instructions to monitor its progress and switch back to the installation screen. Step 4: Checking the AirWave Installation After the AirWave software installation is complete, the following message appears: STEP 4: Checking AMP installation Database is up. AMP is running version: (version number) This step requires no user input.
Generating SSL certificate for < IP Address > 2. If AirWave has a valid host name on the network, type y at the prompt. The following is displayed: Enter AMP's fully qualified domain name: 3. Type the AirWave DNS name and press Enter. The following message is displayed: Generating SSL certificate for < IP Address > Proceed to the next step when the system prompts you. Step 8: Changing the Default Root Password Upon completion of the prior step, the following message is displayed.
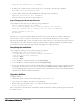
Configuring and Mapping Port Usage for AMP The following table itemizes the communication protocols and ports necessary for AirWave to communicate with wireless LAN infrastructure devices, including access points (APs), controllers, routers, switches, and RADIUS servers. Assign or adjust port usage on the network administration system as required to support these components.
Port Type Protocol Description ing NAS (captive portal, controller, autonomous AP). Only used when usernames are not available in the SNMP MIB of a controller or autonomous AP.
Field Description When selected, AMP shows a detailed list of all Up devices. Down (Wireless) The number of managed authorized, wireless devices that are not currently responding to AMP requests. When selected, AMP shows a detailed list of all Up devices. Mismatched The total number of Mismatched devices. A device is considered mismatched when the desired configuration in AMP does not match the actual device configuration read from the device.
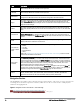
Some navigation items may be hidden for users depending on a user’s role. The table below describes the navigation elements in further detail. Table 8: Components and Subtabs of AirWave Navigation Main Tab Description Subtabs Home The Home pages provide basic AirWave information including system name, host name, IP address, current time, running time, and software version.
Main Tab Description Subtabs l Diagnostics VPN Users Subtab: l VPN User Detail Reports Generated Definition Definition Subtab: l Detail The System page provides information about AirWave operation and administration, including overall system status, the job scheduler, trigger/alert administration, and so forth. For additional information, refer to Monitoring and Supporting AirWavewith the System Pages in the Dell PowerConnect W-AirWave 7.6 User Guide.
NOTE: The AMP Setup tab varies with the user role. Activity Section The Activity section is the main section of the user interface. This section displays all detailed configuration and monitoring information. It is where you view activity and implement configuration changes. Figure 9: Activity section of the Home > Overview Page Common List Settings All of the lists in AirWave have some common options. All lists are paginated with a configurable number of items per page.
Figure 10: Common List Settings Choose Columns Illustration These settings are user specific. To reset them, select Reset List Preferences on Home > User Info. Buttons and Icons Standard buttons and icons are used throughout AirWave as follows: Table 11: Standard Buttons and Icons of the AirWave pages Function 14 Image Description Acknowledge Acknowledges and clears an AMP alert. Add Adds the object to both AMP’s database and the onscreen display list.
Function Image Description Plan file. Drag and Drop Dragging and dropping objects with this icon changes the sequence of items in relation to each other. Duplicate Duplicates or makes a copy of the configuration of an AirWave object. Edit Edits the object properties. Email Links to email reports. Filter (Funnel icon) Filters list by values of the selected column. To reset all filters in all columns, click Reset filters link at the bottom of the table.
Function Image Description Revert Returns all configurable data on the screen to its original status. Rogue Indicates a rogue AP, and links to RAPIDS. Run Runs a new user-defined report. Save Saves the information on the page in the AMP database. Save & Apply Saves changes to AMP’s database and apply all changes to devices. Scan Scans for devices and rogues using selected networks. Schedule Schedules a window for reports, device changes, or maintenance.
server, or an external LDAP server, per the AirWave’s configuration. If the credentials are valid, the user’s browser is sent a session cookie to use in subsequent requests. Use your browser to navigate to the static IP address assigned to the internal page of the AirWave, as shown in Figure 12. Enter the User Name and Password as admin/admin for your initial login, and then select Log In. Figure 12: AirWave Login Form If desired, you can set one of the available languages for your login.
Copyright © 2013 Aruba Networks, Inc. Aruba Networks trademarks include , Aruba Networks®, Aruba Wireless Networks®, the registered Aruba the Mobile Edge Company logo, and Aruba Mobility Management System®. Dell™, the DELL™ logo, and PowerConnect™ are trademarks of Dell Inc. All rights reserved. Specifications in this manual are subject to change without notice. Originated in the USA. All other trademarks are the property of their respective owners.