
Deployment Guide


Perform the following steps to resolve the mismatch.
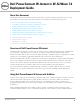
1. Navigate to the AP/Devices->Manage page for that Instant device.
2. Change the Management Mode option to Manage Read/Write.
3. Click on Save and Apply at the bottom on the page.
4. When the Confirm changes page opens, click on Apply Changes Now for the changes take effect.
Upon completion, the configuration will be synced to the Instant network. The status of the device will initially
display as ‘Verifying’ during this process. The status will change to ‘Good’ after the provisioning is successful.
NOTE: This is the same process for any configuration change sync that is done in future.
Adding Additional Instant APs to AirWave
After the first Instant device has been provisioned and set up in AirWave, additional Instant networks in other
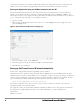
locations can be added and provisioned automatically. To do this, set the Automatically Authorized Virtual
Controller Mode option to Manage Read/Write on the AMP Setup > General page.
Figure 5: Setting devices to Manage Read/Write mode
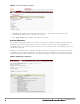
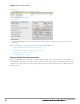
When the second Instant contacts AirWave using the DHCP server options as described previously, and that second
Instant device has the same Shared key, it shows up on AirWave as shown below. Because the devices are in Manage
Read/Write mode, there is no need for manual intervention to provision these new Instant networks. The new
networks will automatically be placed into the same group (if this is the desired configuration), but a new folder will
be created to contain these devices.
NOTE: Keep Dell PowerConnect W-Instant devices in Monitor Only mode to audit the device and to ensure that configurations are not
automatically pushed. This practice is consistent with the rest of AirWave.
Dell PowerConnect W-Instant in W-AirWave 7.6 | Deployment Guide 7