
Deployment Guide


3. When the 6.4 upgrade image is available locally and all subscribers have been patched, the Start Upgrade
link is available in the upper-right corner. Click Start Upgrade. The Start Cluster Upgrade window opens.
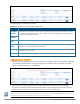
4. You can upgrade the entire cluster or just a subset of nodes. In the Start Cluster Upgrade window, use
the check boxes to select the subscribers to upgrade, and then click Upgrade. The tool begins the
automated upgrade process.
No further manual steps are required until all selected nodes have been upgraded. For information on the
automated process, see "Steps in the Tool’s Automated Workflow" on page 6.
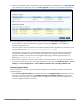
The publisher is always the first node that will be upgraded and rebooted. The Upgrade Tool will not be
available while the publisher node is rebooted and data migration is in progress. When the publisher
upgrade is complete, you may use the Cluster Upgrade Utility page to monitor upgrade progress, as
described in "Viewing Upgrade Status" on page 5.
5. After successful upgrade, confirm that all the nodes in the cluster are back in sync and all the services are
accessible. Verify that any pre-existing standby publisher settings are restored (Administration >Server
Manager >Server Configuration >Cluster-Wide Parameters link >Standby Publisher tab).
Viewing Upgrade Status
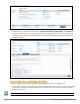
After you select the nodes and initiate the automated upgrade, the tool provides two ways to monitor the
upgrade’s progress:
l On the Cluster Upgrade Utility page, progress indicators in the Upgrade Steps area show the status of
some of the main steps. Indicators in the Publisher Details and Subscriber Details areas also show
when each node is in progress or completed. When the upgrade is complete, these areas should show a
successful upgrade status for every node.
Cluster Upgrade Tool, ClearPass 6.4 | Tech Note | 5