
Reference Guide


2 ClearPass Policy Manager | Tech Note: Installing or Upgrading on a Virtual Machine
2 Gigabit virtual switched ports (Only one is needed if you do not use separate ports for data and
management traffic.)
CP-VA-5K
8 Virtual CPUs
250 GB disk space
8 GB RAM
2 Gigabit virtual switched ports (Only one is needed if you do not use separate ports for data and
management traffic.)
CP-VA-25K
At least 12 CPUs (Aruba hardware appliances ship with 24 cores)
512 GB disk space
At least 24 GB RAM (Aruba hardware appliances ships with 64 GB of RAM)
2 Gigabit virtual switched ports (Only one is needed if you do not use separate ports for data and
management traffic.)
Installing ClearPass Policy Manager on a Virtual Machine
Installing ClearPass Policy Manager on a virtual machine is a two-part process:
Deploy the ClearPass Policy Manager image on a VMware server (below).
Add a hard disk to the ClearPass Policy Manager virtual machine (page 4)
Deploy ClearPass Policy Manager image on a VMware ESX/ESXi server
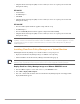
1. Start the VMware Vsphere console and connect to your ESX/ESXi server.
2. Select File > Deploy OVF template.
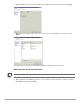
3. Select the .ovf file from the folder where the ClearPass Policy Manager zip file was unzipped. The
Deploy OVF wizard appears.
In order for a CP-VA-25K virtual appliance to properly support up 25,000 unique authentications with full logging
capability, customers should match the number of CPUs and RAM that ship in our hardware appliances. If you do
not have the VA resources to support a full workload, then you should consider ordering the Policy Manager
hardware appliance.
With Policy Manager 6.1, the steps used for installing and upgrading VM evaluation packages (CP-SW-EVAL) now
mimic the steps in production versions. In prior versions, users could not upgrade evaluation packages.