
Concept Guide


Creating a Web Login page in ClearPass Guest
The ClearPass Guest Visitor Management Appliance provides a simple and personalized user interface through
which operational staff can quickly and securely manage visitor network access. With ClearPass Guest, the
users can have a controlled access to a dedicated visitor management user database. Through a customizable
web portal, the administrators can easily create an account, reset a password or set an expiry time for visitors.
Visitors can be registered at reception and provisioned with an individual guest account that defines their
visitor profile and the duration of their visit. By defining a web login page on the ClearPass Guest Visitor
Management Appliance, you are able to provide a customized graphical login page for visitors accessing the
network.
For more information on setting up the RADIUS web login page, see the RADIUS Services section in the
ClearPass Guest Deployment Guide.
Configuring RADIUS Server in Instant UI
To configure Instant to point to ClearPass Guest as an external captive portal server, perform the following
steps:
1. Select the WLANSSID for which you want to enable external captive portal authentication with CPPM. You
can also configure the RADIUS server when configuring a new SSID profile.
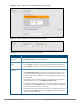
2. On the Security tab, select External from the Splash page type.
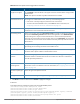
3. Select New from the Captive portal profile drop-down list and update the following fields:
a. Enter the IP address of the ClearPass Guest server in the IP or hostname field. Obtain the ClearPass
Guest IP address from your system administrator.
b. Enter /page_name.php in the URL field. This URL must correspond to the Page Name configured in
the ClearPass Guest RADIUS Web Login page. For example, if the Page Name is Dell, the URL should be
/Dell.php in the Instant UI.
c. Enter the Port number (generally should be 80). The ClearPass Guest server uses this port for HTTP
services.
d. Click OK.
4. To create an external RADIUS server, select New from the Authentication server 1 drop-down list. For
information on authentication server configuration parameters, see Configuring an External Server for
Authentication on page 164.
5. Click Next and then click Finish.
6. Click the updated SSID in the Network tab.
7. Open any browser and type any URL. Instant redirects the URL to ClearPass Guest login page.
8. Log in to the network with the user name and password specified used while configuring the RADIUS server.
Configuring Facebook Login
Instant supports the Facebook Wi-Fi feature that allows the captive portal clients using a Facebook account to
authenticate on a W-IAP. You can configure a guest network to use a customized Facebook page as an external
captive portal URL and allow the W-IAP to redirect clients to a Facebook page when it receives an HTTP request.
The users can select the appropriate option to authenticate and access the Internet. By configuring the
Facebook login feature, businesses can pair their network with the Facebook Wi-Fi service, so that the users
logging into Wi-Fi hotspots are presented with a business page, before gaining access to the network.
The Facebook Wi-Fi integration with the W-IAP includes the following procedures:
l Setting up a Facebook Page
l Configuring an SSID
l Configuring the Facebook Portal Page
Dell Networking W-Series Instant 6.4.3.1-4.2.0.0 | User Guide Captive Portal for Guest Access | 143