
Concept Guide


You can configure a domain name, DNS server, and DHCP server for client IP assignment using the Instant UI
or CLI.
In the Instant UI
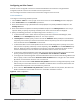
1. Navigate to More > DHCP Server. The DHCP Server tab contents are displayed.
Figure 51 DHCPServers Window
2. Enter the domain name of the client in the Domain name text box.
3. Enter the IP addresses of the DNS servers separated by a comma(,) in the DNS server (s) text box.
4. Enter the duration of the DHCP lease in the Lease time text box. Select any of the following values from
the drop-down list next to Lease time:
l Minutes—For minutes, specify a value between 2–59.
l Hours—For hours, specify a value between 1–23.
l Days —For days, specify a value between 1–30.
The default lease time is 0.
5. Enter the network range for the client IP addresses in the Network field. The system generates a network
range automatically that is sufficient for 254 addresses. If you want to provide simultaneous access to
more number of clients, specify a larger range.
6. Specify the subnet mask details for the network range in the Mask text box.
7. Click OK to apply the changes.
In the CLI
To configure a DHCP pool:
(Instant AP)(config)# ip dhcp pool
(Instant AP)(DHCP)# domain-name <domain>
(Instant AP)(DHCP)# dns-server <DNS-IP-address>
(Instant AP)(DHCP)# lease-time <minutes>
(Instant AP)(DHCP)# subnet <IP-address>
(Instant AP)(DHCP)# subnet-mask <subnet-mask>
To view the DHCP database:
(Instant AP)# show ip dhcp database
Dell Networking W-Series Instant 6.4.3.1-4.2.0.0 | User Guide DHCP Configuration | 223