
Concept Guide


95 | Customizing W-IAP Settings Dell Networking W-Series Instant 6.4.3.1-4.2.0.0 | User Guide
In the CLI
To provision a W-IAP as a master W-IAP:
(Instant AP)# iap-master
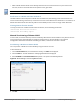
To verify if the W-IAP is provisioned as master IAP:
(Instant AP)# show ap-env
Antenna Type:Internal
Iap_master:1
Adding a W-IAP to the Network
To add a W-IAP to the Instant network, assign an IP address. For more information, see Assigning an IP address
to the W-IAP on page 36.
After a W-IAP is connected to the network, if the Auto Join Mode feature is enabled, the W-IAP inherits the
configuration from the Virtual Controller and is listed in the Access Points tab.
If the Auto Join Mode is disabled, perform the following steps to add a W-IAP to the network:
1. On the Access Points tab, click the New link. The New Access Point window is displayed.
2. In the New Access Point window, enter the MAC address for the new W-IAP.
3. Click OK.
Removing a W-IAP from the Network
You can remove a W-IAP from the network only if the Auto Join Mode feature is disabled. To remove a W-IAP
from the network:
1. On the Access Points tab, click the W-IAP to delete. The x icon is displayed against the W-IAP.
2. Click x to confirm the deletion.
The deleted W-IAPs cannot join the Instant network anymore and no longer are displayed in the Instant UI.
However, the master W-IAP details cannot be deleted from the Virtual Controller database.