
Concept Guide


For information on the GRE tunnel configuration on the controller, refer to the ArubaOS 6.5.x.x User Guide.
In the Instant UI
To configure a GRE tunnel:
1. Click the More > VPN link located directly above the Search bar in the Instant UI. The Tunneling window is
displayed.
2. Select Manual GRE from the Protocol drop-down list.
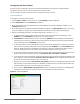
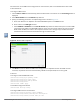
3. Specify the following parameters. A sample configuration is shown in Figure 52.
a. Enter an IP address or an FQDN for the main VPN/GRE endpoint in the Host text box.
b. Enter a value in the GRE type text box.
c. Select Enabled or Disabled from the Per-AP tunnel drop-down list. Enable this option to create a GRE
tunnel from each W-IAP to the VPN/GRE endpoint rather than the tunnels created just from the master
W-IAP. When enabled, the traffic to the corporate network is sent through a Layer-2 GRE tunnel from
the W-IAP itself and need not be forwarded through the master W-IAP.
By default, the Per-AP tunnel option is disabled.
Figure 52 Manual GRE Configuration
4. Click Next to continue. When the GREtunnel configuration is completed on both the W-IAP and the
controller, the packets sent from and received by a W-IAP are encapsulated, but not encrypted.
In the CLI
To configure a manual GRE VPN tunnel:
(Instant AP)(config)# gre primary <name>
(Instant AP)(config)# gre type <type>
(Instant AP)(config)# gre per-ap-tunnel
(Instant AP)(config)# end
(Instant AP)# commit apply
To view VPN configuration details:
(Instant AP)# show vpn config
To configure GRE tunnel on the controller:
(Instant AP)(config)# interface tunnel <Number>
(Instant AP)(config-tunnel)# description <Description>
(Instant AP)(config-tunnel)# tunnel mode gre <ID>
Dell Networking W-Series Instant 6.5.1.0-4.3.1.0 | User Guide VPN Configuration | 228