Dell Docking Station WD19S User Guide Regulatory Model: K20A Regulatory Type: K20A001 February 2021 Rev.
Notes, cautions, and warnings NOTE: A NOTE indicates important information that helps you make better use of your product. CAUTION: A CAUTION indicates either potential damage to hardware or loss of data and tells you how to avoid the problem. WARNING: A WARNING indicates a potential for property damage, personal injury, or death. © 2021 Dell Inc. or its subsidiaries. All rights reserved. Dell, EMC, and other trademarks are trademarks of Dell Inc. or its subsidiaries.
Contents Chapter 1: Introduction................................................................................................................. 4 Chapter 2: Package contents ....................................................................................................... 5 Chapter 3: Hardware requirements................................................................................................7 Chapter 4: Identifying Parts and Features ..........................................................
1 Introduction The Dell Docking Station WD19S is a device that links all your electronic devices to your system using a cable interface. Connecting the system to the docking station allows you to access all peripherals (mouse, keyboard, stereo speakers, external hard drive, and large-screen displays) without having to plug each one into the system. CAUTION: Update your system’s BIOS, graphic drivers and the Dell Docking Station WD19S drivers to the latest versions available at www.dell.
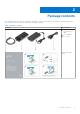
2 Package contents Your docking station ships with the components shown below. Ensure that you have received all the components and contact Dell (see your invoice for contact information) if something is missing. Table 1. Package contents Contents Specifications 1. Docking station with USB Type-C cable 2. Power adapter 3.
Table 1.
3 Hardware requirements Before using the docking station, ensure that your system has a DisplayPort over USB Type-C designed to support the docking station. NOTE: Dell Docking stations are supported with select Dell systems. See the Dell Commercial Docking Compatibility Guide for the list of supported systems and recommended docking.
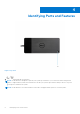
4 Identifying Parts and Features Figure 1. Top view 1. Sleep/Wake up/Power button NOTE: The dock button is designed to replicate your system's power button. If you connect the Dell Docking Station WD19S to supported Dell systems, the dock button works like your system's power button and you can use it to power on/sleep/force shutdown the system. NOTE: The dock button is not functional when connected to unsupported Dell systems or non-Dell systems.
Figure 2. Front view 1. USB 3.1 Gen1/Gen2 Type-C port 2. USB 3.1 Gen1 port with PowerShare Figure 3. Left view 1. Wedge-shaped lock slot 2.
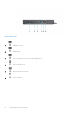
Figure 4. Back view 1. DisplayPort 1.4 (2) 2. HDMI2.0 port 3. USB 3.1 Gen1/Gen2 Type-C port with DisplayPort 1.4 4. USB 3.1 Gen1 port (2) 5. Network connector (RJ-45) 6.
Figure 5. Bottom view 1.
5 Important Information Dell Docking Station drivers (Realtek USB GBE Ethernet Controller Driver) are required to be installed before using the docking station for full functionality. Dell recommends updating the system BIOS and graphics driver to the latest version before using the docking station. Older BIOS versions and drivers could result in the docking station not being recognized by your system or not functioning optimally.
6 Quick Setup of Hardware Steps 1. Update your system's BIOS, graphics and drivers from www.dell.com/support/drivers.
2. Connect the AC adapter to a power outlet. Then, connect the AC adapter to the 7.4 mm DC-in power input on the Dell Docking Station WD19S.
Figure 6. Connecting the AC Adapter 3. Connect the USB Type-C connector to the system. Update the Dell Docking Station WD19S firmware from www.dell.com/support/drivers.
Figure 7. Connecting the USB Type-C connector 4. Connect multiple displays to the docking station, as needed.
Figure 8.
7 Setup of External Monitors Topics: • • • • Updating the graphics drivers for your computer Configuring your Monitors Display bandwidth Display Resolution Table Updating the graphics drivers for your computer The Microsoft Windows operating systems include the VGA graphics drivers only. Therefore, for optimum graphics performance, it is recommended that Dell graphics drivers applicable for your computer be installed from dell.com/support under the “Video” section NOTE: 1.
3. Under the Multiplay displays section, select Extend these displays. Display bandwidth External monitors require a certain amount of bandwidth to work properly. Monitors with higher resolution require more bandwidth. ● DisplayPort High Bit Rate 2 (HBR2) is 5.4 Gbps maximum link rate per lane. With DP overhead, the effective data rate is 4.3 Gbps per lane. ● DisplayPort High Bit Rate 3 (HBR3) is 8.1 Gbps maximum link rate per lane. With DP overhead, the effective data rate is 6.5 Gbps per lane. Table 2.
Table 3. WD19S (continued) Display Port Available Bandwidth Single Display (maximum resolution) Dual Display (maximum resolution) Triple Display (maximum resolution) ● DP1.4 + HDMI2.0: ● DP1.4 + DP1.4 + MFDP FHD (1920 x 1080) Type-C: @60 Hz ○ 1 x FHD (1920 x 1080) @60 Hz ● DP1.4 + MFDP Type-C: FHD ○ 2 x HD (1280 x 720) (1920 x 1080) @60 Hz @60 Hz HBR3 (HBR3 x2 lanes - 12.9 Gbps) DP1.4/HDMI2.0/ MFDP Type-C: 4K (3840 x 2160) @60 Hz ● DP1.4 + DP1.4: QHD (2560 x 1440) @60 Hz ● DP1.4 + HDMI2.
8 Removing the USB Type-C cable module Prerequisites The Dell Docking Station WD19S is shipped with the USB Type-C cable attached. To remove/change the cable module, follow these steps: Steps 1. Turn over the docking station.
2. Remove the two M2.5 x 5 screws [1], and turn over the docking station [2].
3. Gently pull the cable module away from the docking station.
4. Lift and remove the USB Type-C cable module from its connector inside the docking station.
9 Technical specifications Topics: • • • • LED Status Indicators Docking specifications Input/Output (I/O) Connectors Dell ExpressCharge and ExpressCharge boost overview LED Status Indicators Power Adapter LED Table 4. Power Adapter LED indicator State LED Behavior Power Adapter is plugged into wall socket Flash three times Docking Status Indicator Table 5. Docking Station LED Indicators State LED Behavior Docking station is receiving power from power adapter Flash three times Table 6.
Table 8. Docking Specifications (continued) Features Specifications ● DisplayPort++ 1.4 x2 Network Port ● Gigabit Ethernet (RJ-45) x1 ● Support Wake On LAN from S3, S4, or S5 sleep state with select Dell systems. See platform setup guide for more details. ● Support MAC Address Pass-Through with select Dell systems. See platform setup guide for more details. USB Ports ● ● ● ● DC-in Port 7.
Table 10. I/O connectors (continued) Ports Connectors Input/Output Ports ● ● ● ● ● USB 3.1 Gen1 x 2 USB 3.1 Gen1 with PowerShare x 1 USB 3.1 Gen1/Gen2 Type-C 7.4 mm DC-in x 1 Gigabit Ethernet (RJ–45) x 1 Dell ExpressCharge and ExpressCharge boost overview ● Dell ExpressCharge enables an empty battery to charge to 80% in about one hour when the system is turned off and to 100% in approximately two hours. ● Dell ExpressCharge Boost enables an empty battery to charge to 35% in 15 minutes.
10 Dell docking station firmware update Standalone Dock Firmware Update utility NOTE: Information that is provided is for Windows users running the executable tool. For other operating systems or further detailed instructions see the WD19 admin guide available on www.dell.com/support. Download the WD19S driver and firmware update from www.dell.com/support. Connect the dock to the system and start the tool in administrative mode. 1.
3. Wait for all the component firmware update to complete. A progress bar is displayed in the bottom. 4. The update status is displayed above the payload information. Table 12. Command-Line Options Command lines Function /? or /h Usage. /s Silent. /l= Log file. /verflashexe Display utility version. /componentsvers Display current version of all dock firmware components.
● Dock asset management locally and remotely through DCM (Dell Command | Monitor) and SCCM (System Center Configuration Manager).
11 Frequently asked questions 1. The fan is not working after connecting with the system. ● The fan is triggered by temperature. The dock fan will not rotate until the dock is hot enough to trigger a thermal threshold. ● Vice versa, if your dock is not cool enough, the fan will not stop even when you disconnect the dock from the system. 2. The dock does not work after high-speed fan noise. ● When you hear a loud fan noise, it is warning you that the dock is in some kind of a hot condition.
12 Troubleshooting the Dell Docking Station WD19S Topics: • Symptoms and solutions Symptoms and solutions Table 14. Symptoms and solutions Symptoms Suggested solutions No video on the monitors that are attached to the High Definition Multimedia Interface (HDMI), or DisplayPort (DP) port on the docking station. ● Ensure that the latest BIOS and drivers for your system and the docking station are installed on your system. ● Ensure that your system is connected to the docking station securely.
Table 14. Symptoms and solutions (continued) Symptoms Suggested solutions ● First power off the docking station by disconnecting the Type-C cable and then removing the power adapter from the dock. Then, power on the docking station by connecting power adapter to the dock before connecting the Type-C cable to your system. ● Undock and reboot the system if, the above steps do not work. The video on the attached monitor is not displaying as an Extended Monitor.
Table 14. Symptoms and solutions (continued) Symptoms Suggested solutions ● 2. Enable External USB Port PXE boot on dock does not function. ● If your BIOS has an integrated NIC page, select Enabled w/PXE. ● If your BIOS Setup on your system has an USB Configuration page, ensure that the following options are checked: ● 1. Enable USB Boot Support USB Boot does not function. ● If your BIOS has an USB Configuration page, ensure that the following options are checked: ● 1. Enable USB Boot Support ● 2.
13 Getting help Topics: • Contacting Dell Contacting Dell Prerequisites NOTE: If you do not have an active Internet connection, you can find contact information on your purchase invoice, packing slip, bill, or Dell product catalog. About this task Dell provides several online and telephone-based support and service options. Availability varies by country and product, and some services may not be available in your area. To contact Dell for sales, technical support, or customer service issues: Steps 1.