
Administrator Guide


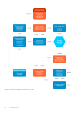
Table Of Contents
- Dell Wyse ThinOS Version 8.5 Administrator’s Guide
- Introduction
- Getting started
- Configuring ThinOS using the First Boot Wizard
- Connecting to a remote server
- Using your desktop
- Configuring thin client settings and connection settings
- Connecting to a printer
- Connecting to a monitor
- Locking the thin client
- Signing off and shutting down
- Additional getting started details
- Classic desktop features
- Login dialog box features
- Accessing system information
- Global Connection settings
- Configuring the connectivity
- Configuring the network settings
- Configuring the remote connections
- Configuring the central configurations
- Configuring the VPN Manager
- Configuring the connection brokers
- Configuring Citrix
- Configuring the Citrix broker connection
- Citrix HDX RealTime Multimedia Engine or RealTime Optimization Pack
- Citrix icon refresh
- Using multiple audio in Citrix session
- Using Citrix NetScaler with CensorNet MFA authentication
- Configuring ICA connections
- ICA Self Service Password Reset
- QUMU or ICA Multimedia URL Redirection
- HTML5 Video Redirection
- ICA SuperCodec
- Anonymous logon
- Configuring the Citrix UPD printer
- Introduction to Flash Redirection
- Configuring VMware
- Configuring Microsoft Remote Desktop
- Configuring Dell vWorkspace
- Configuring Amazon Web Services or WorkSpaces
- Configuring Citrix
- Configuring thin client settings
- Introduction to TCX Flash Redirection
- Performing diagnostics
- BIOS management on ThinOS
- Security
- Automating updates and settings using central configuration
- Examples of common printing configurations
- Important notes
- Troubleshooting
- Firmware upgrade
- Frequently asked questions

Getting started
Use the following information to quickly learn the basics and get started using your thin client:
● Configuring ThinOS using the first boot wizard
● Connecting to a remote server
● Using your desktop
● Configuring thin client settings and connection settings
● Connecting to a printer
● Connecting to a monitor
● Locking the thin client
● Signing off and shutting down
● Additional getting started details
NOTE:
ThinOS is centrally managed and configured using INI files to automatically push updates and any desired default
configuration to all supported thin clients in your environment — see Central configuration: Automating updates and
configurations.
If no INI files are detected, you can use local dialog boxes on each thin client to make available configurations. ThinOS will
save many of these locally configured settings such as resolution, mouse, and keyboard to persist after reboot. However,
once INI files are detected, rebooting causes ThinOS to become stateless while ignoring locally configured settings after a
reboot and then the settings contained in the INI file will be used.
Configuring ThinOS using the First Boot Wizard
The First Boot Wizard runs the first time you start a new thin client with the ThinOS version 8.5. The thin client starts the
First Boot Wizard application before you enter the ThinOS system desktop, and allows you to perform a set of tasks, such
as, configuring system preferences, setting up the internet connectivity, loading USB configurations, configuring management
software, and configuring broker connections.
If you are an existing thin client user, and you have upgraded to the ThinOS version 8.5, then you can reset your thin client to
factory default settings to enter the First Boot Wizard.
The following flowcharts depict the workflow of First Boot Wizard:
2
Getting started 9