
Install Guide


CAUTION: Do not overtighten the screws.
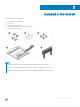
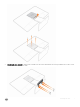
4 Attaching E-series mount to the monitor—
Position the E mount on the back of the monitor and attach it by using the monitor screws at 4 locations.
CAUTION: Do not overtighten the screws.
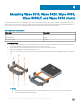
5 Attaching the client—Slightly tip the client to align and insert the four protruding shoulder screws into the cutout areas of the E-
series mount. Slide the client until it snaps into place. The security latch moves automatically when the shoulder screws are inserted.
The security latch is marked with the number 1 in the following image.
CAUTION
: The power button should face towards the security latch and air vents should face outwards for proper heat
dissipation.
1. Security latch
8
Mounting the client