
Administrator Guide


Getting started
Use the following information to quickly learn the basics and get started using your zero client:
• Connecting to a Remote Server
• Using Your Desktop
• Conguring Zero Client Settings and Connection Settings
• Connecting to a Monitor
• Connecting to a Printer
• Locking the Zero Client
• Signing O and Shutting Down
• Additional Getting Started Details
ThinOS Lite supports the headless mode that enables you to boot the operating system without a monitor.
ThinOS Lite is centrally managed and congured using INI les to automatically push updates and any desired default conguration to all
supported zero clients in your environment. For more information, see Central Conguration: Automating Updates and Congurations.
If no INI les are detected, you can use local dialog boxes on each zero client to make available congurations. ThinOS Lite saves many of
these locally congured settings such as resolution, mouse, and keyboard to persist after reboot. However, once INI les are detected,
rebooting causes ThinOS Lite to become stateless while ignoring locally congured settings after a reboot and then the settings contained
in the INI le will be used.
Conguring ThinOS Lite using First Boot Wizard
First Boot Wizard runs the rst time you start a new thin client. The thin client launches the out-of-box experience application before you
enter the ThinOS Lite desktop, and allows you to perform a set of tasks, such as, conguring system preferences, setting up the internet
connectivity, loading USB congurations, conguring management software, and conguring broker connections. The thin client congures
settings that are applied during the rst-boot experience, and processes before your log into ThinOS Lite. If you are an existing thin client
user, and you have upgraded to ThinOS Lite v2.5 or later, then you can reset your thin client to factory default settings to enter First Boot
Wizard.
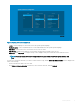
The following owcharts represent the First Boot Wizard workow:
3
Getting started 13